Heck, I just posted a long reply about testing/evaluating a lens in a critique post and then thought, hey, this would be a great exercise for those who are looking for things they can do during some idle time: Here’s a reprint of my comment:
Back to the sharpness issue. I go through this exercise with most all my lenses, especially when I pick up a new one.
1, Google and get yourself a resolution chart, print up a few on 8x11 photo paper (assume you have a printer? Just a plain inkjet will work
-
Mount these to a large 32x40 mat board - or simply tape them to a flat wall out of direct sunlight, but lit well, diffused.
-
set up camera/tripod such that you’re filling the frame with the res charts. I like to have it where I can test center and edge resolution/sharpness
-
If you have a zoom lens, start at the wide angle, take an image at each of the apertures. For simplicity sake, might be easier to stick with the standard apertures, ie f/4,5.6, 8, 11, 16, 22… we all know with the electronics there are many others the camera may select, f/6.3 , f/3.5, f/18 etc. etc.
Be consistent though which ones you use throughout the process -
walk your tripod back with the next focal length, remember to keep the same frame-filling image in your viewfinder.
-
I use focusing in live view as you’re focusing right on the sensor and not relying on any sw algorithms …
-
Cycle through all your focal lengths (for example on a 70-200mm lens maybe use 70mm, 100mm, 150mm and 200mm, for example) with each focal length capturing images at the various apertures.
-
Then back on the computer, sort and start analyzing. In PS I’ll open all the images for a particular focal length (I open from Bridge where you can sort/filter by focal length for eg.) and then use Window>Arrange>Tile all Vertically(or horiz by choice) Zoom in 50 or whatever percent to give a good look at detail/sharpness. One tip here when you have 8 or more images opened, you zoom in to one image, move around to the point in the image you want to analyze, then use the Window>Arrange>Match all and it will zoom in to the same exact point in ALL the image. Sure beats doing this on each of 8 image panes
-
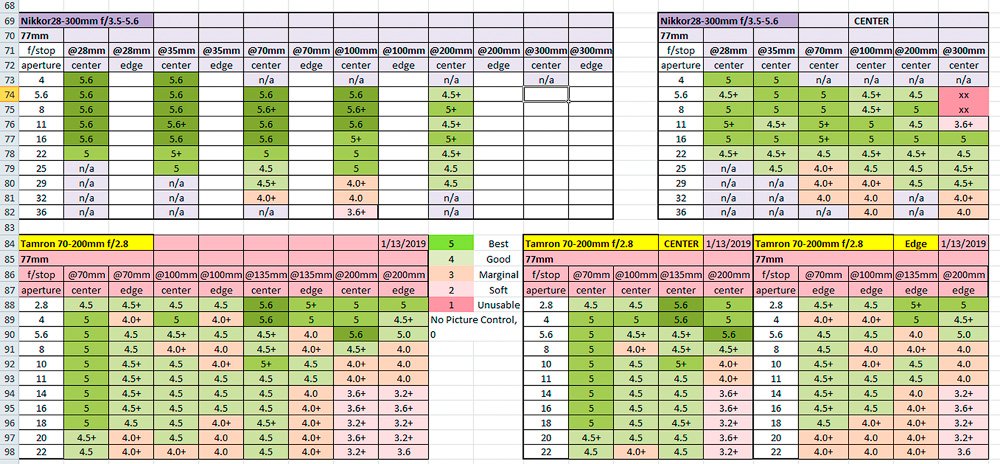
Determine some sort of criteria judgement. I could be as simple as, Very best, best, good, fair, poor, unusable. And start evaluating. I enter these ratings in a spreadsheet. You might briefly look through all of them and determine which one is the very best and make that your reference. Because remember, it’s all relative… The “best” results on one lens might not match or come close to the “best” results from another manufacturer’s lens. the exercise here though, will tell you which focal lengths and which apertures are the BEST for THAT lens.
-
Oh, and I do this for both the center of the image, and the edge. Taking a look at the edge will also reveal problems like chromatic aberrations.
If this sounds time consuming… it is. You could easily spend an afternoon doing this - for just one lens, most especially a zoom lens. Obviously quicker for a fixed focal length.
ok, since I went through all the discussion, here’s a screenshot of a spreadsheet that I use. I will print it out and carry it with me and once in a while reference it in the field if I can’t recall which aperture is the sharpest - and which on to never use…
Hope this helps. If anyone would like a copy of the spreadsheet let me know.