Originally published at: https://www.naturephotographers.network/articles/capturing-wildlife-photos-with-a-tilt-shift-effect/

In my wildlife photography I have always had a desire to push myself, which manifests in multiple ways. One way is to push myself physically — this can be extreme weather conditions, hard to get to locations, or incredibly uncomfortable body positions for extended periods just to get the shot I want. The second way I push myself is to try to photograph wildlife in a unique way that I have either rarely or never seen done. Recently, this turned into trying to use a lens that gives a tilt-shift effect in camera. This is an effect that can be created in processing, but not quite to the same level. I love the challenge that this lens creates, and the results are exactly what I am after. I know I’m not the first to use this technique or lenses like this for wildlife, but it’s been a blast trying it for myself.
This all started during my first visit to the rugged coastline of Newfoundland in the summer of 2022. During that trip I had the experience of photographing multiple species of seabirds up close and personal. I often found myself using my 24-70mm lens to try to include the beautiful scenery along with my subject. I was able to achieve a few photos I was happy with, but one of the challenges of wide-angle bird photography is making a scene look uncluttered. The day I left Newfoundland I knew I wanted to return the following year with a tilt-shift lens. I could already imagine capturing a photo of an Atlantic puffin close-up in the foreground and having the plane of focus lead the viewer’s eye into the scene to a sea stack in the background that was also in focus. I was dreaming of photos and opportunities well before I had a lens that could do that, and I had never even used a tilt-shift lens.
I started my research into Nikon tilt-shift lenses and quickly realized that, while I wanted to try this effect, I wasn’t willing to spend over $2,000 on a lens I knew would be rarely used. As much as I love trying to capture wildlife with a wide-angle lens, it’s not often I find wildlife cooperative enough that I can do that. I had heard of Lensbaby lenses, and it wasn’t long before I found the Composer Pro II + Edge 35, which was exactly what I was looking for. This lens is 35mm, which is often plenty wide for what I want to capture. It does not have any lens shifting capability, but that’s fine since all I wanted was the ability to tilt. I ordered the lens and immediately began the countdown to when I would return to Newfoundland a year later.
A tilt lens allows you to play with the plane of focus. When we use a standard lens, it focuses along a single flat plane on the sensor, which is usually what we want. All things the same distance from the lens are in focus, and everything else starts to fall out of focus. With a tilt lens you can change that entirely, and that is what excited me!
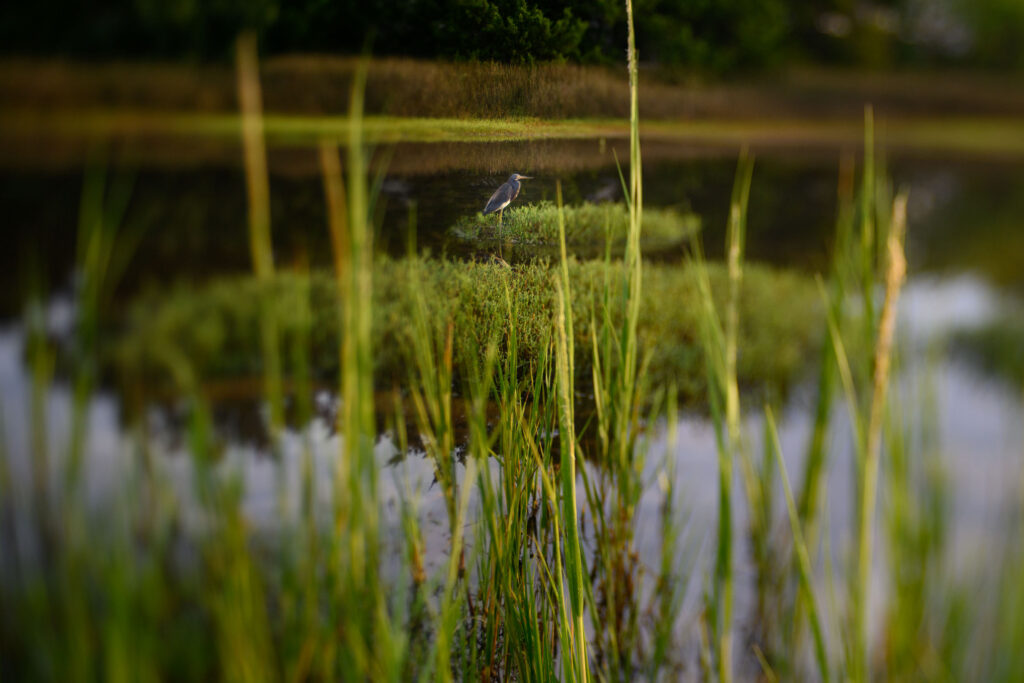
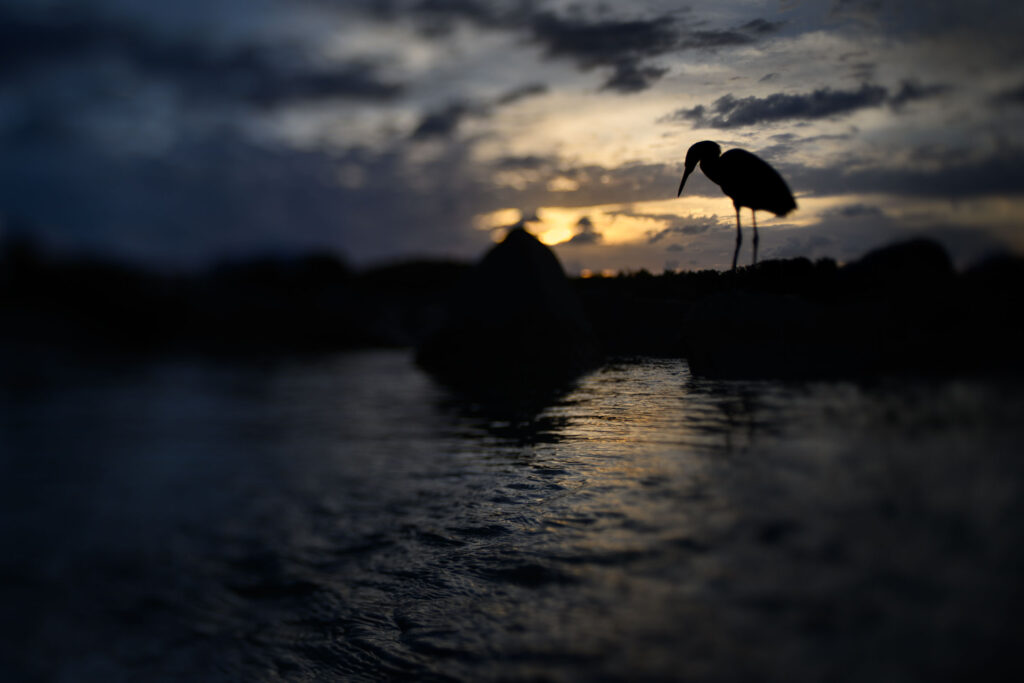
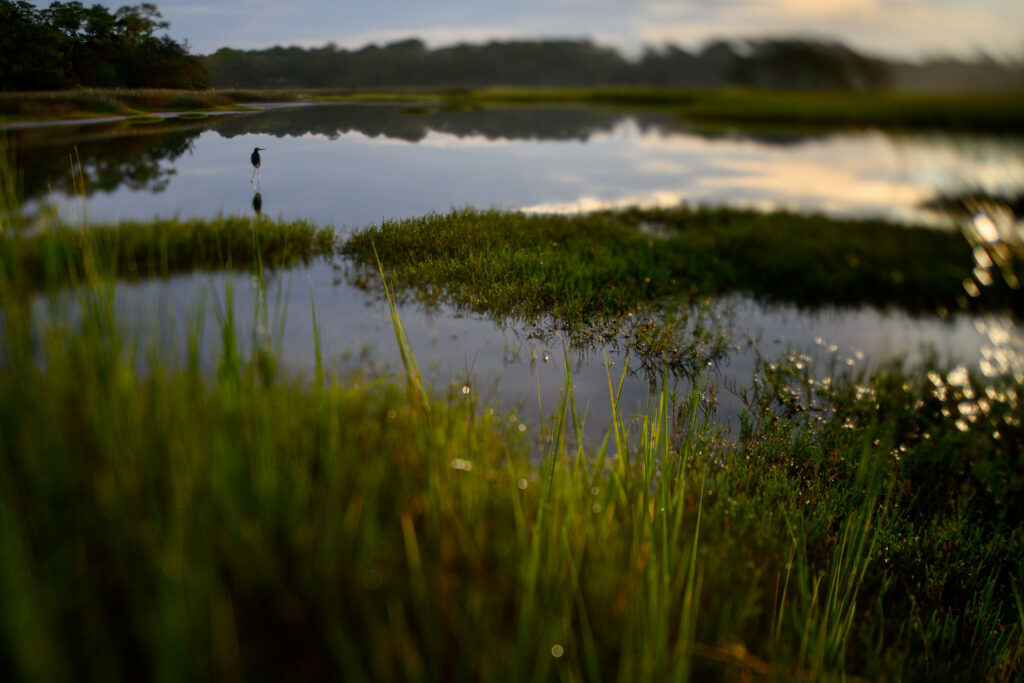
Of course, I didn’t wait until the next year to start playing with the lens. One of the first opportunities I had was with the friendly wading birds in a South Carolina marsh that my girlfriend, who is an amazing wildlife photographer, introduced me to. I started with making a thin vertical slice of focus through the image where both sides blurred. I also tried some horizontal slices and then started playing around with my main goal, which was diagonal planes of focus. This allows you to make something close to you and something far away all in focus. How cool is that?
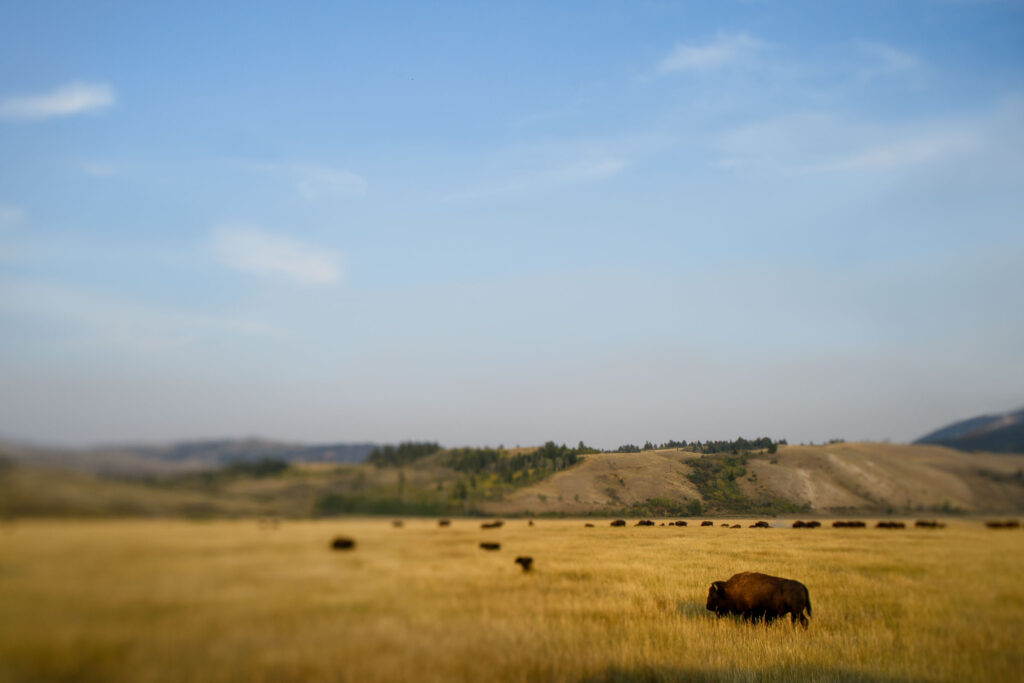
My next encounter was in the Tetons. I tried to photograph bison with the mountain range in the background. This time it was a little better, but still not quite what I wanted. I was learning what worked and what didn’t. Mainly I needed to get really close to the subject or I needed to have something else worth highlighting in the scene very close to me.

The photos I was capturing were certainly different, but I have learned over the years that different just to be different doesn’t mean a photo is good. I was sharing some of the photos that I was happy with, though I knew I wasn’t quite there yet. The entire process of learning and using this lens was such a great reminder to give things time and patience, not give up, and continue to push to learn how to use the gear for great photography.
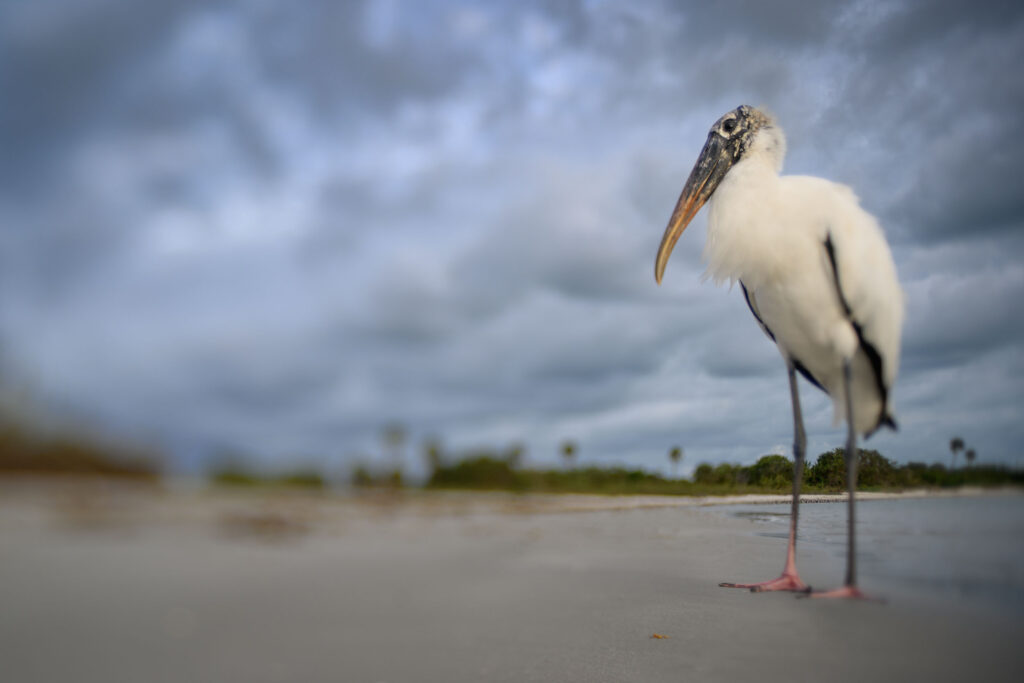
Next, I spent time with some habituated wading birds in Florida. They chase the local fishermen around hoping to get bait. This allowed me to get really close and isolate individuals in a unique way with the Lensbaby. Shooting from overhead let me isolate a ruddy turnstone on the sandy beach by completely blurring out the left side of the photo. Then I came upon a wood stork. For this scene I wanted to show off the beautiful cloudy sunrise sky in the background but somehow keep the attention on the bird. Dialing in a diagonal plane of focus allowed me to do just that, but I also started to notice some gulls flying around in the sky. I waited until one flew into the in-focus plane and took the shot. Now I was finally getting somewhere with this lens!

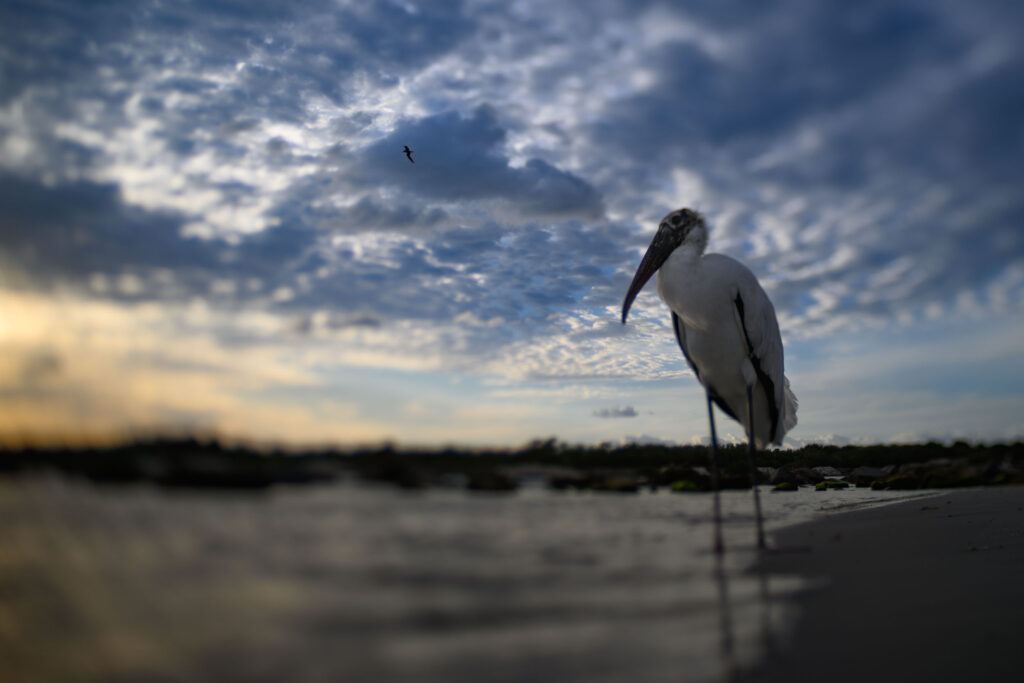
A second image of the wood stork let me blur the entire left side. At this point I was doing a good job of using the lens to isolate birds in wide-angle scenes by blurring areas that would otherwise be distracting. But I still wasn’t consistently getting shots that featured two in-focus elements that complemented each other — the main goal I was after with this lens.
It took that full year until I was back in Newfoundland to begin to finally get this lens to produce what I was after. One of my first chances was with a friendly group of caribou. I spent a few hours this particular morning with the small herd, and they eventually lay down. Thankfully they were in an area that had a lot of small purple wild iris in the open tundra. I crawled in close to a nice-looking flower in the foreground and started trying to figure out how to get what I envisioned.
To use this lens, everything is manual. It’s manual focus and manual aperture ring; and you manually grab the lens and push it around to make the angle you want with the focal plane. It takes practice to figure out how to push and tilt the lens to get the focal plane you want. With an image like this, instead of the focus changing from front to back as we are used to with standard lenses, it moves from top left to bottom right across the image. It’s wild to use, but what a fun result! I finally had an image to be proud of — and one that could not be captured any other way.
To use this lens, everything is manual. It’s manual focus and manual aperture ring; and you manually grab the lens and push it around to make the angle you want with the focal plane. It takes practice to figure out how to push and tilt the lens to get the focal plane you want. With an image like this, instead of the focus changing from front to back as we are used to with standard lenses, it moves from top left to bottom right across the image. It’s wild to use, but what a fun result! I finally had an image to be proud of — and one that could not be captured any other way.
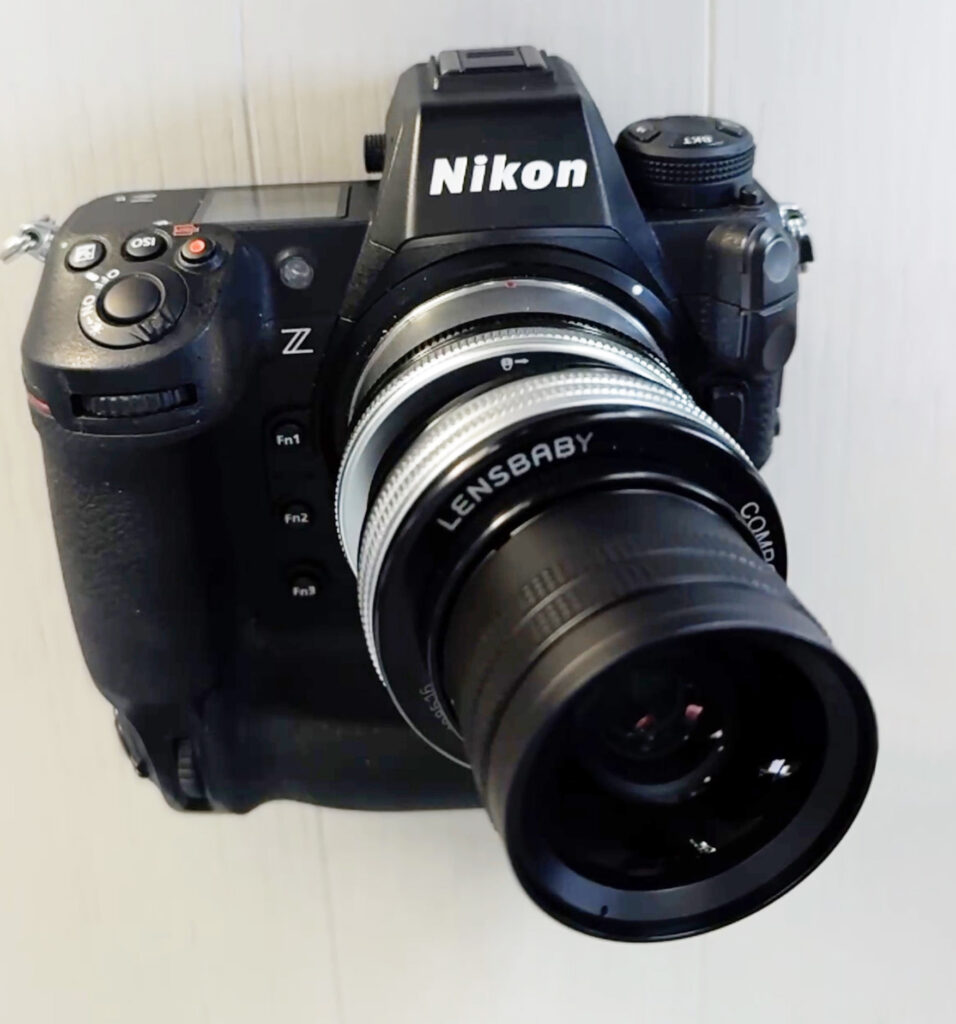
I consider myself very good with Photoshop, and to fake this effect would be almost too easy for me. It would take away all the challenge of capturing it in the field, which is a big part of the enjoyment of using unique gear like this.
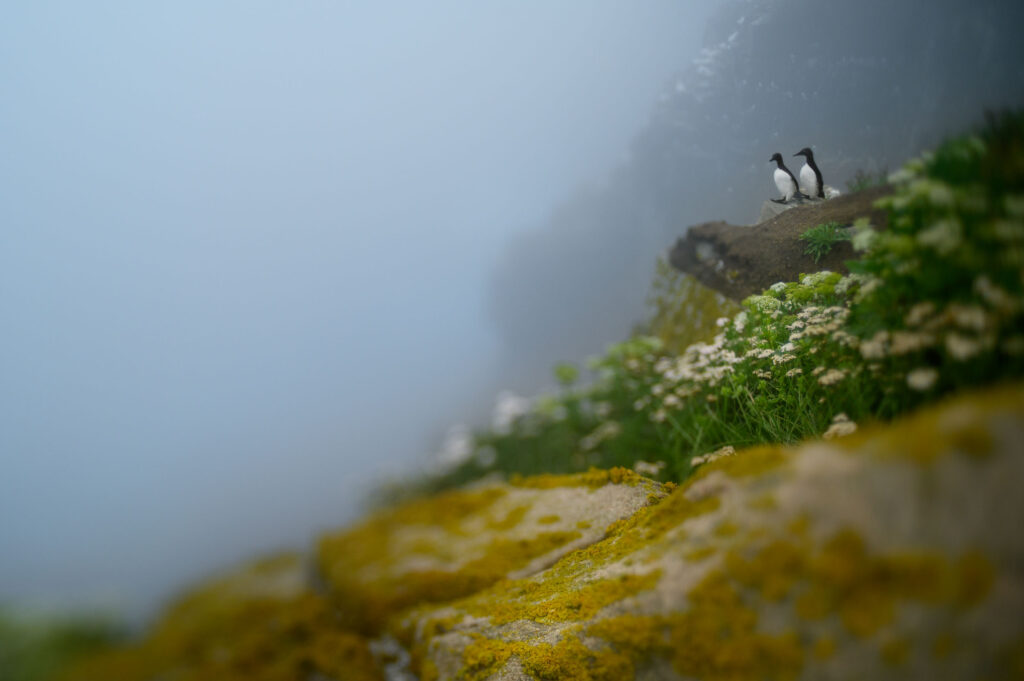
Now that I was dialing things in, and also having the opportunity with both cooperative wildlife and an incredible landscape, I was loving this lens and what it could do. For my image of a pair of common murres perched on the edge of a cliff, I used a diagonal focal plane to lead the viewer into the scene and also give some focus and weight to the white flowers. This image is a perfect example of one I think would mostly fail if shot with a standard wide-angle lens: Much of the foreground would be in focus, as would all that surrounds the birds — pulling attention away from them. The other standard option could be a very fast wide-angle lens, such as a 35mm f/1.4 shot wide open, but that would potentially blur out all the surroundings and defeat the purpose of using a wide-angle lens to put attention on the habitat as well as the subject. Using the Lensbaby tilt-shift lens allowed me to depict the habitat exactly as I intended to, and lead the viewer’s eye where I wanted it in the image. At least that was my goal, and I feel I achieved it.
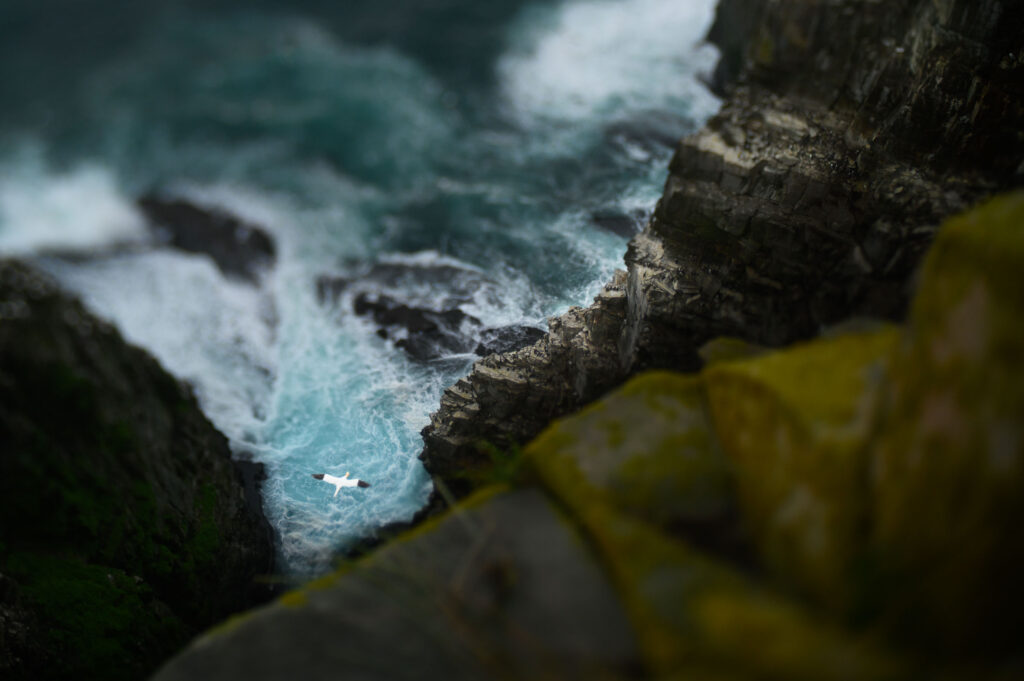
Next, I composed a scene that included the rugged sea cliff coastline and the hundreds of birds on it. I then waited for a northern gannet to fly into the diagonal focal plane I had set. It took some time, but eventually a bird did that for me. This composition allowed me to focus on specific cliffs as well as highlight the bird in flight, my main subject. All of this together shows off this location in what I hope is a unique and beautiful way.
One of the last images I took in Newfoundland with this new lens was of the Atlantic puffin. I had a morning when I was the only one at the puffin colony, and a single bird flew over to the mainland and landed on the edge of the cliff. I slowly belly-crawled in to get really close to the bird — probably three to four feet away — and did what I had finally learned to do with this lens. I chose a nice diagonal focal plane from the bottom right to the top left of the frame and played around with the focus until it all lined up. Then I sat and waited for the puffin to turn its head to look into the frame, and captured the image you see here. It was a dramatic sunrise, and I was excited I finally had the image with the puffin in focus and the sea stacks in the background also in focus. The image I had imagined was now in my camera.
It took me a full year of playing around with this new piece of gear, but now I feel like I have a handle on what it can do and how I can use it. Of course, there is still more to learn with it and more experimentation ahead. At least until I find another weird lens to try out!