The purpose of this post is twofold. First, I wanted to share my findings on the denoise applications of DXO PureRaw6 vs. Adobe’s LR/ACR Denoise. Secondly, I wanted to summarize my image workflow that includes a denoise step and get feedback from anyone willing to give it.
Here’s just a quick backstory that prompted this denoise comparison exercise. Two years ago I finally upgraded to the mirrorless Nikon Z system, including all new lenses. For years my most used lens was a zoom of 28-300mm. It was a kit lens, but it served me well. When upgrading I wanted a little more reach, so I got the Z 28-400mm. The focal range was great and I started photographing some birds in my backyard. Then, after a trip to Yosemite with numerous folks in our group touting their Nikkor 180-600mm beasts… I knew I still needed (well, wanted) more reach. Not wanting the bulk of the Nikkor or the price, I purchased the Tamron 150-500mm.
I was having fun photographing the variety of birds and hummers and pleased with some decent captures. I’m very happy with the performance and sharpness of the Tamron. I started posting on NPN and received numerous recommendations to try DXO’s PureRaw RAW processing and denoise software. Previously I had been using Adobe’s Denoise feature in Adobe Camera Raw, ACR, which is the same as in LR. On many occasions I would add Topaz Denoise AI on top of that! Learning now that probably isn’t the best idea. So I just bit the bullet and invested in to the DXO PureRaw6 software. With a coupon code I found, it was about $120… not bad. And it’s not a subscription!
In the second part of this post I’m going to lay out my image processing workflow. To preface the images below, the very first step I take on any image is to run it thru the denoise software. Of course I will only use the SW if the image needs it, like a high ISO image with noise and/or low light images like stars and the night sky.
If needed, is denoising an image the first step in your workflow? If not, why not?
To test and compare, I used a single image. This was not a scientific study…  The original RAW image is 60MB.
To be clear, I’m no techie guru when it comes to noise, artifacts, etc., etc., and certainly not between any brand’s sensors. I only know what the Nikon Z8 produces in terms of noise. One always hears how great the noise is at high ISO… I suppose if you comparing sensors from 10 years ago… but honestly, I have no reference what makes the amount of noise good or acceptable.
So, let’s get on with it already. The first image is the RAW, unprocessed image. ISO 16000, f/9 @ 1/800th, 500mm. To me, this is pretty dang noisy! Then again, I have no other reference if the Nikon’s noise is good, bad or average.
The second set of images are also unprocessed and cropped to 100% in Photoshop. All that was done was to run the RAW NEF file through DXO PureRaw6, crop and size for the web. No other adjustments. Reset the RAW file and ran it thru ACR and the Denoise tool. Cropped 100% and resized for the web.
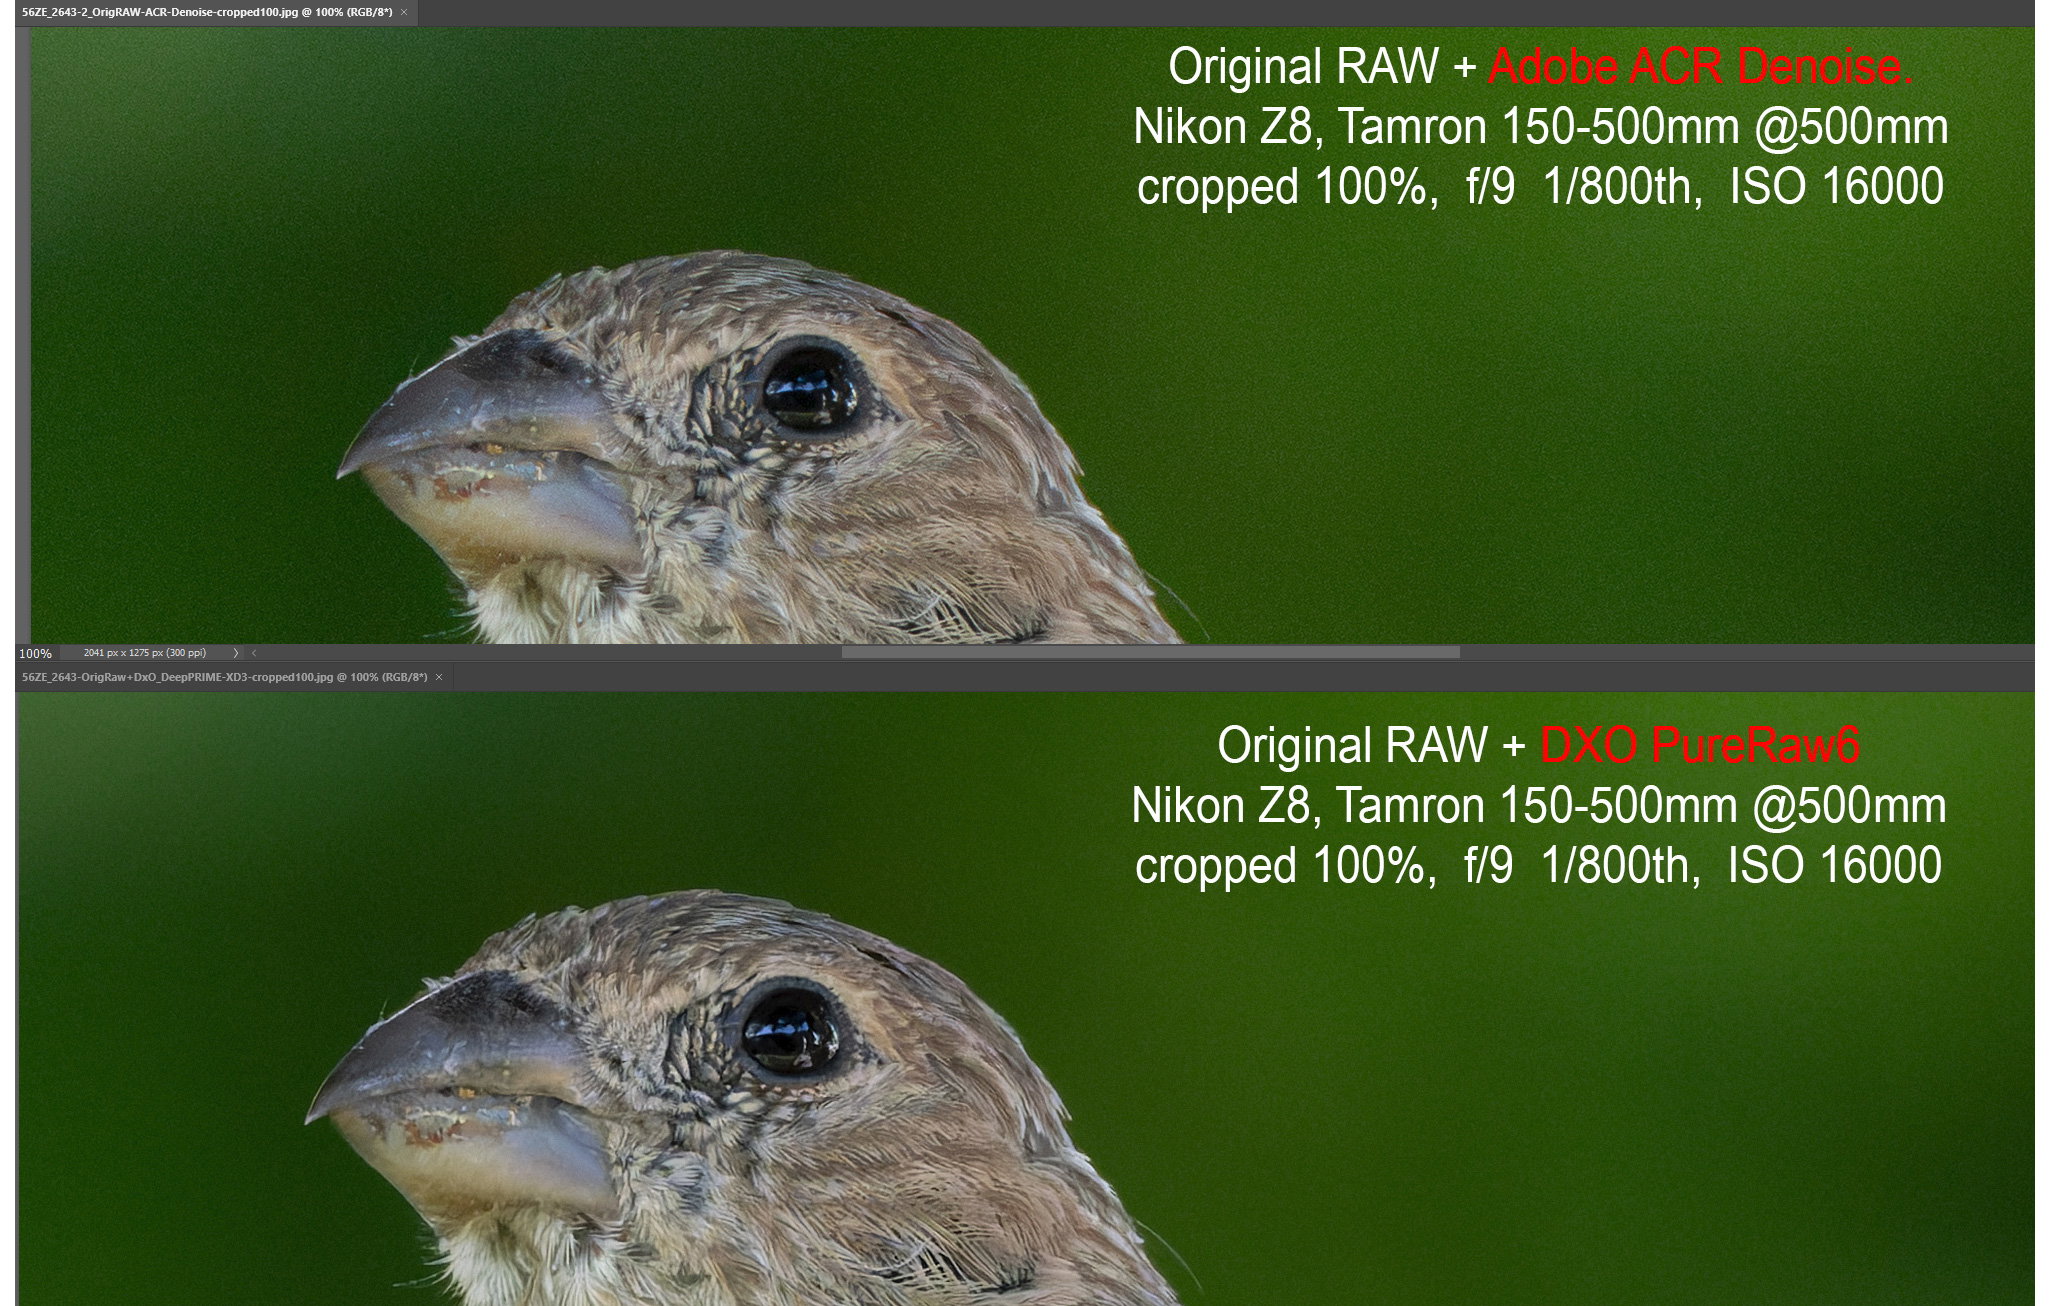
Next image, just the same as previous, but combined side by side for comparison.
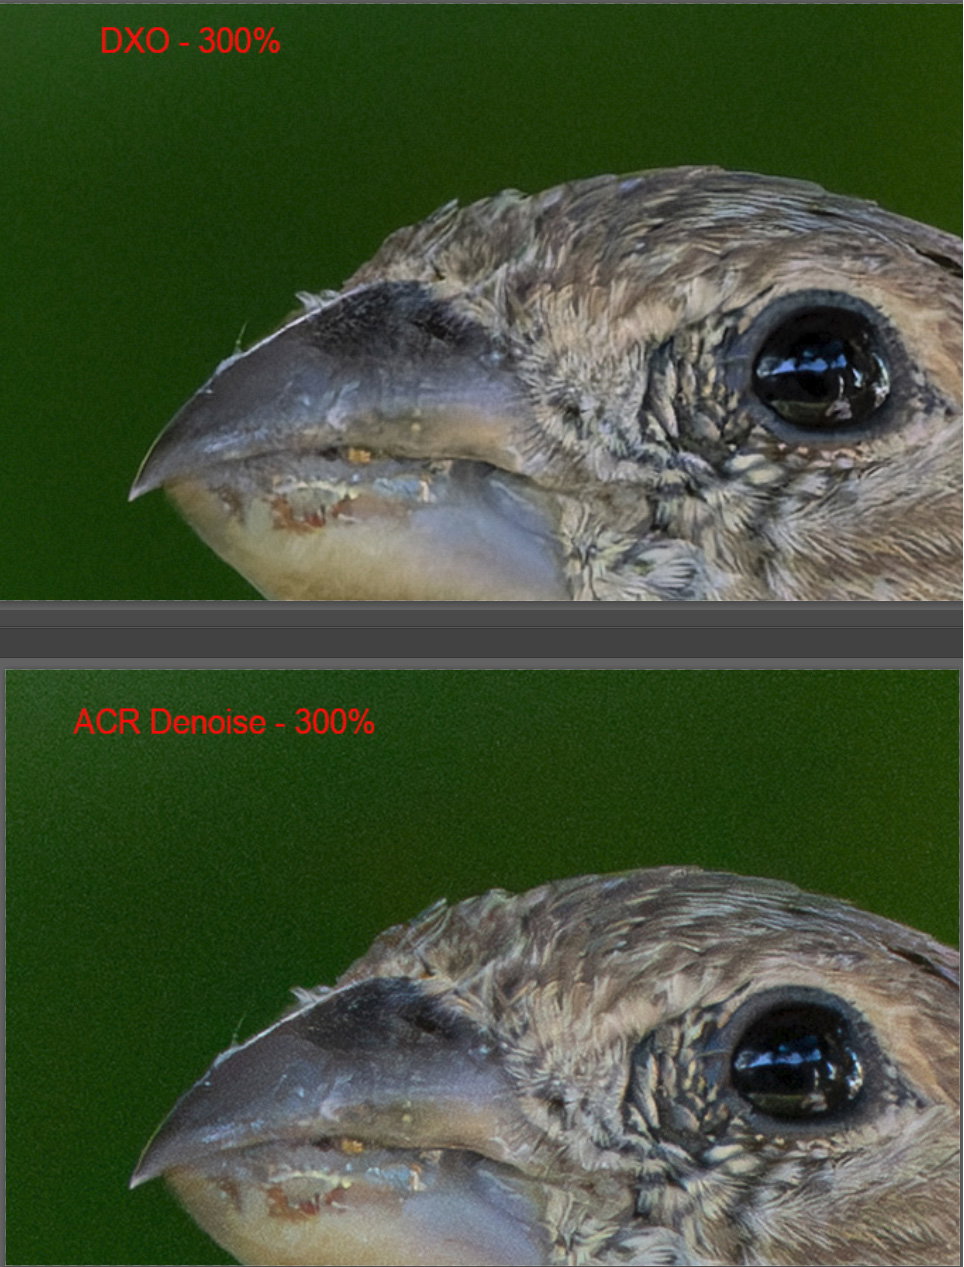
Last set of images, the original was processed thru the two Denoise applications, cropped to 100%, then opened in PS and zoomed in to 300%. Here are the images, conclusions to follow:
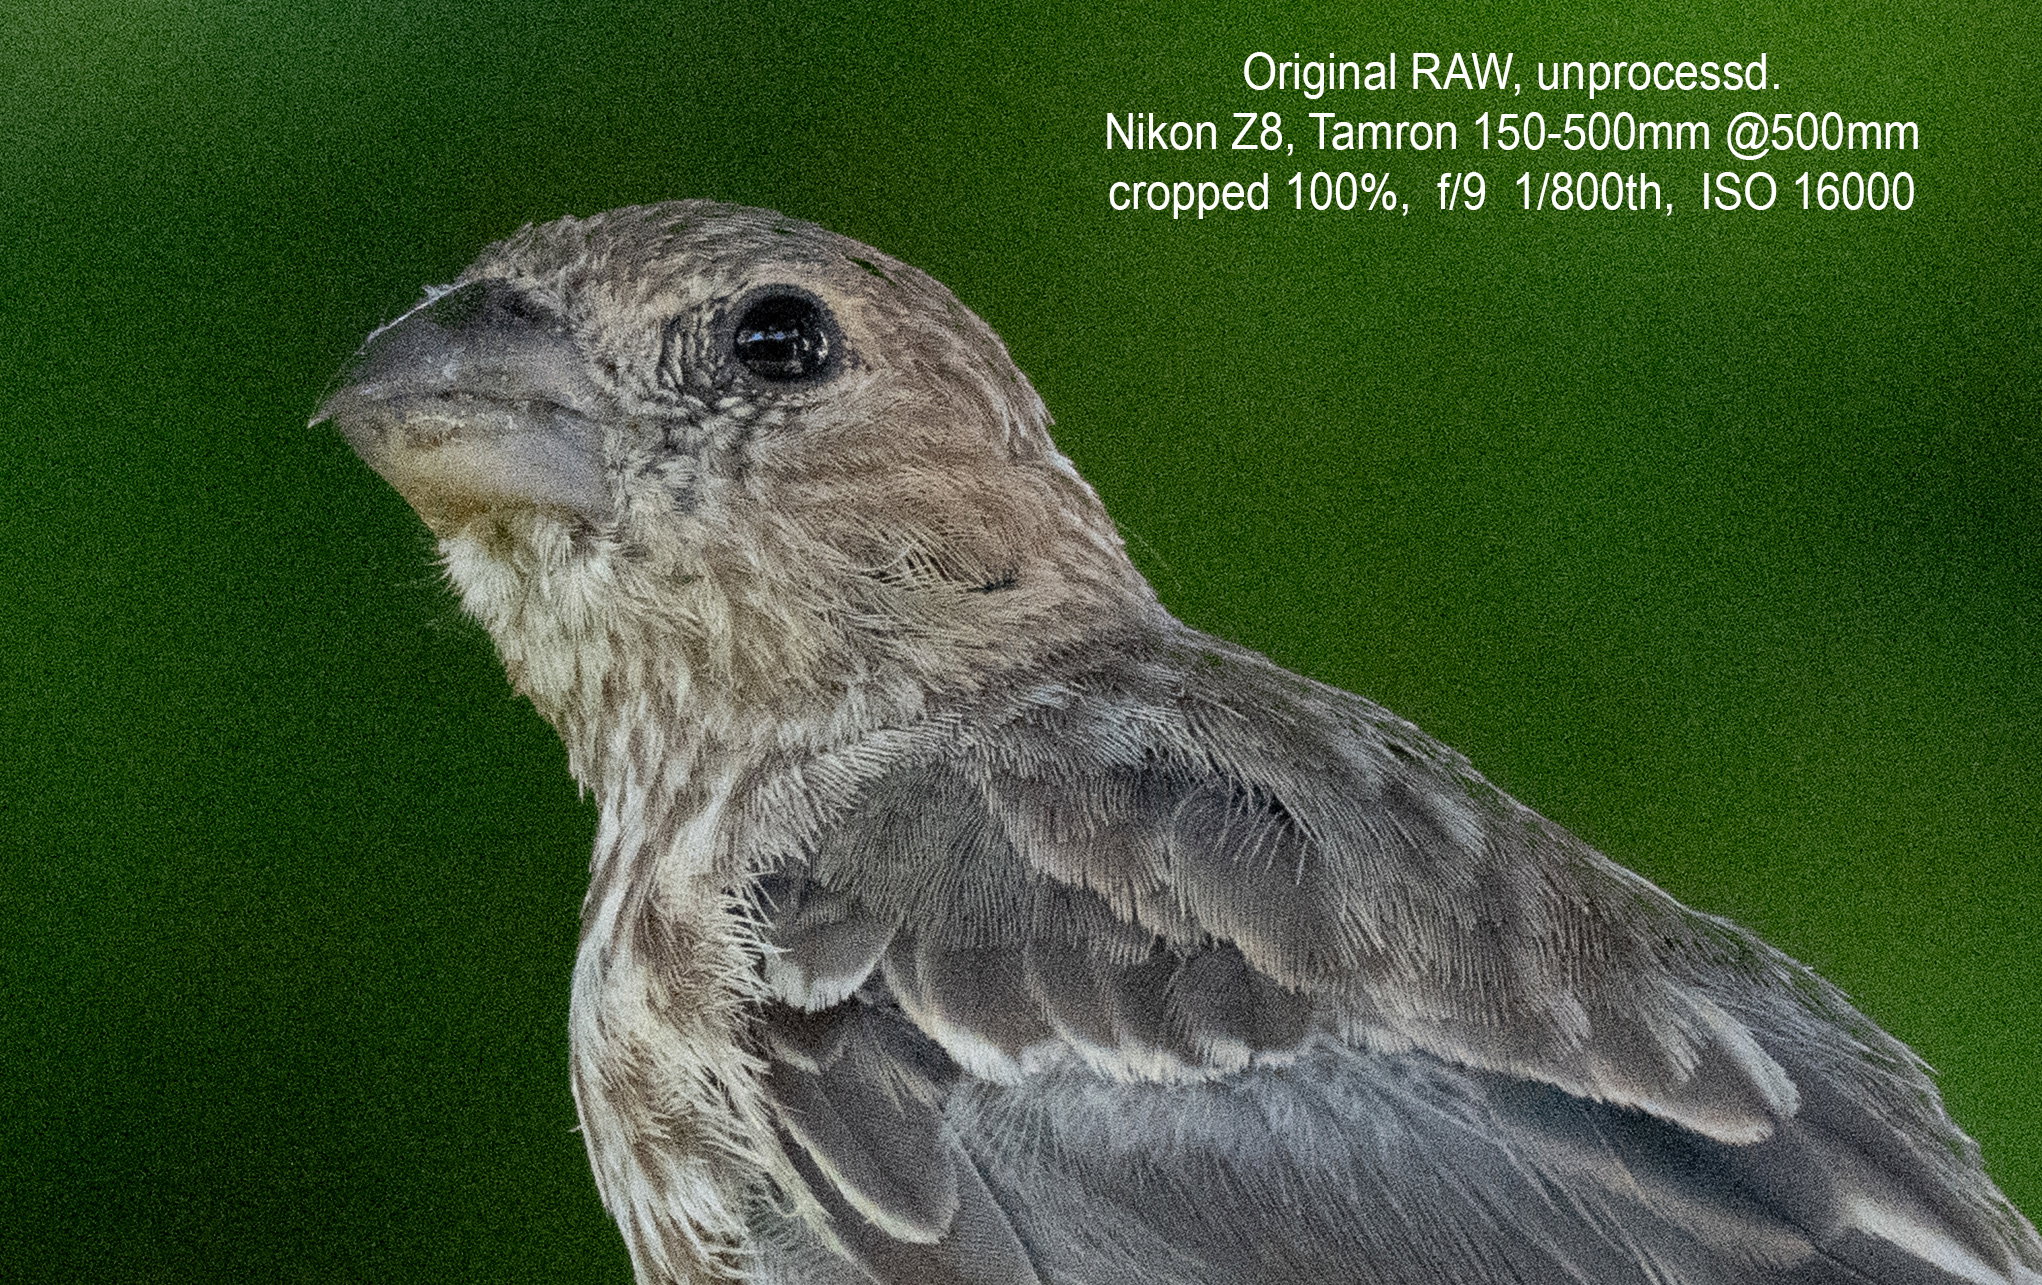
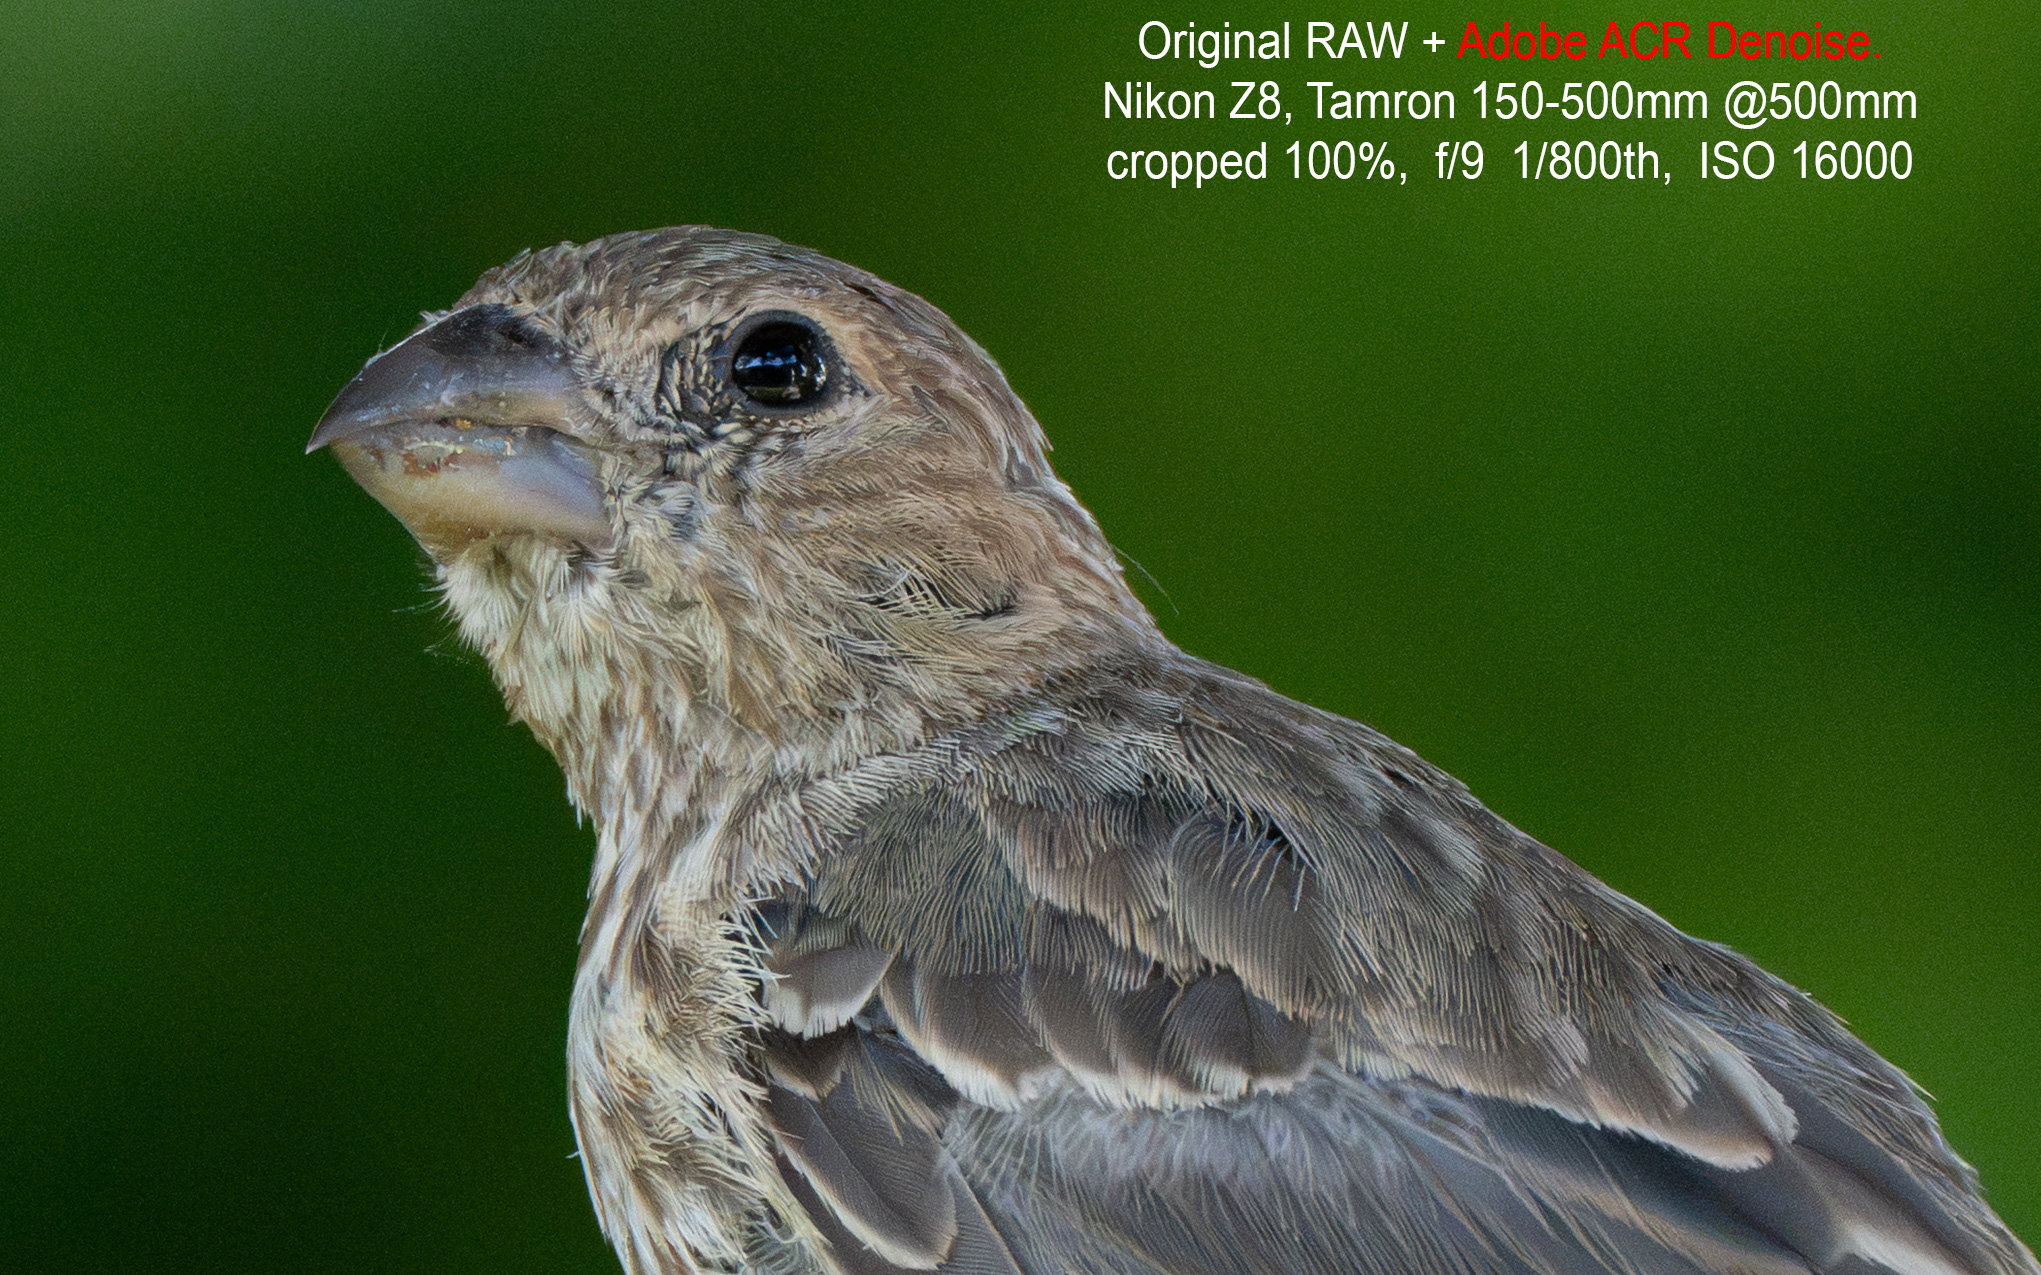
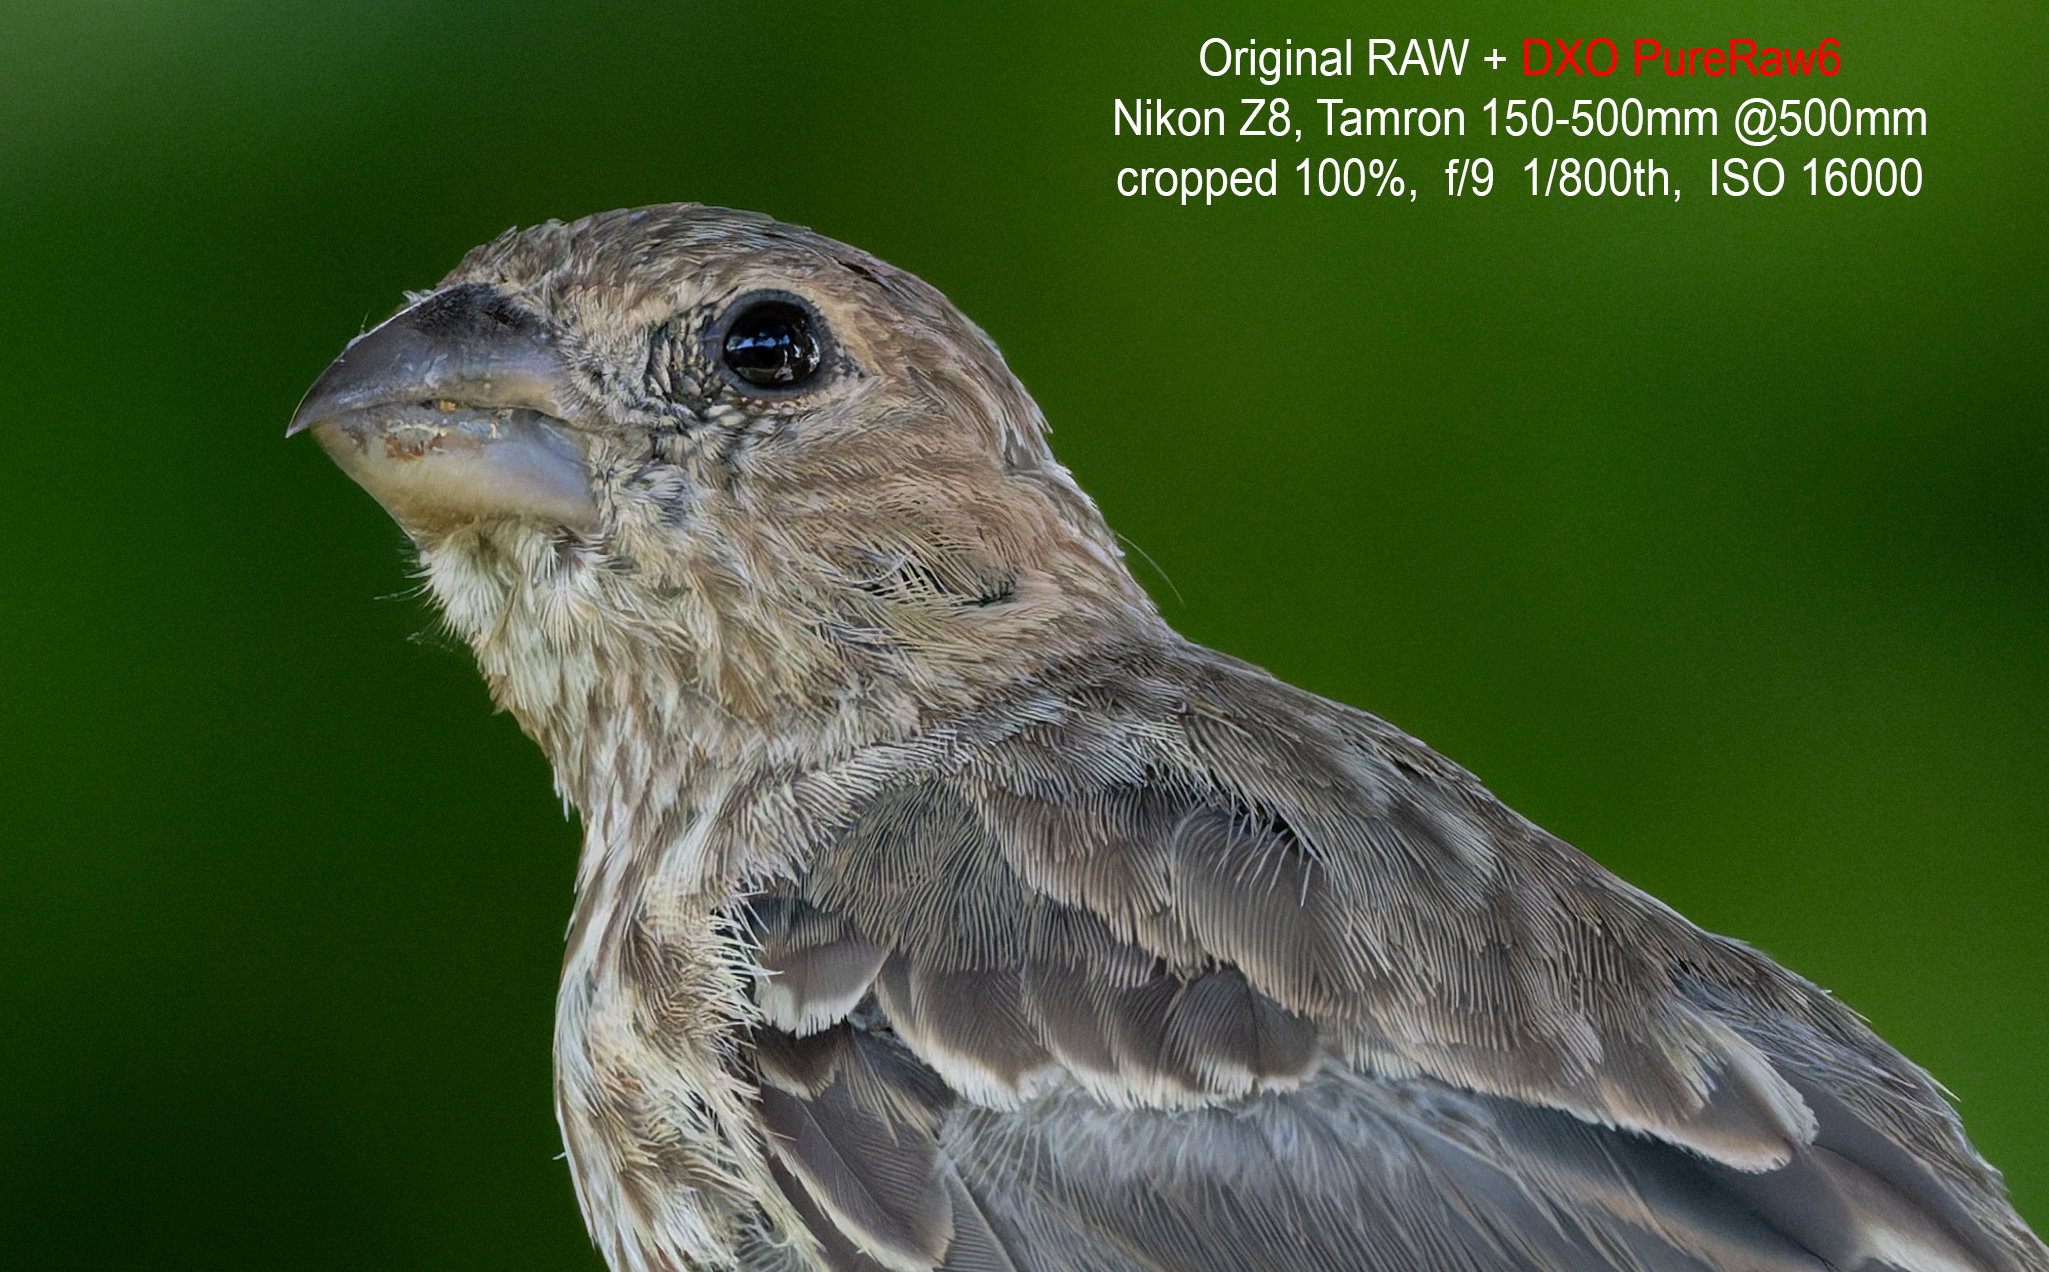
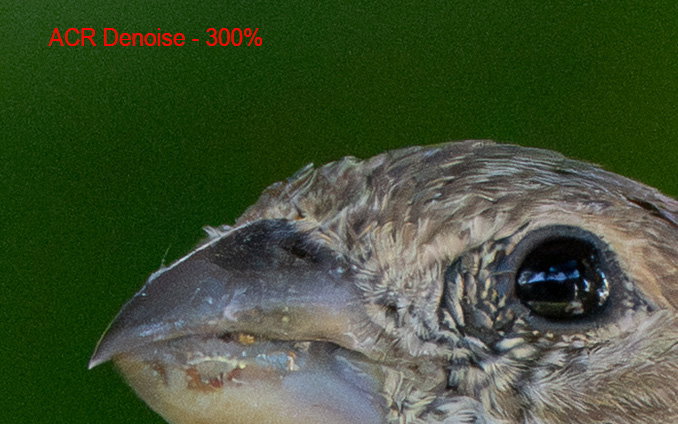
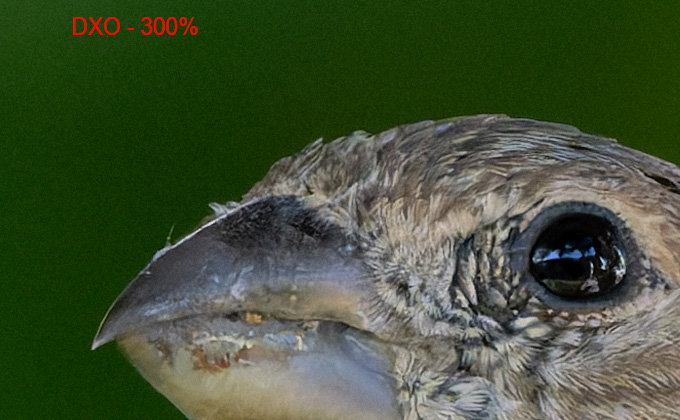
As you can see, the original RAW NEF file is pretty dang noisy! Again, I don’t have a reference, but it’s even difficult to tell if the image is sharp, at least until you reduce the noise.
My initial reaction after putting the file through both tools, was kind of unremarkable. They both do a fantastic job of reducing, almost eliminating noise. I was hard pressed to tell the difference and asked myself, why did I just buy new software, the Adobe Denoise does the same thing. When it came to the details in the bird, I couldn’t tell the difference between the two. Then, with the soft, uniform background, I could actually see a difference. The difference is subtle, but there. The question is, does it really matter at this level?
Lastly, I decided to zoom in to 200%, then 300%. At this level it became increasingly clear how much better the background rendered, even at 300%. It seemed there was little difference between 100% and 300%.
My conclusions? Both Adobe’s ACR/LR Denoise and DXO’s PureRaw6 do a phenomenal job of reducing and nearly eliminating noise. Adobe and other companies have made huge technical leaps with the insertion of AI in their algorithms. It’s mind boggling what these tools can do now with cloning, Content-Aware replacements, etc. Denoising is no different.
If you’re using the Denoise in LR/ACR and are happy with the results, then I’d be hard pressed to recommend buying another piece of software. However, depending on your use and type of photography, you may benefit in better noise reduction with high ISO, low light images, with the DXO PureRaw6 software. The PureRaw denoise tool is the same engine as in their more complete DXO PhotoLab software where you’re getting a complete image processing solution. (And paying for it.)
For me, with my new found joy of photographing the birds in my backyard, purchasing the DXO PureRaw6 software was certainly worth it. I now have the tool worked in to my image processing workflow. Speaking of my workflow, on to second part.
My Image Processing workflow. I would appreciate anyone who uses Photoshop and ACR/LR to take a look and let me know if you do things differently. I’m really curious to know if the order I’m doing things in the best or most efficient way.
To be clear, I am not an expert and honestly, I’m posting to solicit feedback so I can improve my image processing and workflow. I also realize there a many, many options out there besides Photoshop and I get that. I’m a creature of habit for sure. I’ve never even opened LightRoom and have no desire to use it. The main reason is that I have always organized my images manually going way back to the 35mm slide days… and I’ve never had an interest of having my images “catalogued” in to a library, whatever. Anyway, that’s just me. What I have developed through the years is using Photoshop for all my image processing. I don’t remember when I started using Adobe Camera Raw, ACR, to make adjustments, but that is at the core of the workflow.
I should also let you know that I’ve been using Tony Kuypers Panels, tools and luminosity masking for years. If you’re a user of Photoshop, TK’s products are worth checking in to. I highly recommend. Sean Bagshaw has collaborated with Tony and produced numerous How-To videos. Also highly recommended.
So, with that in mind, if you use Photoshop as your primary processing tool, including ACR, I would appreciate your feedback in my workflow.
- I do not batch process any images. I simply begin reviewing my images in Adobe Bridge to determine what images are worth processing. Once I have an image I want to work on:
- Open RAW image in ACR. Review for sharpness and other details to confirm if I’m going to continue. If noise reduction is not needed, skip to Step 5 and begin processing directly in ACR.
- If noise reduction is needed, Process the RAW NEF file in DXO PureRaw 6. Export to DNG. BTW, they have a “High Fidelity Compression” algorithm that is amazing and greatly reduces the DNG file size.
- Open the DNG in ACR.
- Clean Up. Dust bunny removal, any minor cloning, etc. Very impressive removal/healing tools in ACR. Most always, I zoom in 100%, then page around the image to clean up spots and little artifacts.
- Level, rotate and crop as needed. At this point, I’m ready to start making color and luminosity adjustments.
- Optionally, but frequently, I then assign a Linear color Profile to the image in ACR. These profiles can be obtained from Tony Kuyper, and they’re free. You can read all you need to know about these Linear Profiles on his website. Linear Profile Repository
- Perform color, exposure adjustments. Here is where I start making adjustments regardless of whether or not I’ve used the Linear Profile. Honestly, I’m still getting used to it and not completely sold on how it’s benefiting my images. But I trust Tony’s knowledge and experience!
a. Adjust White Balance - to taste. I usually try to make the color histogram, “neutral”.
b. Exposure adjustments: Exposure, whites, highlights, shadows and blacks. (On a PC you can hold the ALT key while adjusting these sliders and you will see where the whites and blacks are washed out. Option key on a Mac?)
c. Adjust global saturation and vibrance. I tend to prefer Vibrance over Saturation. Subjective of course. I also frequently adjust hue, sat and lightness in the individual color channels.
d. Dehaze, Texture, Clarity. I typically bump up Dehaze to boost contrast. Texture a little and Clarity I’m using quite a bit with ICM’s, not so much with straight landscapes.
Does image need chromatic aberrations corrected? What else?
-
Targeted adjustments. If the image needs it, I will use the masks like the Linear gradient or even the Subject or background masks to target adjustments to specific areas or things.
-
Open adjusted RAW image in Photoshop. Once I feel the basic exposure, color, saturation, WB are pretty good in ACR, I’ll open in PS and create a Smart Object layer with Adobe Camera Raw filter. I do this so if I want to adjust any of those settings, I can go back in to ACR. For example, I find a dust spot or artifact I missed that I want to remove.
-
Modified cropping or transformations in PS, if needed.
-
Make any additional, non-pixel-containing adjustments above the Smart Object layer.
- Burning and dodging layers for specific areas
- Painting contrast (A TK tool in his panels)
- Adding an Orton effect layer
- Any other tweaks needed, maybe a targeted saturation reduction.
- BW conversion on the stack if that’s what I want to do
- I often just do these adjustments on the entire layer, but than add a black mask. I then paint on those masks with a soft brush for my targeted adjustments. There is a lot of freedom here by changing the opacity of the layer, painting at different opacities, etc.
-
Last steps, not often used
a. Sharpening, as I understand it, should be the last step if you’re going to sharpen at all. Maybe as part of a printing workflow. I will go back in to ACR and perform any sharpening there.
b. Sometimes I may want to paint color or use a filter such as Gaussian Blur on a pixel containing layer. Bummer now, because so many adjustments could be affected if you made these new alterations at the bottom of the stack on the Smart Object Layer. Subsequently I must work on a combined pixel containing layer by merging them all and creating new layer on top of the stack. I do this by using the CTRL-ALT-SHIFT-E command. Unfortunately, this is a one-time thing. If you make any changes below this new layer later, you’ll have to repeat the new layer process. -
SAVE the PSD file. (Actually, save early and save often!)
-
Resize and Save for Web using Tony Kuyper’s resizing tools in his panels.
I hope you found both the Denoise comparison and my workflow to be helpful. More importantly, and glaring issues with my workflow, or any tips, suggestions you may have, I’m open to hearing and learning.
If you’ve made it this far, THANK YOU!