Originally published at: https://www.naturephotographers.network/eight-ways-to-improve-your-photographs-of-plants/
When photographing smaller subjects in nature like plants and flowers, paying attention to the details, being intentional about composition, and making deliberate choices about how to use natural light are all especially important. In a grand landscape, a small bare patch of ground can be fine as there are enough other visually stimulating elements to enjoy. With smaller scenes, however, a small bare patch can instead compete directly with the subject you most want to share with your viewers. With less visual complexity filling the frame, issues with subject selection, composition, lighting, and depth of field can be amplified. Training your eye to see such details and learning how to address them, both in the field and during processing, can help elevate your photographs.
Nearly all of the things I discuss below are conditional and depend on the context of each individual subject you are photographing. For example, one thing I encourage you to be alert to is the condition of your subject but in my own portfolio, I have some photos that show totally desiccated, sometimes tattered leaves and I think the end result works quite well. The list below is not a checklist of what not to do but instead an invitation to be more attentive, deliberate, and intentional in your photography. In my own work, I find that these practices help take a photograph from an okay execution of an idea with potential to a photograph that deserves a place within my portfolio.
Note: In the other articles I have written for NPN, I have included some of my favorite photos, all with refined compositions and careful processing. Today, I am taking a different approach: showing some of my photos of plants that did not work out so well and pointing out what I could have done to address the issues either in the field or during processing. With the exception of the photos at the end, most of the examples below are lightly edited RAW files.
#1: Pay Attention to Small Details
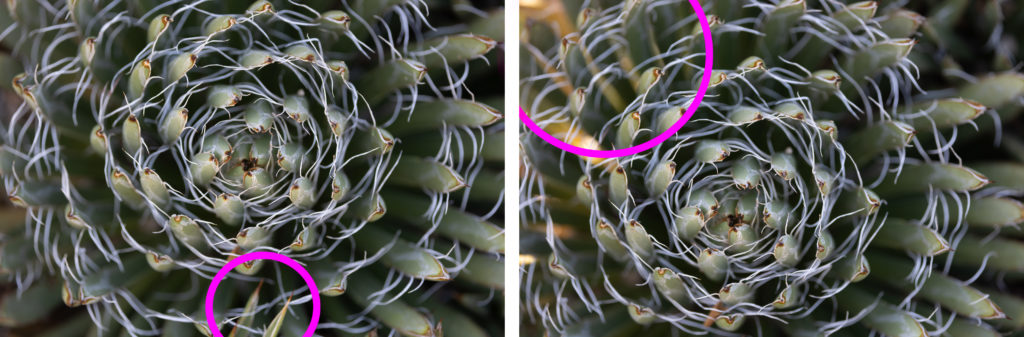
While many of the topics below fall under this general category, I mean something more specific with this lesson. After a day of photography, you are back at home and are looking at your photo on a larger screen. You pull up a file you were particularly excited about and a small detail that you did not notice in the field is now a glaring issue, probably because it attracts a whole lot of attention (and not in a good way). In the example above, when I was outside photographing this beautiful collection of queen’s crown, a plant that grows above tree line in the Rocky Mountains, I did not notice that one of the stems was missing a flower. I have experienced this sinking feeling quite a few times because of important details that I didn’t notice at the time but seem so obvious later: unattractive spider webs, messy debris settled in the crevice of a leaf, or a splatter of bird poop on a flower petal.
These disappointments have encouraged me towards more deliberate field practices. Now, as long as I am not working with rapidly changing light, I photograph at a slower pace and spend time to study the subject more carefully before starting to work on a composition. Paying attention to such details has significantly improved the quality of my plant photography because I notice and can address these issues while I am still working with the subject.

#2: Carefully Assess the Condition of Your Subject
Whenever I teach plant photography in person and am reviewing student photos, one of the most common challenges I see is the photographer choosing subjects in tattered or poor condition. The photographer is drawn to a subject, often a colorful flower, and does not look beyond the attractive color to consider the poor condition of the subject or the other elements of the plant like the leaves and stems. Flowers and leaves do not have to be in pristine condition to be compelling subjects, and flaws sometimes add character and visual interest to photographs. In my experience, such photos often work best when the photographer deliberately chooses to work with past-prime plants, not as a result of quickly choosing a subject without considering its condition first.
In the example above, some of the succulent leaves are missing tips, the flowers are all dead, and decaying leaves are scattered across the frame. If the dead flowers were arranged in a more visually interesting way and the succulent leaves were in better condition, the subject could have worked but as is, I do not think it makes for an attractive photograph. So, in extending the first lesson, I encourage to assess the condition of your subject before getting started to make sure that all elements of your scene will make a visually appealing photograph.
#3: Be Mindful of the Background: Does it Enhance or Distract?
Especially when working with shallow depth of field, I pay attention to both the main subject and the background when deciding whether or not to create a photo. Since I do not use any artificial backgrounds, I need everything to work together: a soft background with appealing colors and consistent texture that will complement, and not distract from, the main, in-focus subject.
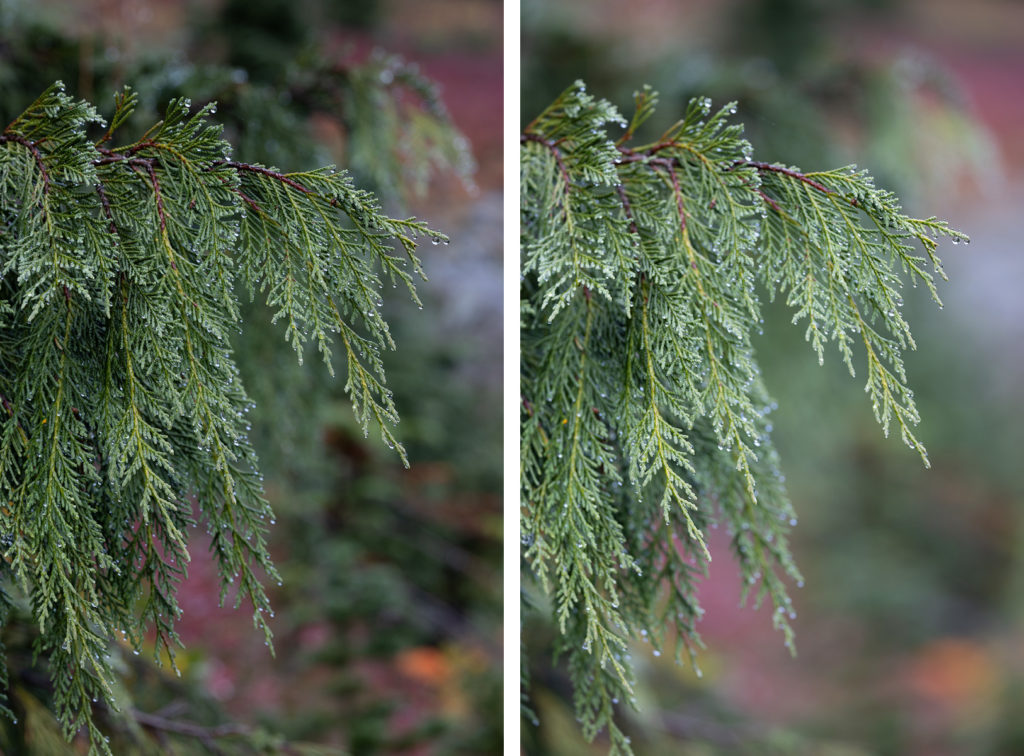
While walking along a trail in Mount Rainier National Park, the water droplets on this cedar tree attracted my attention. This branch was hanging above my head so my composition options were limited and never worked out very well. I liked that the background was filled with a mix of fall colors but it was also filled with branches, dark spots, and bright spots. These visual distractions and inconsistencies are especially obvious with the example on the left, which I photographed at f/13. I switched to f/5, seen on the right, to help hide and soften some of the mess. While the background looks better at f/5, the cedar bough looked worse with too many of the interesting parts softened by the shallow depth of field. In this case, with the limited composition options, I was not able to find a good balance between a sharp subject and a soft background. Thinking about both the subject and the background in these ways will help improve your photographs of plants and flowers.
#4: Be Intentional About Including or Not Including Focal Points
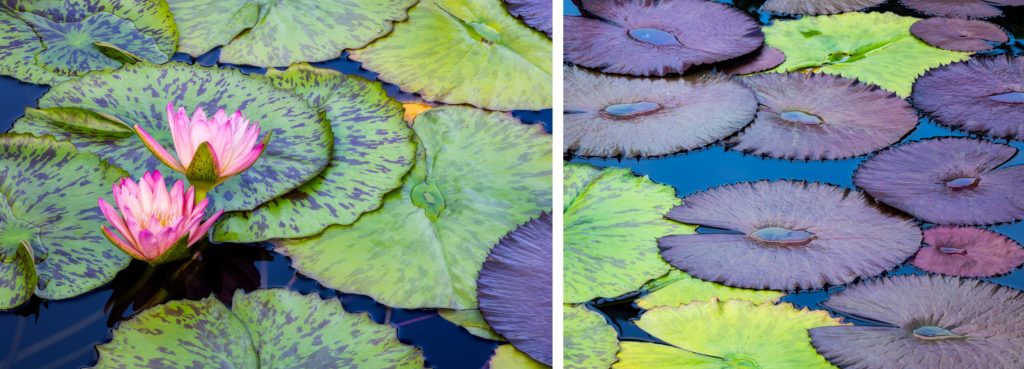
One thing we typically learn as new photographers is that we must have a focal point—a place where a viewer’s eye can land. This focal point can be something like a pink flower among a grouping of green lily pads, or a red maple leaf that had landed in the perfect spot on an expanse of green moss. A pink water lily, with its upright spikes and bright color, provides visual contrast to the flat, round leaves. The red maple leaf is a textural and color opposite of green moss. These focal points, opposites, or elements of contrast provide a place for the viewer’s eye to land and are necessary for a strong composition, correct?
While this guidance can be helpful in certain circumstances, it is often repeated as a directive: your photo MUST have a focal point! This directive does not consider the full range of stories we can tell through our compositional choices. So, no, your photo does not need a focal point, an opposite, or some sort of visual contrast to attract attention, especially if your composition relies on repetition or a pattern for visual impact. In fact, if your composition relies on repetition or pattern, an intentional or unintentional focal point can entirely break the flow and feel of a photograph. For example, one straight line among a set of curving lines can pull all the viewer’s attention away from the rest of a lovely pattern.
This directive sometimes leads photographers to add a focal point to their photos, all of which can look unnatural or artificial (like that perfectly placed red maple leaf). A better approach is to be intentional in crafting a composition based on what attracted you to a subject in the first place. Creating a composition around an expanse of repeating water lily leaves, without flowers, or a bed of intricately detailed moss, without a red maple leaf, is a perfectly valid approach to plant photography. For such subjects, many of the other lessons in this article are important since little details, like an empty spot or a tattered leaf, can create a focal point that unintentionally draws attention away from the patterns or repetition. Again: details matter.
#5: Be Mindful of The Margins, and Minimize Distractions on the Edges and in the Corners
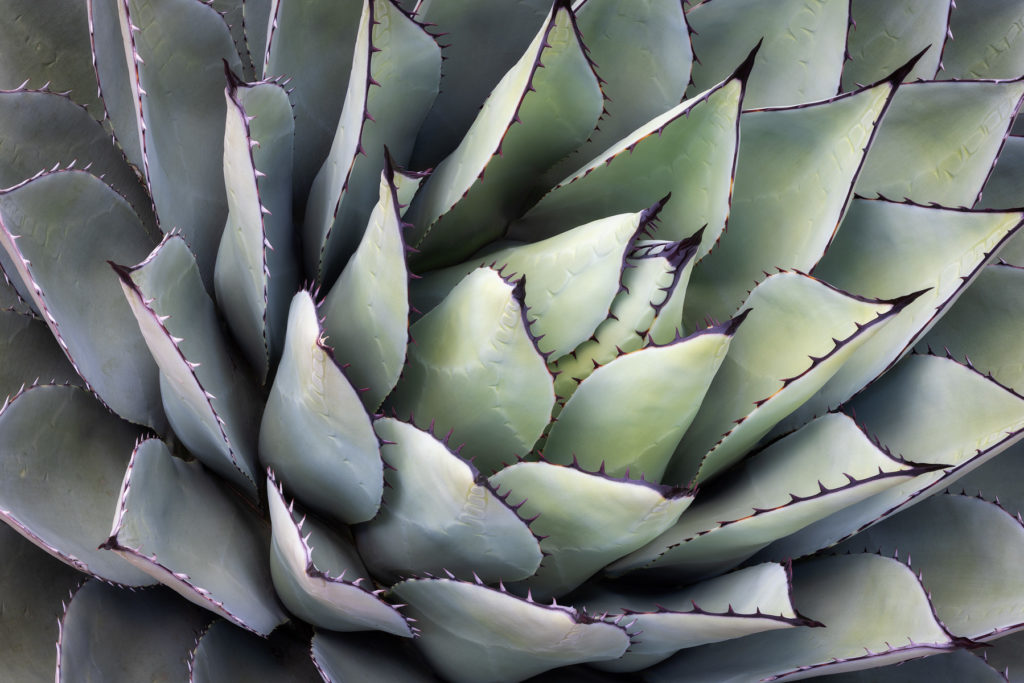
As you get closer to the edges and corners of your frame, elements of your composition start to take on more visual weight, and more power to distract, than if the same thing was closer to the center. In the example on the left, two leaves from an adjacent yucca were poking up into the bottom of the frame. While I could darken or desaturate them so they would attract less attention, I decided that they break the radial pattern too much and worked on a different composition. By the time I had set up the different composition, light started creeping in on the upper left (lesson #6).
In both cases, these issues in the margin of the frame distract from the rest of the scene. Whenever I am working on a composition, I mentally think about putting a thin margin around the edges, and I want to keep the most important parts of the composition on the inside of that margin. I also want to be sure that nothing in the margin, on the edges, or in the corners creates a visual distraction to pull attention away from the more important parts of the photograph.
#6: Pay Attention to the Nuances of Natural Light
Sometimes, mixed lighting and strong contrast can bring a subject to life in an exciting way. Working with this kind of light can be challenging, and a lot of plant/flower photography resources discourage mixed lighting in favor of soft, even light. Instead of saying there is a right answer, my lesson here is again to pay attention to the lighting in a scene and think about what it is doing with regard to tonality and contrast. With more attention to all different types of light, you will be able to see more opportunities, build a more diverse portfolio, be a more versatile photographer, and refine your photos so they are more visually cohesive.
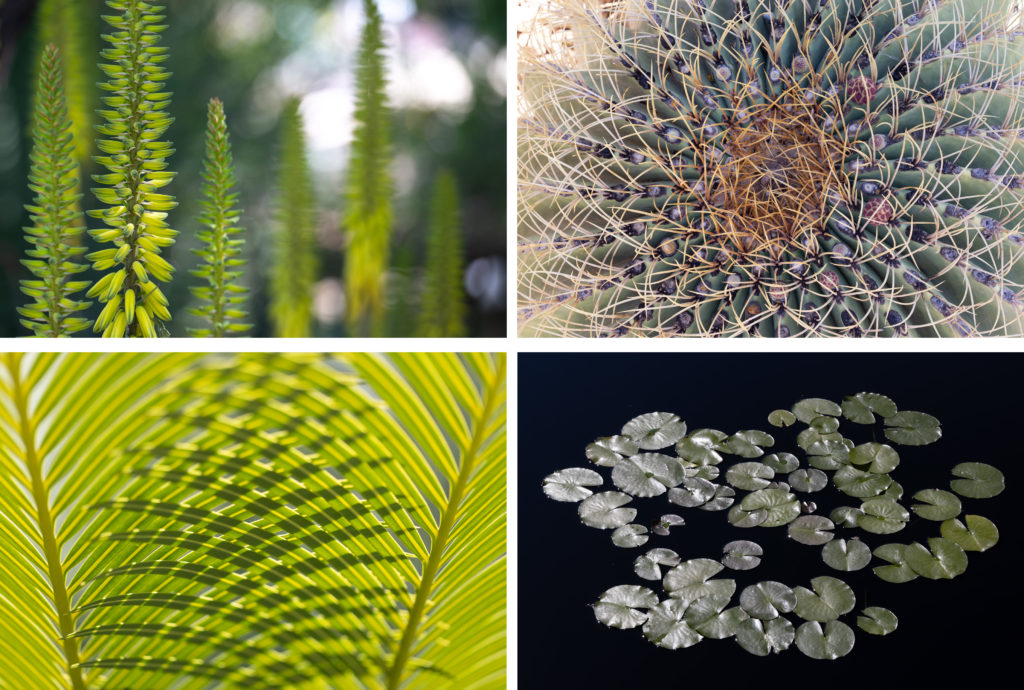
In the photograph above are four examples of how paying attention to the nuances of natural light can improve your results and create new opportunities:
- Upper Left: If your subject is in soft shade or even light but the background is full of harsh spots of light, your photo might be improved with even lighting. In this example, the bright spots in the background pull all the attention away from the green spikes.
- Upper Right: If you notice specks of light that are creeping in along the edges of your frame, you can address it right away and improve the result. Here, I just needed to move my body to cover the upper left corner that is blown out.
- Bottom Left: If you notice that a bit of interesting light is falling on a single subject with an interesting result, you can create a composition out of the interesting light. I also look for edges of light, where a single bit of a subject is being highlighted or an ephemeral moment creates a fleeting opportunity. Here, some direct light created the effect of cross-hatching with the light and resulting shadows on this cycad.
- Bottom Right: If harsh light is creating interesting contrast, it might be an opportunity for black and white photography. Here, the transition of silvery light across the scene creates contrast that I can emphasize when converting this file to black and white.
#7: Empty Spots Sometimes Break Compositional Flow and Repetition
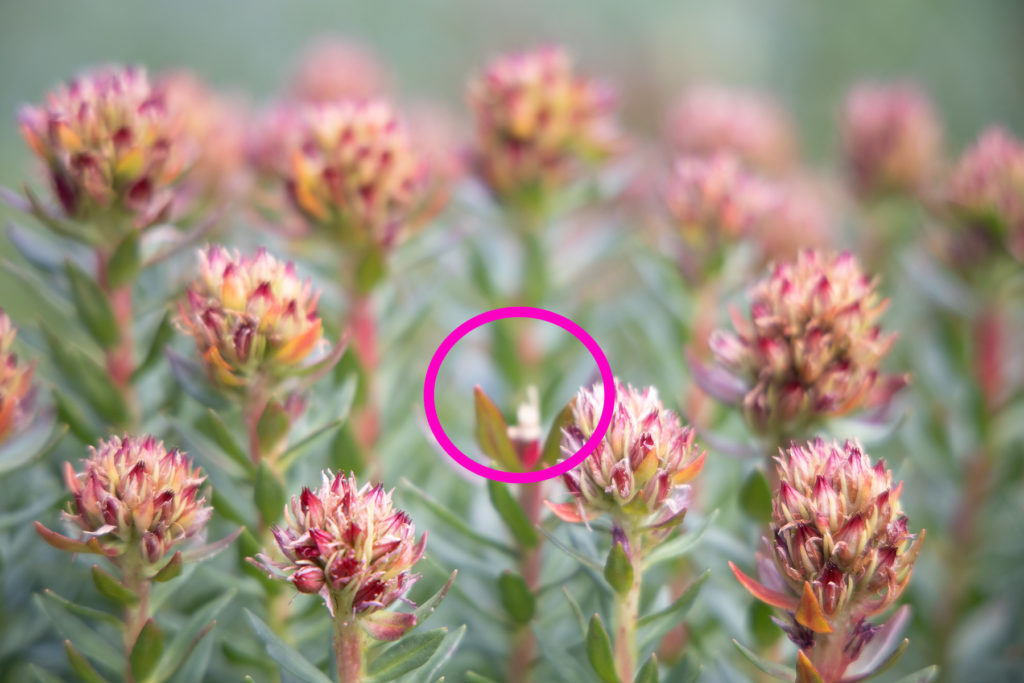
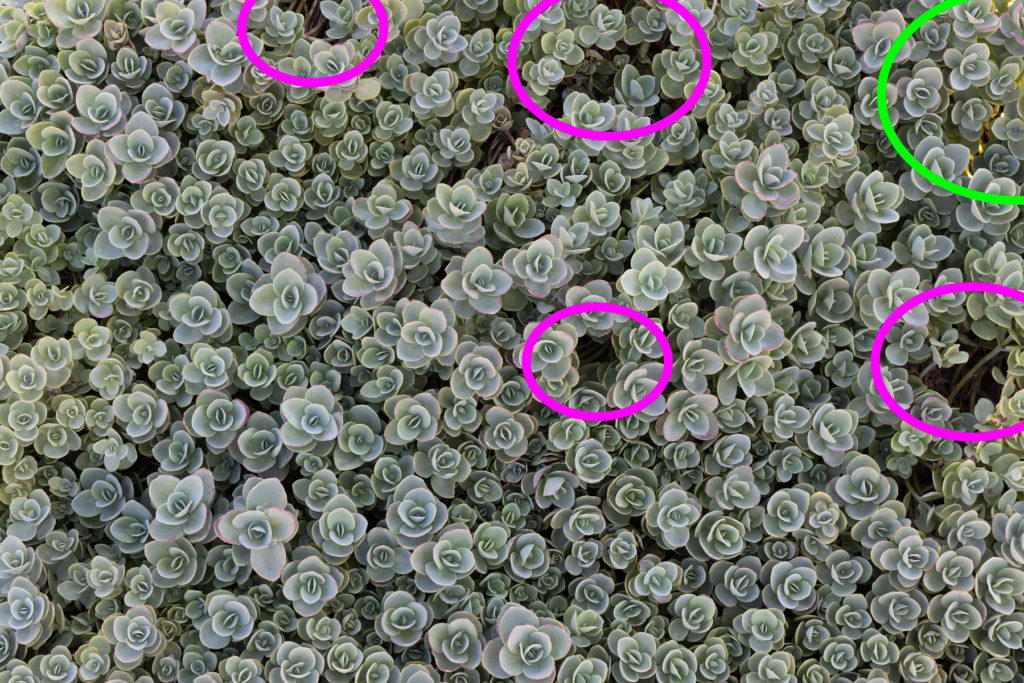
When photographing plants, we are dealing with living subjects that will naturally have imperfections. In working on a composition of a plant, I often think of myself as a portrait photographer. I want to show off the plant in the best way that I can. This means noticing and working around imperfections that can sometimes create visual distractions. In the example of this sedum plant above, there are a few holes and areas where the stems are showing through (pink circles). There are also little specks of light in the upper right corner (green circle).
The repetition is what drew me to this scene but each hole and speck of inconsistent lighting breaks the pattern. The holes, because they are different than the rest of the scene, pull attention away from the pretty plants. This is another example of how paying attention to the details of a scene matters. I could easily move my composition to the left and zoom in a bit, excluding all of the empty spots and specks of light, for a much more cohesive scene. For scenes like this, I am always looking for missing leaves, missing flower petals, stems showing through, empty holes, or bits of ground that distract from the rest of the scene, adjusting my composition in response.
#8: Fill the Frame by Getting Closer
I recently viewed a few thousand photographs as a judge for a landscape photography competition and one of my most common reactions was: please crop! The same applies to plant photography. When we try to include too much in the frame, we sometimes dilute the power of the photograph by including too many competing elements. I also find that by simplifying a scene and focusing on abstract design elements for composition, I am able to present a less literal and more creative take on a subject.
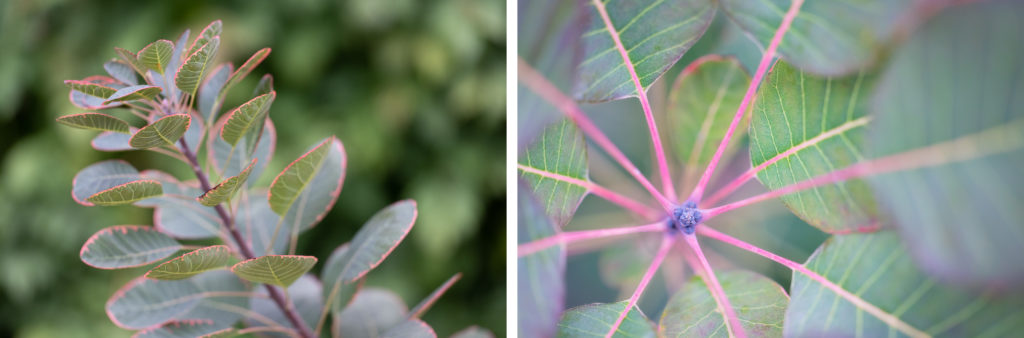
In the example above, the color contrast between the pink and green is what attracted me to this smoke tree plant. The photo on the left is more of a documentation of what the plant looks like and the background, with all of its bright and dark spots, competes for attention. By focusing just on the radial pattern of a single stem as seen in the photo on the right, I am still able to communicate that initial spark of connection (the pink and green) but think the much tighter composition is quite a bit more interesting. Just like the other lessons in this article, filling your frame isn’t a rule in any sense but it can be helpful to think about as a tool to simplify and strengthen a composition.

Case Study #1:
Clematis seed heads are such a fun subject for photography because of the beautiful radial pattern and elegant shape. The example on the left includes far too much context, with the leaf, secondary seed head in the upper left, and messy background all competing for attention. The primary seed head isn’t in terribly good shape, with the frills on the lower right looking a little tattered. By selecting a different seed head with a cleaner background and getting much closer, I was able to simplify the scene and make the photograph about the elegant shapes of the plant.
Case Study #2:
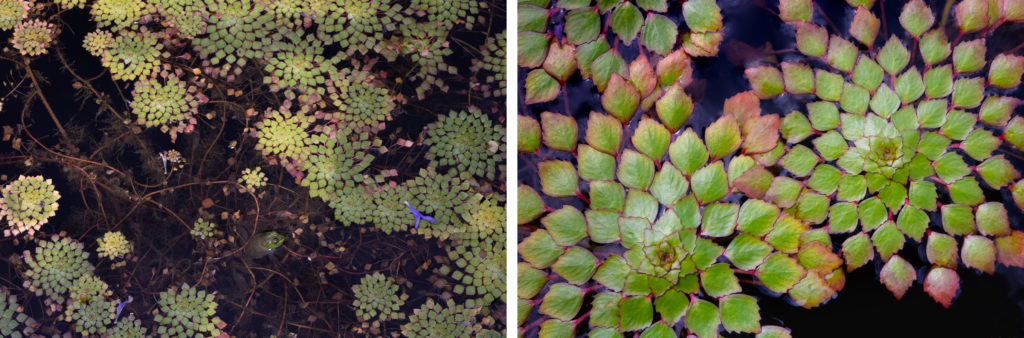
This mosaic plant is aquatic, with its tiny leaves and stems floating on the surface of a small pond. For the photo on the left, I selected a wide composition because I wanted to include the frog in its environment. After looking at the photo later, the frog is such an inconsequential part of the scene that it didn’t work. There is also inconsistent lighting, with some of the plants in partial sun and the rest in the shade. There are also purple flower petals that have fallen onto the scene and other debris is floating in the water. Overall, there is way too much going on with the composition and lighting. With the photo on the right, I selected three plants that were in good shape and worked on a much tighter composition under even light. The bit of room around the plant allows the full radial pattern to play out in a few spots, which I think enhances the flow of the scene.
Conclusion
I hope these examples have helped show why details and intentionality matter in plant photography. With these lessons in mind, I encourage you to take the time to study your scene before you get to work in creating a photograph. Be deliberate in selecting a subject and intentional about framing and light. If you notice something that is not working, think about how you might be able to address the issue by changing your position, working from a different angle, moving to a different section of your subject, or working through a variety of compositions. By applying these lessons, you can create more refined, visually stimulating, and cohesive photographs of the wonders of the botanical world.
---Turn off Notifications for Articles
If you prefer not to receive notifications about future articles, please click here to modify your notification preferences. You can remove any tags you do not want to be notified about under the Watching First Post section. These are broken down by genre, so if you only want to get notifications about landscape, macro, etc., you can do that here.