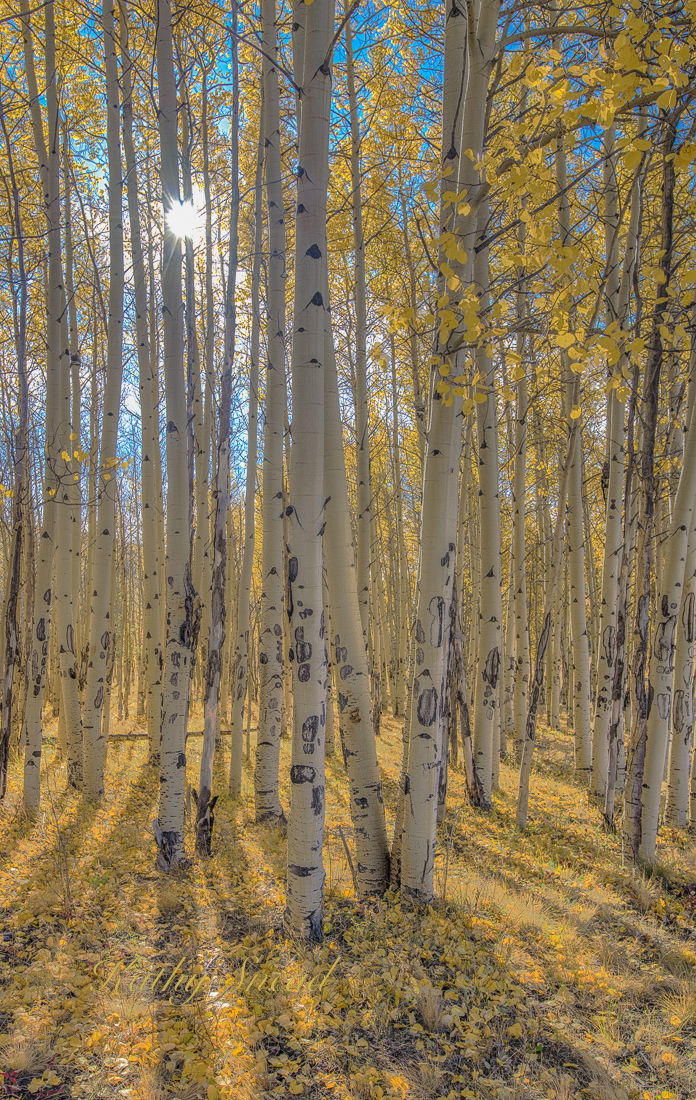
I shot two exposures yesterday at f/8, 25 mm on tripod. Different times were used as I planned to use HDR and the scene varied greatly in brightness. I ran the two shots through Photomatrix Pro here. I did some other processing but the problem with the shot arose when I ran it through Photomatrix. If you look at the upper right hand quadrant the leaves are funky with purple and red lines and just generally rendered incorrectly.
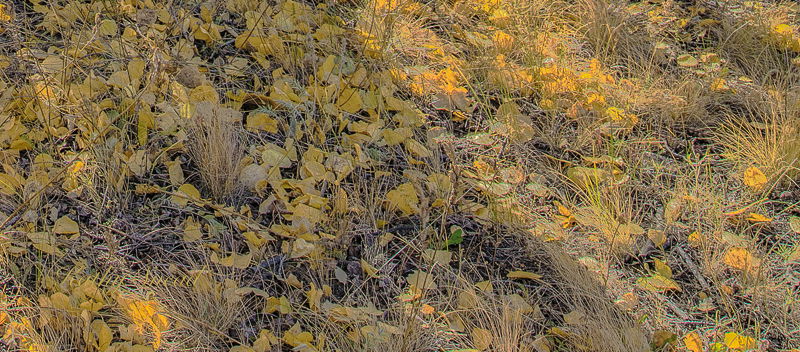
So, as I now have both Photomatrix Pro and HDR Efex Pro, I decided to run the same two exposures through HDR Efex Pro ( why I have both is just a matter of my really wanting to learn this!). The result is in the comments. In this case the leaves in the upper right hand quadrant were more or less OK but the leaves and grasses on the ground in front of the trees were completely messed up with more or less the same kind of aberrations.
Can anyone explain to me what is going on and how to work with it?
If you would like your image to be eligible for a feature on the NPN Instagram (@NaturePhotoNet), add the tag ‘ig’ and leave your Instagram username below.
You may only download this image to demonstrate post-processing techniques.
I think this is a fine image - well composed and wonderful light. But I have to tell you, I’m not a fan of automatic HDR programs for the same reason I don’t shoot jpeg. The HDR (i.e., blending) process is a complex one and, personally, I don’t want some dumb algorithm making creative choices for me. This image, for example, feels flat to me. The surface of the birches have an almost “gummy” or muddy feel to them. A lot of the glow that I expect you experienced when you took this shot is lost. And that is largely due to the HDR program, which, frankly, is pretty ham handed when it comes to blending. If you find yourself doing a lot of this sort of blending I would strongly recommend learning how to do it manually. Tony Kuyper’s TK7 luminosity panel is a remarkable tool and Sean Bagshaw has some excellent tutorials on how to use it for blending manually that, I believe, will give you much better results.
Kerry
Thank you for the quick reply. I am a fairly new convert to PS , having hung out in LR for many years, but perhaps it is time to dive into more technology. I don’t understand luminosity issues yet but will look up the Sean Bagshaw tutorials.
I did think of blending manually with layers but was hesitant due to all the work of having to keep the tree trunks and branches at one exposure , with the sky and the background at another. Perhaps the luminosity panel solves this .
I stopped using other programs when they added HDR to LR. Photomatix is more about tone mapping than HDR. I always found the results garish and ridiculous. You are basically getting the results the program is designed to give you. LR gives me the raw style exposure blend I’m usually looking for.
I can’t see the funky aberration that you mention, Kathy. Can you post a crop of that section that you have in mind? I think this might have something to do with merging objects that are moving frame to frame. Different algorithms might use different interpolation. Have you considered a faux HDR by using multi-processing?
Finally, I really like the added contrast on the HDR EFex Pro image but I like the sunstar on the first one better, Kathy. You can combine the two in Photoshop pretty easily though.
Hi Adhika @Adhika_Lie This is the anomaly that I experienced in in the leaves at the bottom of the photo in HDR Efex Pro . It wasn’t windy so I cant imagine these leaves moving. I looked again at the anomaly in Photomatrix pro that is in the leaves in the upper right quadrant. Pretty sure that is due to leaf movement so did not include that here.
I am about to post another version that I did in LR. Maybe as Bradley Strong suggested I should just use LR in the future for non manual exposure blends but still wondering what this is as I imagine there will still be some use to these programs. Thanks for the help !
Thank you to everyone who commented! I rethought what I was doing and chose one image to work with. Created a virtual copy in LR and processed the two differenetly for light and shadow then HDR in LR , readjusted the result, took into ps, enlarged, brought back to LR , made some other adjustments. Then enlarged a different shot that was very dark but had a sun star. Exported both as layers to photoshop and used some of the sun star from the dark version in the finished product via a mask.
This is the result. I am much happier with it. No anomalies!
Finally, I tried just using LR and PS for adjustments, no HDR, no layer combining re the suggestions fro, @Kerry_Gordon and @Eva_McDermott.This is the result. I admit to being somewhat confused at this point and obviously debating about the basic adjustments of vibrance, highlights and shadows. Sorry about the numerous posts. Going to step away for awhile.
Kathy, from what I can tell, the anomaly that you are seeing looks like to be some contrast issue that perhaps can be fixed with the right curves but you are right it is weird.
I think the result that you did with virtual copy in LR as outlined here gives the best result so far.
This is a gorgeous image and it’s worth going back and forth to process.
I agree with others on the virtual copy process being best. It makes sense: push one copy, pull the other, merge (no worries about alignment or wind in leaves) and then adjust to taste by adding contrast.
I think the thing about HDR that is tricky is that dynamic range is cool, but we still want constrasts, not a flattening of the image, which some HDR tools create, and then a crunchyness (grungy style) to compensate for the broad, low contrast tonality.
For me, I find I can process a properly exposed single image better than any hdr and get the results I want most of the time. The only exception is getting a sun start (like you mention) or having to do more than apply a gradient filter to a sky that is blown (and using two images, one for sky, one for fg).
In Photomatix, I do sometimes select a single element (say the sun star) and use only that from one image. That’s easily done in PS for someone with basic PS skills, but my PS skills are more of a “what the heck do all these icons do?” pre-school level.
Kathy, I’ve been using luminosity masks and Sean Bagshaw’s tutorial for exposure blending in PS since 2013. While it’s more work than an automated routine, controlling the dynamic range and especially the contrast results in high quality, realistic blends. Looking at your three posts, I’d say that the first post was lacking in contrast (especially in the mid-tones) and the sky is too bright. Your second post is notably better in it’s rendition of the sky, the golden leaves and the shadows, although it too feels like it lacks contrast relative to the situation (with strong backlight). The third post is even better, although it’s lacking some of the blue in the lower parts of the sky relative to post #2. If you want, in the future, you can post all three in the original post, then viewers can “arrow” between the larger views, which makes comparisons easier.
I will echo @Kerry_Gordon thoughts. If you purchase TK"s actions, you will get a great easy to follow manual with it. Of course you’ll have to print it out.
@Michael_Lowe Or, @Kathy_Snead, you could go crazy and spend the extra 30 bucks on Sean Bagshaw’s excellent top to bottom video tutorial, which you wouldn’t even have to print out.
Kathy, this is nicely composed. The strong vertical lines of the aspen give the composition a nice rhythm and they are nicely spaced throughout the frame.
A couple of comments - while I am not a big sunstar fan, I do think this would be a great image for it so my recommendation in the future would be to use a smaller aperture in the f/18 - f/22 range.
My second comment is in regard to the processing. I don’t have any experience with HDR software, but I do think the result here is a bit flat here. I would like to see deeper shadows for a more natural appearance. The shadows of the aspen are a great compositional element in this image, but their impact is largely lost.
This one gets my vote is it has much better contrast than the original post. I would still consider going even a bit darker with the shadows. It wouldn’t take too much, but a bit darker would be beneficial I think.
Bryan Thank you for the critique and for the sun star setting. I usually do more birds and flowers so that wasn’t a setting I was aware of. Will remember next time!!
First, that’s a beautiful image! I love the lines of shadow and the carpet of color. I can see why you were drawn to this scene. If didn’t, definitely play with with a smaller aperture to get longer rays on your sun star.
The aberrations you mention are not easy to see at this resolution. Your virtual copy version looks really good to me. I definitely agree with Kerry, and tend to “roll my own” blending in Photoshop.