What am I missing to get sharp images on social media? I keep trying different techniques but seem to come up short. Am I expecting too much?
This is my first attempt at focus stacking. I doubt my abilities and always come away with too many images and make it hard on myself for my limited abilities in PS. I keep seeing the adds for Topaz DeNoise and Sharpen and wonder if it’s worth it?
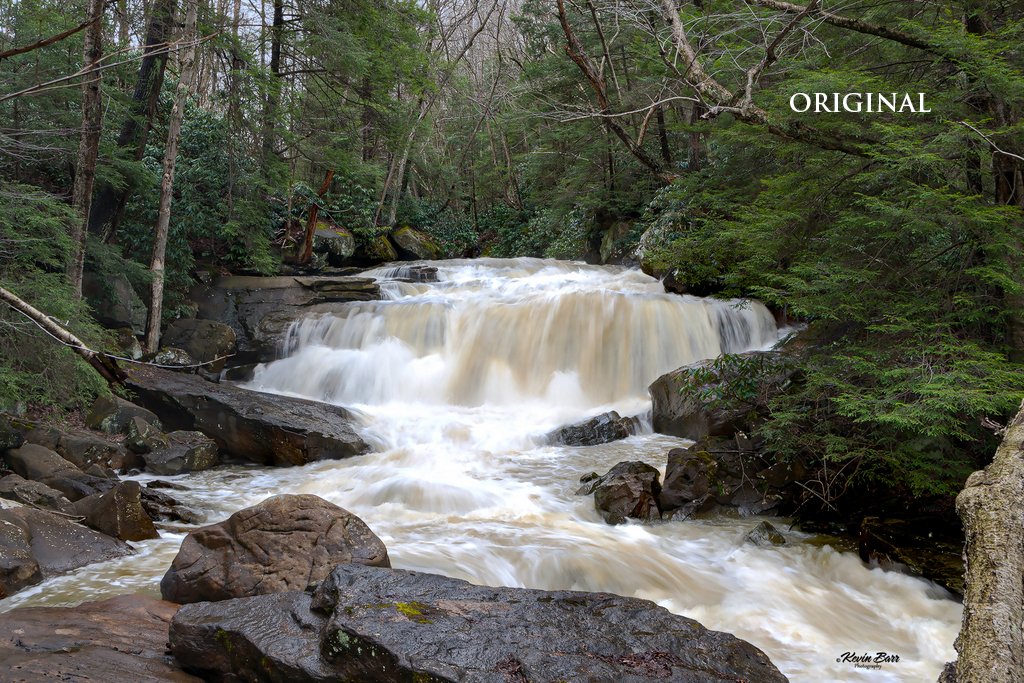
This Photo was exported as a jpg at 85% quality and sharpened in PS. There has been no denoise filters applied.
Nikon D800 1/10 sec at f13 ISO 100, 27mm (17-50mm f2.8) Sigma
Is your image sharp prior to uploading to social media? The reason I ask is because my D810 always produces fuzzy RAW files that need to be sharpened PRIOR to image reduction for the web. I go through a 2 phase sharpening when processing for the web, before and after reduction. The non reduced sharpening I do in ACR Detail module with the image viewed at 100%. For web presentation I use Tony Kuypers application. I don’t know if this helps.
Nice image but I would do something about the rock in the lrc.
The answer is no. I’ve fine tuned my lenses and still have to sharpen in post. My D7200 wasn’t any better. This all combines to create the problem. When I see crystal clear images posted I think there’s no reason I can’t do the same. I end up going too far with sharpening and my images look like a lego puzzle or I get one that I think is good and it is still soft.
Is this a camera issue or a technique problem. After thinking about it I hear more problems from people shooting Nikon. Maybe I just need more practice and settle on a consistent process.
Thanks for the tip on the lrc. I’ve been so caught up in everything else I totally missed it.
A couple comments/questions regarding sharpening, but since you imply your processing abilities are limited, they may help others provide good advice to you.
I assume you shoot raw instead of Jpeg?
If you do shoot raw, then as Igor said, all raw files have some softness, that require capture sharpening in software like Lightroom. In the LR Detail tab, I use as a starting point the settings of
Amt. 40, Radius 0, Detail, 100, Masking 30. I tweak Amt and Masking based on details in the specific image. I also use Lightroom Texture and clarity to add local contrast which also enhances apparent sharpness. And as Igor said, you also need to apply output sharpening when you output to print or web. I also use the same TK Web sharpening action that @Igor_Doncov does.
This may be obvious, but since I don’t know your experience level, do you use in the field techniques to maximize sharpness, like religiously using tripod, cable release, and mirror lockup? If you are using all 3 religiously, that can make a big difference.
Before concluding that your lens in the problem, I would also ask if you could please post the unedited raw file here in this thread, but at a larger size, like 1500 or 1600 pixels on the longest side. This would let us see if the lens is very soft or not. The image size you used above is not big enough to tell for sure.
At ISO 100 on a Nikon D810 you should be getting sharp crisp images using proper field techniques, barring a bad copy of a lens.
Image is shot in raw on a tripod with a corded shutter release. It is not shot with mirror lockup. My tripod is an average aluminum one and not a high end carbon fiber. Is motion the problem?
I have LR, PS and the TK7 panel. I guess I do know my way around a little bit but have tried so many things I’m not sure if I’m going in the right direction. I feel like I spend too much time on focus and lose direction on other editing .
Thanks for your responses. Any guidance is appreciated.
Sounds like field technique is not the issue Lets start by separating possible lens/camera issues from processing. Please post this or any other image shot with that lens/camera combo as an unedited raw file, and size the resulting Jpeg at 1500 or 1600 px, so we can see it larger to evaluate if lens/camera is a problem or not. If not then we can dig into how you process.
Maybe, and its a big theoreticall maybe, you are not shotting with the most sharp settings of your lens. Assuming i got the rigth lens, when go over f/10 or f/11 that lens is very soft.
Do a test and shot the same scene with f/5.6 and f/13 on the same focus point and compare the zone were you focused.
If this is a well known issue with that Sigma lens, then there is another test to do in the future. Rent a similar Nikon lens and shoot a brick wall from a tripod with both the Nikon and Sigma lens with similar settings, at something like f8 or f11. Then compare results.
Welcome Kevin to NPN. I see you’re a Trial Member; I hope you’ll become a full member and join us in the fun.
I’ll get to sharpness in a bit, but first, I think you composition is good here and that’s the hardest part, at least for me! The rest can be learned. I love Topaz DeNoise and pretty much use it on every image. I run it first thing after my RAW conversion. For sharpening I using use NIK Output Sharpener for printing and TK’s Sharpening for Web use, but I usually reduce the strength because DeNoise will also sharpen your image. Many times I will also reduce the sharpening in DeNoise as well because I like to sharpen as a last step according to the size I want. I see where you also have TK’s Luminosity Mask V7. That will make a world of difference for you for the general appearance of your images. Alex Norreiga has some excellent video tutorials on using TK’s Lum. Masks, as does Sean Bagshaw. Alex’s tutorials. I downloaded your image and played with just a bit, concerning myself with the trees more than anything because it looks like everyone else has taken care of the sharpening and lens issues. My playing was quick and dirty, without any real effort, took less than five minutes but I think it made a big difference in overall appearance.
Please keep in mind my changes were done on a small image; they would be much more effective if done on a full size image.
First things first - Welcome to NPN! Great to have you here and you’re starting off with a nice image and an even better discussion. Thank you to those who have chimed in to help.
Honestly, it’s pretty hard to judge sharpness, focus and lens performance with these small images. I will say up front that it sure looks like you did well with the focus stack with good detail front to back. The texture and sharpness in the wet rock up front looks pretty darn good to me. as mentioned though, any softness issues will be more apparent in the original file.
BTW, I like the image. The processing looks good, colors natural and there’s enough texture in the water, yet still has a nice flow to it. The main nitpick as has already been mentioned is the tree limb (rock?) on the lower right. Looks like a crop would take care of that without losing too much. In fact, if you want to keep the format/ratio, you could crop right and top; coming down from the top to eliminate the bigger patch of sky.
Back to the sharpness issue. I go through this exercise with most all my lenses, especially when I pick up a new one.
1, Google and get yourself a resolution chart, print up a few on 8x11 photo paper (assume you have a printer? Just a plain inkjet will work
Mount these to a large 32x40 mat board - or simply tape them to a flat wall out of direct sunlight, but lit well, diffused.
set up camera/tripod such that you’re filling the frame with the res charts. I like to have it where I can test center and edge resolution/sharpness
If you have a zoom lens, start at the wide angle, take an image at each of the apertures. For simplicity sake, might be easier to stick with the standard apertures, ie f/4,5.6, 8, 11, 16, 22… we all know with the electronics there are many others the camera may select, f/6.3 , f/3.5, f/18 etc. etc.
Be consistent though which ones you use throughout the process
walk your tripod back with the next focal length, remember to keep the same frame-filling image in your viewfinder.
I use focusing in live view as you’re focusing right on the sensor and not relying on any sw algorithms …
Cycle through all your focal lengths (for example on a 70-200mm lens maybe use 70mm, 100mm, 150mm and 200mm, for example) with each focal length capturing images at the various apertures.
Then back on the computer, sort and start analyzing. In PS I’ll open all the images for a particular focal length (I open from Bridge where you can sort/filter by focal length for eg.) and then use Window>Arrange>Tile all Vertically(or horiz by choice) Zoom in 50 or whatever percent to give a good look at detail/sharpness. One tip here when you have 8 or more images opened, you zoom in to one image, move around to the point in the image you want to analyze, then use the Window>Arrange>Match all and it will zoom in to the same exact point in ALL the image. Sure beats doing this on each of 8 image panes
Determine some sort of criteria judgement. I could be as simple as, Very best, best, good, fair, poor, unusable. And start evaluating. I enter these ratings in a spreadsheet. You might briefly look through all of them and determine which one is the very best and make that your reference. Because remember, it’s all relative… The “best” results on one lens might not match or come close to the “best” results from another manufacturer’s lens. the exercise here though, will tell you which focal lengths and which apertures are the BEST for THAT lens.
Oh, and I do this for both the center of the image, and the edge. Taking a look at the edge will also reveal problems like chromatic aberrations.
If this sounds time consuming… it is. You could easily spend an afternoon doing this - for just one lens, most especially a zoom lens. Obviously quicker for a fixed focal length.
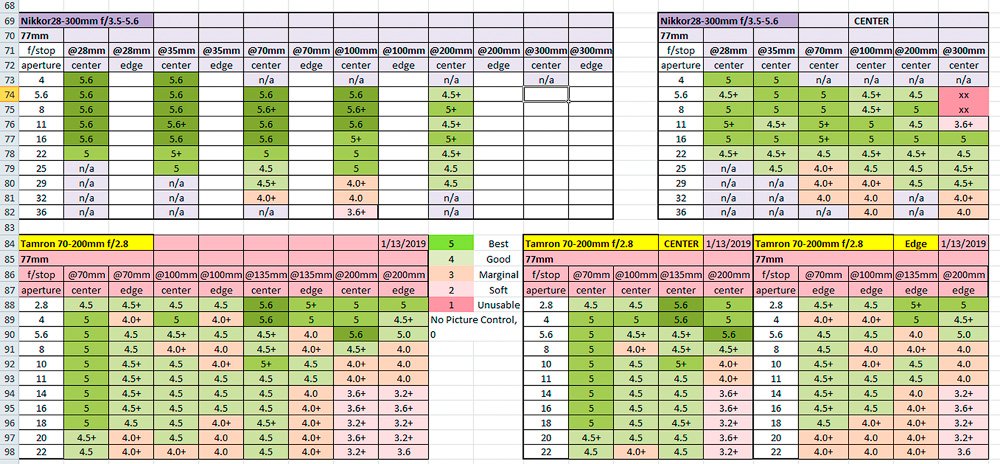
ok, since I went through all the discussion, here’s a screenshot of a spreadsheet that I use. I will print it out and carry it with me and once in a while reference it in the field if I can’t recall which aperture is the sharpest - and which on to never use…
Hope this helps. If anyone would like a copy of the spreadsheet let me know.
Welcome to NPN, Kevin! We hope you will become a full member and enjoy all that NPN has to offer.
You have received a pile of very good responses, all of which I agree with. If you crop out the tree on the right corner, the composition really comes together. Also, there is an old tree trunk laying on the rock on the left that really catches my eye. You might consider cloning it out.
Nice first image, and we hope to see more of your work and participation!
-P
I did some quick testing done and found that a big part of the problem is the aperture setting I’ve been using. My best focus was at f4.5 and f6.3 with this lens. Once I got to f9 it dropped off pretty bad. So if you start at f2.8 it climbed better up to f4.5. f5 and f5.6 dropped off a little then good again at f6.3. From there it’s all down hill. Hope everyone understands my explanation. This has been a great learning experience for me.
I’ve unfortunately got to get back to the real world tomorrow. If you have a copy of your spreadsheet I would love to have it. I have three go to lenses that are going to get some needed attention. LOL who said photography was easy.
Kevin, or anyone wanting the spreadsheet. Looks like you’ll have to send me a PM/email within NPN. But since we can’t exchange/send anything by image files, you’ll have to include your personal email and I’ll send it to you directly.
I don’t have ftp or anything like that on my Smugmug site either. Short of creating a dropbox link…
So happy to send to anyone reading this. Actually just send to lon dot overacker @ gmail… I think y’all can interpret that. Not sure what I’m worried about… this is a private forum, right?
Kevin, I will try to remember what I did. Normally, I name each layer but since I was just playing and going quickly I didn’t label anything in this case.
I believe I started by opening a dodge layer, using just the green channel, and attached a Lights 4 mask on it and then just dodging the trees and rocks. Then I did the same but with a Lights 3 mask. I don’t remember if I did a Lights 2 dodge on a separate layer or not, but probably not.
For the rocks and deep shadows I opened a dodge layer and applied a Darks 5 mask and dodged the rocks and other blocked areas. That did VERY little as usual, but then I did the same but with garks 4, and another with darks 3. I’m sure I also adjusted the opacity on these layers as needed, but I don’t remember which layers or by how much I adjusted.
That’s about all I can remember. I may have burned something but don’t remember. Sean Bagshaw’s videos are great, but honestly, I prefer Alex’s simply because they’re shorter and easier to understand (at least for me).
Bill that makes sense to me. Definitely a process I need to spend more time with. When you see an example on one of your own images it’s a real eye opener.
You have all been great. I’ve probably learned more useful information in one day being here than I have in a year. I have the tools to succeed and I see that now. Give me a couple days to get my lenses sorted out and I will keep posting updates. I’ll be watching Alex’s videos tonight.

 I’ve fine tuned my lenses and still have to sharpen in post. My D7200 wasn’t any better. This all combines to create the problem. When I see crystal clear images posted I think there’s no reason I can’t do the same. I end up going too far with sharpening and my images look like a lego puzzle or I get one that I think is good and it is still soft.