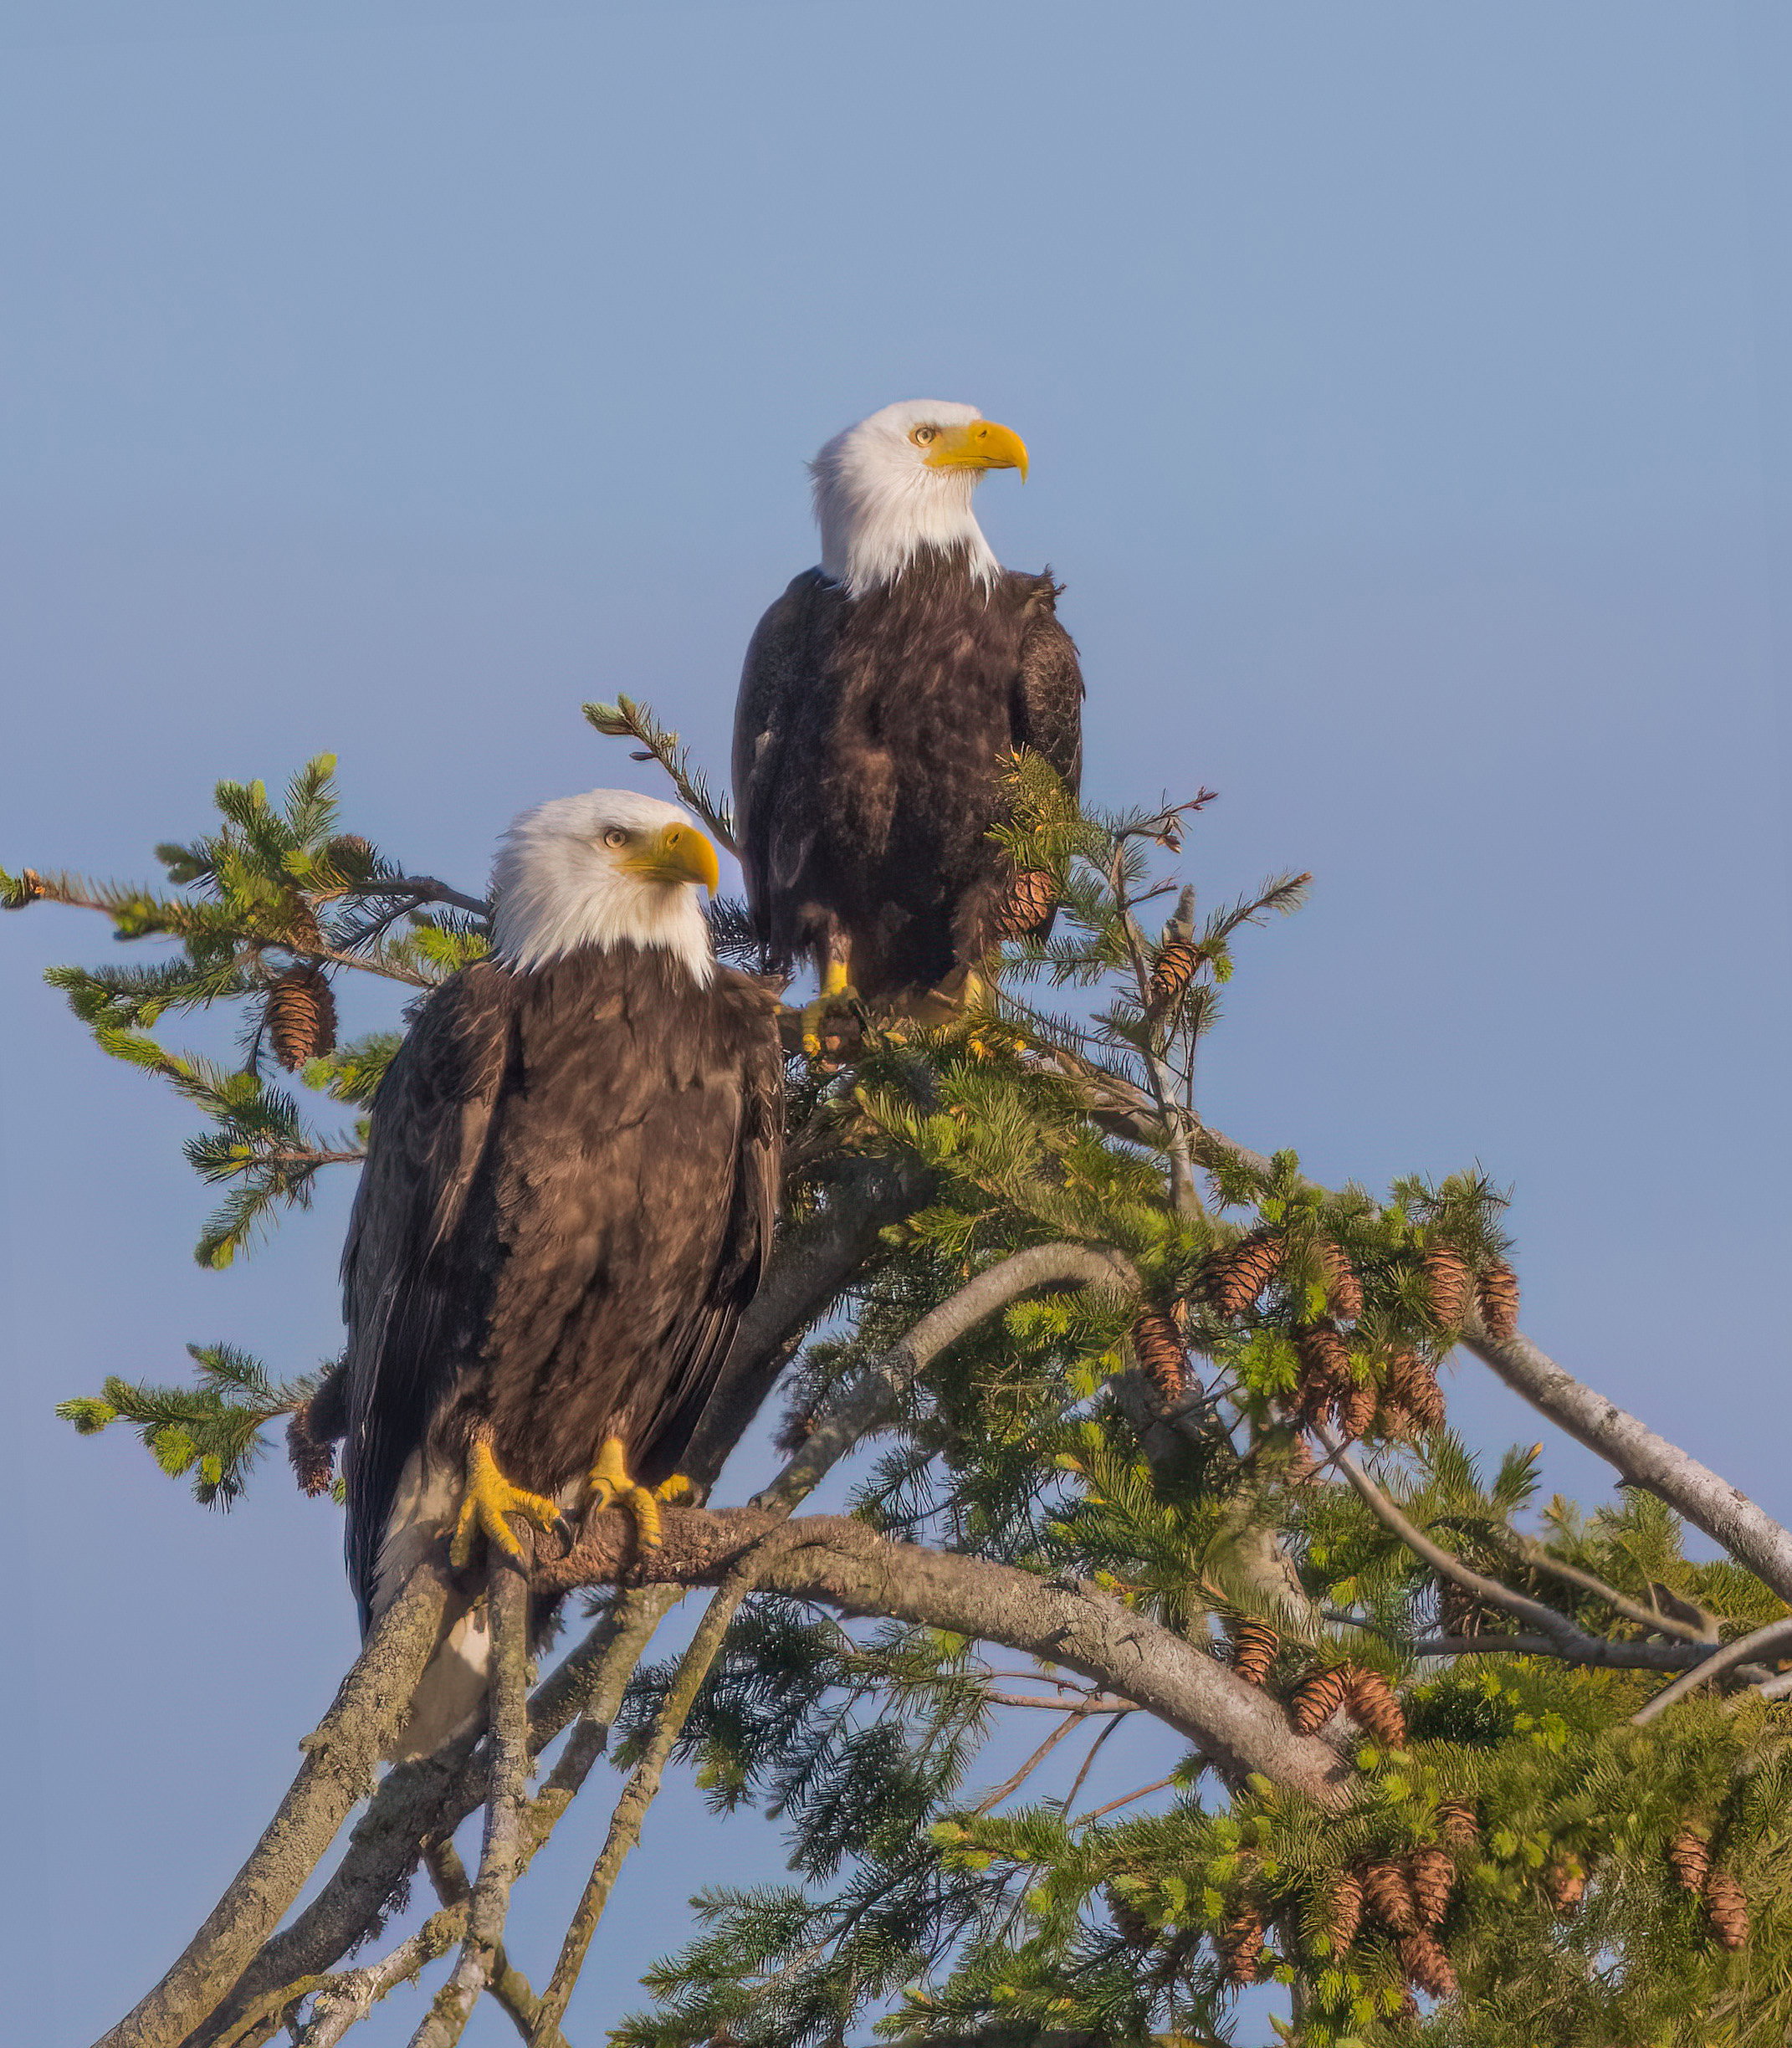
The Happy Couple

My Edit

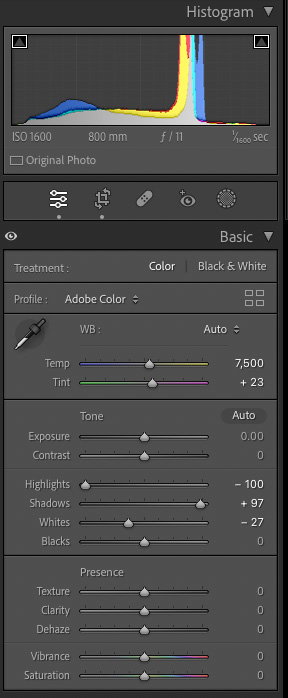
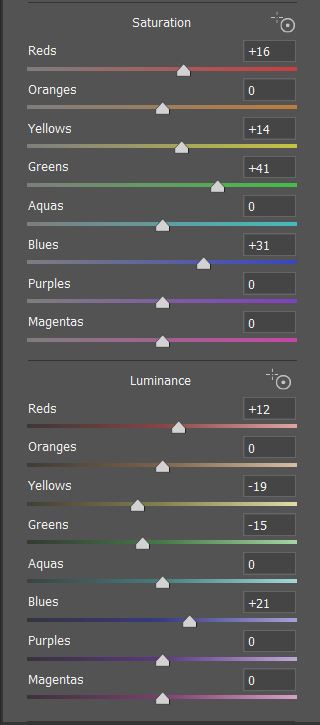
I’ve attempted to upload the .xmp file, but was unable to do so. LR changes I made, other than lens correction are as shown here:

Raw File

The Happy Couple.ARW (30.5 MB)

You may only download this file to demonstrate how you would process the image. The file is Copyright of the photographer, and you must delete the raw file when you are done. Please post a jpg of what you created, explain what you did, and why you did it.

HI Peg,

Sorry for the delay today, we had an unexpected situation, a fellow on a motorcycle broke down right in front of our house so I done my best to help him out, we got it going again but it took some time.

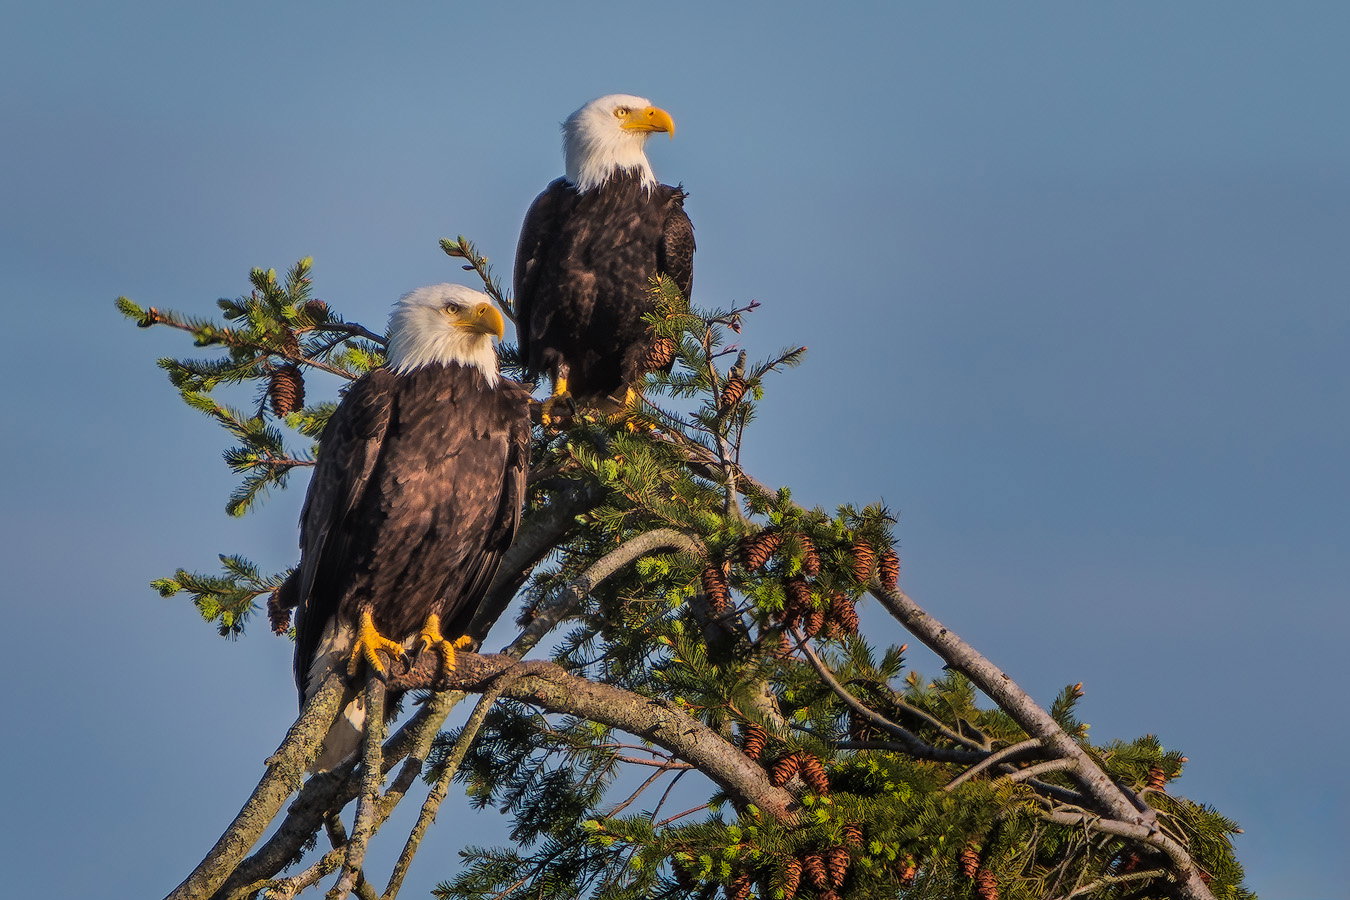
Anyway, I managed to finish the Happy Couple image the best I could. After working with it more, it didn’t seem to have a lot of detail. Not sure why but there are spots in the middle of an in focus part that is blurry, that’s strange, it might be the resolution from the cropping we discussed earlier but I’m just not sure.
I like to end up with a minimum of 4000 pixels on the shortest side even with heavily cropped images but this one ended up 2448 (with a looser crop).

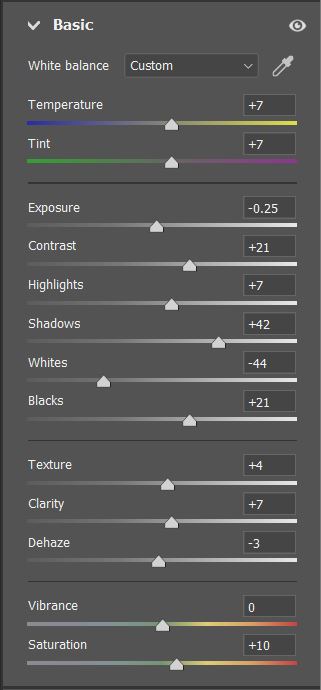
I added some warming using white balance in ACR but I didn’t go as far with it as I did yesterday in your original posted image.

The eye on the male (the small eagle on the right) was distorted looking for some reason, maybe the noise reduction had something to do with it?, so I copied the eye from the female, reshaped it a bit and pasted it over the male’s eye. BTW, I used the bare minimum in DeNoise AI.

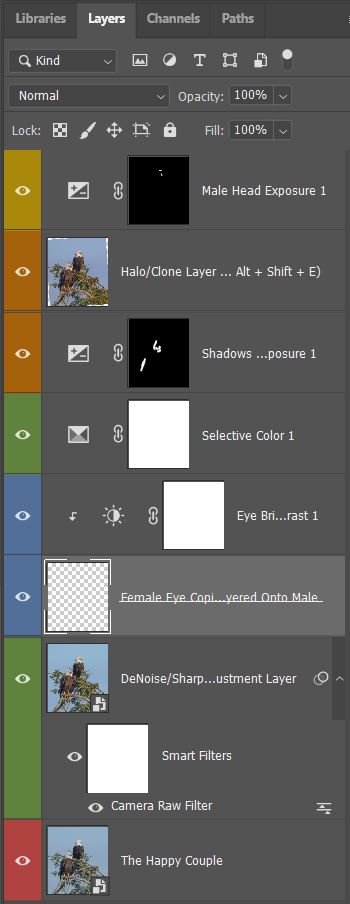
I made some adjustments with the layers shown in the adjustment layers image below, then I created a layer that combines all layers using Ctrl + Alt + Shift + E, then used that layer to remove the halos using a clone tool with a small brush. (You need to have the top layer selected before creating the combined layer).
Keep in mind that the amount of adjustments needed in the final Tiff copy after noise reduction and sharpening all depends on the level of shadows, blacks, highlights and contrast adjusted ‘before’ the image was converted to a Tiff.

See what you think about the new edit. Maybe you’re getting close to the same image quality as I am, if so, I’m not sure I have an answer but I am fairly convinced that you probably should be raising the shadows and blacks, then lowering the highlights and contrast in Lr or ACR before converting to Tiff and doing the noise reduction and sharpening.

Let me know what you think of this edit, then we can take it from there.

Maybe someone else can chime in, too? :slight_smile:

Was that a Harley, or a Honda? Hubby says if the first, it could REALLY take some time… :rofl:

Aside from that, I downloaded your Lr edits and it looks like you increased, rather than decreased the contrast before you took the image into PS, correct? Yes, decreasing the contrast wiped out my detail/sharpness pretty much, but again, it looks like you increased the contrast slider. Regardless, I’ll create a virtual copy and follow your example to determine which is best. The eye on the male has a shadow on it, so the sw very well could have determined it to be an edge and clarified it. And thanks for the keystroke info for combining the layers. I’m really liking Laura Emerson’s Dave Kelly’s YouTube approach for removing halos (see her post) but I thank you for including instructions on yours as well. Aside from that, I’ll attempt to use your guideline of 4000 pixels on the short side and/or use Topaz Gigapixel before I use my much beloved crop tool.

Again, thank you for your time and your exceptional kindness!

I have no clue what make or model it was, it looked like it had been pieced together with whatever would fit, along with a few parts that were made to fit with a hammer (if don’t fit-force it - kind of parts) - Lol
I sort of know my way around motorcycles, I have a 1980 FLT Harley that I restored a few years ago but I didn’t want to show it the owner of the mystery bike :roll_eyes:

Actually, no, I reduced the contrast in this one mostly because the whites were really bright and the shadows were really dark, the dynamic range was pretty close to the limits.
Sometimes I don’t have to decrease the contrast if the whites and blacks aren’t too close to clipping.

I think I will try it again with slightly increased contrast just to see what the results would be, it may be worth a try. :slight_smile:

Just an FYI for everyone, I changed our settings to allow uploading of .xmp files now. Thanks for pointing this out Peg!

2 Likes

Just kidding on the motorcycle, but regardless, I tried your settings with the RAW and got favorable results especially when viewing the .tiff in Lr because the blacks weren’t clipped as they were on mine (they weren’t clipped when I initially opened the RAW with Ps though. So I’ll look at all my Ps steps and see where I went wrong in that respect. With that said, I do prefer lighter feathers on the body of the birds (more similar to mine initial post) but yours are more true to life…so I plan to compromise and lighten them a little, but not be as aggressive as I was before.

Thanks for having the stamina to tackle this AGAIN, you’re a Prince!

Hi Peg,

I tried processing this again but this time with the contrast just a bit higher than ‘as shot’ but even with shadows raised I couldn’t get the shadows and blacks to come up after converting to a Tiff file (at least not as much as I would have liked and without having to raise shadows all the way).
It did help a bit with sharpening but not much.

I done some research on the A1 and I read a few of comments that the DRO function (in the Auto mode) will produce/record shadows darker than normal in the ARW file. I’m not sure if you had DRO “On” for this shot but the feathers do look very dark to me before any initial adjustments, it seems like they would have been at least a little lighter in the ARW file with nearly 14 stops of DR and with the eagles in sunlight, especially with the whites being so close to clipping as they are (according to the histogram in ACR, the whites are less than 1 stop shy of clipping).
Some people use DRO with video in the A1 for the same reason as I understand it.
It might be worth trying a few shots with DRO turned off. Just a thought.

Also, I’m still trying to figure out why some parts of the pine needles are OOF while others are fairly sharp, I see where the feathers appear to be sideways and wispy looking as well, was it windy at the time this shot was taken? If so, that might explain it, even with the shutter speed at 1/1600s, the effective 800mm focal length adds to the issue in my mind, maybe a faster shutter speed would have solved it?
Maybe 1/2000s or more?

I’m just trying to study this and think of things that might help you out for future shots. :slight_smile:

Hi Merv, and for the research you put into this, as well as your input on how to improve my image. Your feedback has been very helpful!

I just checked my copy of The Friedman Archives Guide to Sony’s Alpha 1, and learned that DRO is really only effective in JPGs and not when shooting RAW, but that if enabled when shooting RAW, the image on the back of the camera will reflect DRO enhancements, as will the histogram, but the RAW will not include them…so I was trusting my histogram for exposure, and thinking I’d be getting more DRO in the RAW when that’s not the case…apparently, I need to spend more time with the manual and Friedman’s book. And yes, I’ll have DRO turned OFF in the future.

Yes, it was a windy day and prior to shooting the image, I wasn’t shooting with the TC, and didn’t ramp up my SS after attaching it. I typically start at 1/2500 with it on and while shooting birds.

I think it’s time I suck it up and accept what I have with this image and to realize that no amount of wizardry is going to make it any better than where it is now. The whole experience has truly opened my eyes to what I need to do going forward though…

Hmmm…my apologies for the misinformation/mix up, I didn’t do a good job at that at all! I got my signals crossed there. I allow myself one senior moment a month so I just met my quota for the month of June–LOL :laughing:

Let me see if I can get it right this time.
Yes, DRO only effects the jpeg, and yes, it does effect the histogram, the histogram might reflect a higher or lower exposure level than what is being applied to the RAW file.
DRO comes enabled by default and I remember reading up on it as well as seeing the differences for myself so I turned it off and haven’t looked back.
I have Creative Style set to Neutral as well, I’m not suggesting that you should set yours like mine but I am suggesting that you should set the jpeg colors, contrast and saturation to match your RAW files as close as possible.

What I meant to write about was Gamma, this is the one thing that does effect the RAW files, gamma settings can be found in the Pictures Profiles menu (it should be under the Color/WB/Image Processing heading on the A1 as well).
There is a YouTube video where the creator (Gerald) proves that gamma does effect the RAW file.
I tried the Movie profile with my A7RIV and it does produce darker shadows and brighter highlights than normal so I turned Picture Profiles off so the jpegs closely match the RAW files, the jpegs are still a little bit punchier than the RAW files but they are close enough for my purposes.

Here’s the link to the video I just referred to: Link>>>YES, Sony Picture Profiles DO Change Raw Photos!

Can you forgive me for not providing the information I meant to provide?? (Picture an old guy mumbling under his breathe here) - “I don’t know how I got that one mixed up!!” :thinking:

No worries on the mix up, Merv. There’s not even time in the day to learn it all, find great subjects, shoot, process, publish, and do laundry! :slight_smile:

Just looking at the video now and previewing some of his others. And yes, I forgive you, I forgive you! :rofl:

I have Creative Style set to Neutral as well, I’m not suggesting that you should set yours like mine but I am suggesting that you should set the jpeg colors, contrast and saturation to match your RAW files as close as possible.

Gamma > Color/WB/Image Processing

| Mervin Rosenquist Merv Regular
June 11 |

  • | - |

Peg:

I just checked my copy of The Friedman Archives Guide to Sony’s Alpha 1, and learned that DRO is really only effective in JPGs and not when shooting RAW, but that if enabled when shooting RAW, the image on the back of the camera will reflect DRO enhancements, as will the histogram, but the RAW will not include them…so I was trusting my histogram for exposure, and thinking I’d be getting more DRO in the RAW when that’s not the case

Hmmm…my apologies for the misinformation/mix up, I didn’t do a good job at that at all! I got my signals crossed there. I allow myself one senior moment a month so I just met my quota for the month of June–LOL :laughing:

Let me see if I can get it right this time.
Yes, DRO only effects the jpeg, and yes, it does effect the histogram, the histogram might reflect a higher or lower exposure level than what is being applied to the RAW file.
DRO comes enabled by default and I remember reading up on it as well as seeing the differences for myself so I turned it off and haven’t looked back.
I have Creative Style set to Neutral as well, I’m not suggesting that you should set yours like mine but I am suggesting that you should set the jpeg colors, contrast and saturation to match your RAW files as close as possible.

What I meant to write about was Gamma, this is the one thing that does effect the RAW files, gamma settings can be found in the Pictures Profiles menu (it should be under the Color/WB/Image Processing heading on the A1 as well).
There is a YouTube video where the creator (Gerald) proves that gamma does effect the RAW file.
I tried the Movie profile with my A7RIV and it does produce darker shadows and brighter highlights than normal so I turned Picture Profiles off so the jpegs closely match the RAW files, the jpegs are still a little bit punchier than the RAW files but they are close enough for my purposes.

Here’s the link to the video I just referred to: Link>>>Can you forgive me for not providing the information I meant to provide?? (Picture an old guy mumbling under his breathe here) - “I don’t know how I got that one mixed up!!” :thinking:

[
maxresdefault.jpeg

YES, Sony Picture Profiles DO Change Raw Photos!
click.pstmrk.it

](https://click.pstmrk.it/3s/www.youtube.com%2Fwatch%3Fv%3D9GGDkf4wMWg%26t%3D337s%26ab_channel%3DGeraldUndone/thlV/TOStAQ/AQ/dc676154-14ec-43a3-8e40-d312b941cfd4/4/2fu9iMTSIA)


Visit Topic or reply to this email to respond.

To unsubscribe from these emails, click here.

Peg Hanson
jpegprofiles@comcast.net

1 Like

Hi Peg, here is my edit of your image. Looking now at yours and Merv’s, I see that I went with a different crop than the two of you.

Here’s what I did:

  1. First in Lightroom I made my initial basic exposure edits as well as the crop. I also applied some sharpening and noise reduction but I don’t think that’s visible in this web sized image.
  2. Next in Photoshop, I used the “Neutralize Color Cast” action in the TK8 panel to further work the colours in the image.
  3. Then, using a luminosity mask and a Levels adjustment I slightly darkened the whites on the eagles head’s.
  4. I then applied the “Make-it-glow” action, again from the TK8 panel to further play with the colours.
  5. Then the “Darks Triple Play” action once again from the TK8 panel to bring out some details in the dark feathers.
  6. I then added a warm “Photo Filter”.
  7. And then a vignette.
  8. Then a “Selective Color” layer to tweak the greens of the needles.
  9. Next I dodged the dark feathers on the birds to make them a bit brighter.
  10. And finally I cloned out a bit of the tree in the very right bottom of the frame to improve the balance between the left and right sides of the image.

2 Likes

Thanks so much, Tom, I appreciate you taking on the challenge. Since I’m unfamiliar with the TK8 panel plugin, I can’t replicate the steps you took completely, but may be able to accomplish the same without it and will try it. Steps 6-10 I especially like.

First off, I like the crop since the leading line of the tree branch is a direct line to eagles, but I think my initial crop has more impact. And, although I really like what you did with the feathers, the entire image is quite a bit darker and almost appears to be a sunset shot, at least on my monitor. That’s okay, but I think it also lessens the impact a bit.

So aside from what I mentioned, again, thank you much. I’m thrilled that I’m already learning so much from this group!

1 Like