I did not know what to expect from my first successful Canon R5 focus stacking image. Watching this emerge and then manipulating it as it sings quietly a bit to me. Fun stuff. Still need to figure out how to optimize step size, but I intend to enjoy the ride. Really glad I loaded up my PC with memory last week.
Specific Feedback Requested
Any and all. Pretty new to macro.
Technical Details
Is this a composite: Yes
Canon R5 100mm f2.8 with all my extenders, for a working distance of about 3-4 inches. f/8 AV 1/10 ISO 2000 ( will try with lower tomorrow, as I might get more subtlety in colors.) 52 captures
Helicon Focus, Topaz Sharpen AI.
Ah, nice focus stack, Dick. They’re so fun to play with. I really like your composition here. The pistols are nice and sharp and the overall image is terrific. I’m not sure of the color balance, you’d know better than me, but to my eye it could use a bit of cooling down, to get the petals a bit more white. Again, that’s purely an artist’s choice.
There are also just a few blemishes on the petals that, if it were mine, I would clone or heal out. The composition is so nice that the little extra work would make it truly shine. Just my opinion.
What a great subject. I couldn’t help but have a go because it seemed like it needed some life breathed into it. I know monitors and optical brain centers have their own biases, but this is what I’ve done -
Keep doing these! The steps between shots will take some trial and error since it’s subject and lens dependent. In my experience, if you want to keep everything in focus, use the sweet spot of the lens (which you probably did here) and up the steps to about 5 or 6. There should be good overlap.
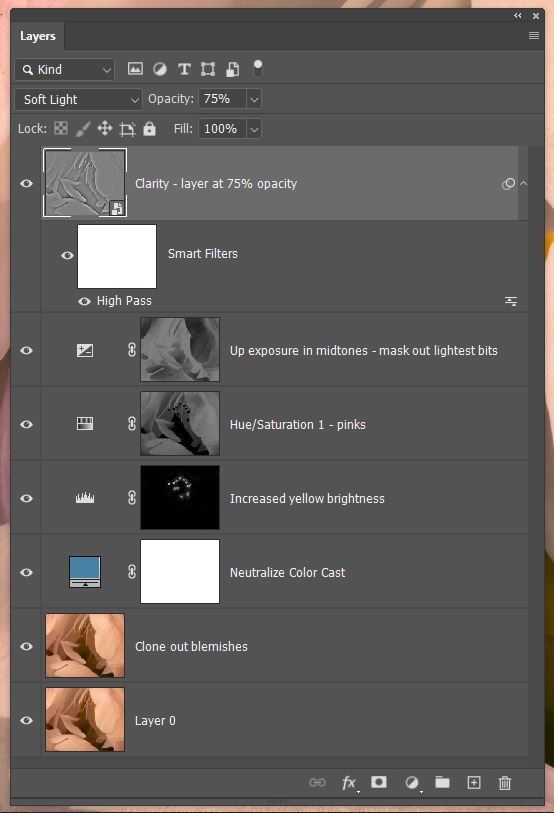
Your changes were terrific. The crop is very effective. Can you tell me what approach you use to create your Clarity layer? I have one approach, but the high pass filter did not do what I hoped. I made changes similar to yours, and I like the result a lot.
Glad you liked it, Dick. I use the TK8 panel to create the effect. I think the default pixel range is 10 and I play with that depending on what I’m looking for. Here I think I had it in the mid 20s. Then I play with the opacity on the layer. Because the TK panel creates a Smart Object layer, I can go back and mess with the high-pass filter itself if needed. I could have used an edge mask here, too, but I forgot until right this moment. That would have added sharpness to the edges only, protecting the rest of the petals.
For whatever reason, I had not found the TK8 Clarity button. But I like it, as it tended to leave the interior of the petals unaffected, which was great.
I had tried theTK8 Find Edges, but could not get it to leave the petal interiors masked out.
I like the upsidedown-ness of the composition. That definitely adds interest. The focus blend looks good except for a couple of anthers on the right that are blurry. I know edges pose issues with this, sot there’s not always a good solution, but you might check your exposures and see if you have a better focus on one and could paint these back.
Thanks, @Tony_Kuyper Tony for the idea. No good exposures for the distractingly blurry anther, but if all else fails, try cloning. Not great art, but the resulting blur is not such an eye-puller. Also used a couple of layers of your Make-it-Glow to bring it more to life, as @Kris_Smith suggested. Her tighter crop helps, plenty.
See re-post