I have this one very grand view with lot of haze/atmosphere elements, that I would really like to like but I can’t really get edit out of it that I’m happy.
I have edited it few times, and I would like to embrace the layers and haze but then I always end up trying to create more contrast and remove it.
You may only download this file to demonstrate how you would process the image. The file is Copyright of the photographer, and you must delete the raw file when you are done. Please post a jpg of what you created, explain what you did, and why you did it.
My Edit
Here’s a edit that I did this morning, and also tried as B&W so sharing both.
Hi Kasperi,
Here is my attempt, It has been a while since I have worked on any landscape images so this might be a bit weak, I try to be subtle with my editing but maybe it is too flat and boring. I dunno
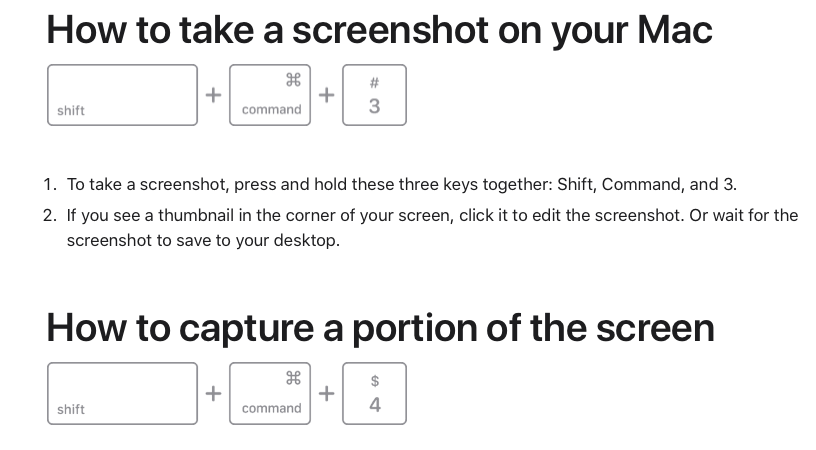
I don’t know how to share a screen shot of the steps I took, can someone please tell me?
First step I did was warm the light on the mountains and some of the clouds.
I did some dodging on the rights side to enhance the light coming from that direction. Darkened the top of the image slightly. Added a little saturation to the light in the mountains.
A bit of work because of the strong haze and the dark foreground. I did quite a lot with ACR and the rest with Nik Color efex for contrasts and detail adjustment. Maybe we could add some warmth to the clouds.
Thanks Bill, Glenn and Jorma for taking a time to process my image. I like each of them, Bill’s and Jorma’s being a closer to what I did and Glenn’s is more preserving the hazy feel that I like. And as the image being as hazy as it is I think I need one more processing and try embrace that, maybe warm it up but make it like dreamy or so. I’ll post here if I do that in near future.
@Glenn_Tunaley if you are using Windows, there’s app called Snipping tool that’s handy for taking a screenshot from area of your choice. And you can just copy paste (ctrl+c, ctrl+v) the image from the tool to these posts, no need to save it between. There’s likely a simular app/feature on MacOS but do not know that top my head.
I can absolutely relate to an almost uncontrollable desire to add contrast to images like this and, it can be difficult to refrain from adding more color in the process.
When I first opened the RAW file I was a little struck by the amount of brightness, I’m wondering if you happened to capture one with a lower exposure value, maybe by 1 or 2 stops?
Original image with reduced file size and resolution:
I’m not sure how many stops of dynamic range your camera is capable of but I recommend shooting at a slightly lower EV because it’s easier to recover details in the darks than it is to recover clipped highlights, the highlights were clipped in a coupled areas of the clouds in this image but not so much that I couldn’t cover them up with a levels adjustment layer mask.
Actually, I recommend to either take a series of images with automatic exposure bracketing at about .3 steps of EV or, use a graduated neutral density filter with the darker portion on the sky, Graduated ND filters are a common tool for landscape photography and you may already have some in you bag of tools but there it is anyway just in case.
The other thing that struck me was the orientation of the clouds, they seem to be oriented in an unnatural way so I rotated the image counterclockwise by a few degrees just to make them appear more natural in terms of being level and what we would expect to see in person.
The lakes and other bodies of water in the middle of the image shouldn’t dictate the rotational orientation of the image because those bodies of water are situated at a fairly large angle in relation to your shooting perspective. I hope that makes sense.
Here’s what I came up with, it may not be to your liking but it’s the best I could come up with based on your concerns.
It’s common and natural to see areas in the FG fairly clear and somewhat contrasty so I used a couple linear gradient layers with exposure and curves adjustment layers to simulate using a Graduated ND filter in the field.
I also lowered the blue hue or color cast by using various adjustment layers to target individual colors and textures, one of my favorite tools for that in Ps is the Selective Color adjustment layer mask.
The image still has some nice blue hues in the distant mountains but the FG and MG areas are more towards the yellow, red color range.
The colors in my opinion need to be warm enough to be inviting, yet cold enough to convey the true temperature of the scene (hope that makes sense to more than just me).
Cameras have a way of reducing or flattening the depth of a scene so we usually have get creative with post processing to restore the depth to a degree.
Really nice Grand Vista/Landscape, BTW!
If you like how this came out I can upload the Ps PSD file so you can see and interact with the layers I used.
Just quick reply (I’ll review the full answer later with more time ) I do have 3 photo exposure bracket series from this, and this was the brightest of them. To be honest, I’m not sure why I chose to work this one from the series. Also my LR is not giving my any highlight clip warning but when playing with exposure slider it indeed looks some of the areas are clipped.
Here’s the middle exposure if you are interested. 20190526-_DSC7258.NEF (25.5 MB)
ghtest of the series
Yes, this version looks like a much easier version to work with.
The original version wasn’t technically clipped but there were a couple of spots in the clouds that were just under 255… maybe 250 or so?
Anyway, with this version I can see that you were prepared with the right tools at hand at the time of capture!
The hard part about this image was finding any embedded colors like red, orange, yellow, green and cyan. There were only minor areas of red and orange while there were no areas of yellow, green or cyan.
However, I could add a few of those colors in selected areas by using one or more Selective Color adjustment layer masks.
I would edit this version as well but I have a feeling it would come out really close the first one I edited.
Mervin, first of all thanks for the both replies and the edit of the image, I like it! It kinda sits between my original edit and Glenn’s version, and it captures well my concerns and goals.
Now that you mentioned the orientation of the clouds, I can’t get over it how much they are leaning. And I agree it looks much better when rotating according to them, thanks!
And yes there’s very little other colors than blue, which definitely gives me a hard time. I would like to reduce the blue but the I tend to go somewhat reduced saturation and little cyan tint or so.
Here’s a edit I did from the middle exposure, and I ended up with pretty similar, little less blue, result without trying to specifically copy the look.
So glad that I could provide a little insight on this image, it is certainly worthy of the time it takes to process it in a way that retains some of the original atmosphere while adding depth and overall visual appeal.
I like the results but most important is how you like the results!
I hope to make it back up that way someday, it’s been a few years for me.