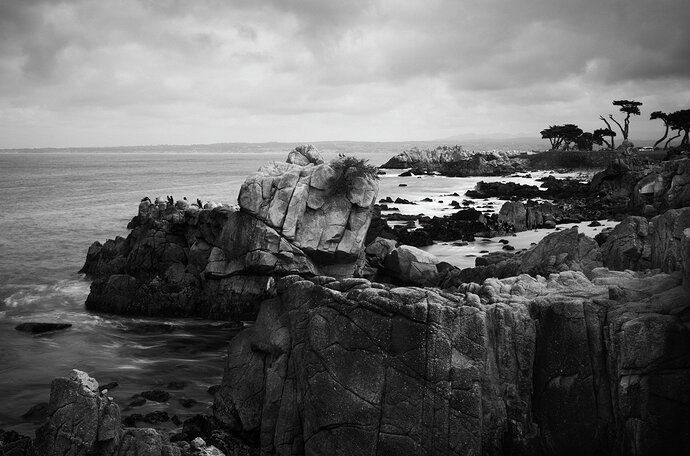
Monterey Coast

I really like this new challenge. I thought it would be fun to upload a raw file from my Leica M10 Monochrom as I’m willing to bet that a lot of people have never worked with them before. There is zero color information so you won’t be able to use the HSL BW sliders in LR or PS. However, you will find an incredible amount of detail in the shadows.

Have fun and I can’t wait to see everyone’s creative choices.

Raw File

You may only download this to demonstrate how you would process the image. The file is Copyright of the photographer, you must delete the raw file when you are done.
monterey-coast-mullin.DNG (47 MB)

My Edit (click to see)

You may download this raw file to show how you would process the image. Please post a jpg of what you created, along with an explanation of what you did and why you did it.

When you are done, you must delete the original raw file. The original photographer maintains the Copyright on this image and may not be used for any other purposes.

Ok, here goes… a true challenge because #1, as close as I’ve ever been to a Leica… ha ha - but for sure first time seeing or attempting to process a RAW file like this. So yeah, my normal tools not available and so had to resort to some basic tools; Levels, burn/dodge and some adjusts in ACR.

But first, I wanted to do this challenge because I have a personal connection here. Unlike David B’s Bandon sea stack where I don’t have an emotional tie, here this has meaning which may guide me in my processing. Both my parents are scattered in Monterey Bay just off Lover’s Pt, which is featured in the background here. Plus, I was just at this spot a month ago, right after the first big storm that hit CA last month.

So anyway, here it goes. My general approach is to first settle on format/cropping and taking care of any major repairs, cloning, sensor dust, all the basics. I cropped off the bottom mainly because the one rock formation bottom left pulled my eye and took away from the bigger, beautiful and rugged coast line. Minor clones - taking away the white car, and a bit of the sea wall on the right edge (didn’t want to crop it out.) And a slight crop from the top to give this more of a pano presentation.

Next, brought in to ACR for some basic adjustments, contrast, highlights/whites/shadows and bumped dehaze and clarity a little bit. As you pointed out, couldn’t do anything with HSL or any color adjustments.

Next used TK’s Darks Triple Play (thanks Bonnie for the idea!) to lift some of the shadow areas.

As a result of the ACR and TK TP adjustments, the contrast in the sky started looking nice. I think opened a general Levels layer, dropped the midtones, brought back some contrast and got the water/rocks looking decent - but then I painted out, masked out the changes to not affect the clouds.

Added a Brightness/Contrast layer to boost contrast a bit more in the clouds, then used a gradient mask to mask changes to the bottom.

Next some targeted adjustments using simply burn and dodge. I dodged/brightened several of the lighter rock formations, Including the distant rocks of Lover’s Pt, all to bring more attention to the rugged formations. Burned down one brighter area in the lower right. Oh, also dodged the water movement in the LL

Lastly I added a vignette. A little unsure about this because the image had quite natural and strong vignetting already from the clouds and the way the bottom of the frame was - Adding more vignetting - again, not sure. More of a personal choice but almost gives this a “window to the world” kinda look and feel.

To be perfectly honest, I’m connected to this place more emotionally when I see all the colors. However, in the vein of all the great B&W photographers, there ain’t too many landscape subjects that do better in B&W than this area of the CA coast.

Here’s my version, plus screenshot of the PS layers.
1 Like

@David_Mullin , first off thanks for sharing the raw file with us. Like Lon, this is the closest I’ve ever come to a Leica of any type. :slight_smile:

I first brought this into Lightroom where I tweaked the highlights and shadows. I guess I could have used Adobe ACR but I’m just used to doing it that way…

Then on to Photoshop where I:

  1. First cloned out a few distractions - the white car in the parking lot, a bright rock on the very right edge, etc.
  2. Next I increased the contrast in the midtones with a curves layer and a midtones mask
  3. Then some LIGHTS Triple Play and DARKS Triple Play - I use these often and I was surprised to learn that other people use it too.
  4. Then Nik Viveza - a plugin I use often as well. Here I used it to selectively ad contrast and dodging and burning
  5. Then a curves layer for some more global contrast
  6. A vignette… a must for every image :slight_smile:
  7. And finally a levels adjustment to darken the sky because it still looked a bit too bright.

1 Like

I’m glad I provided an image that meant something to you @Lon_Overacker. Your rendition looks fantastic! I am sometimes lazy when it comes to masking out distracting bits so this is a good reminder. Thank you for sharing your processing technique.

Looks great, @Tom_Nevesely! I’ve never used Triple Play and I have the Nik collection but I’ve never used Viveza either, so thank you for introducing those tools. Thanks so much for sharing your processing technques.

1 Like

David, thanks for sharing the Leica B&W raw file. Makes me want to revisit my decision not to get the Q2… :slightly_smiling_face:

My processing is a bit more subtle. Taken into Capture One and did some minor contrast and lightness adjustment, Then I added a top gradient for the sky and a bottom gradient for the foreground. Then brushed in a little detail in the water at the lower left.

Thanks again for playing, David.

2 Likes

I think this looks great, @David_Bostock! I really like the subtleness of your processing on this image. Thanks for sharing.

New member here… couldn’t resist looking at a Leica monochrome. did only simple curving, a multiply, shadow/highlight…

recipe

1 Like