Angry Ocean Rescue Challenge!

This is quite literally a rescue effort and not simply a processing challenge - although this one will be challenging! I’m not sure if there will be any takers. I have probably done more “manipulaion” with this image, more than perhaps any I’ve ever worked on. I did so not in an effort to create something that didn’t happen or wasn’t there, but to represent what I experienced at that moment.

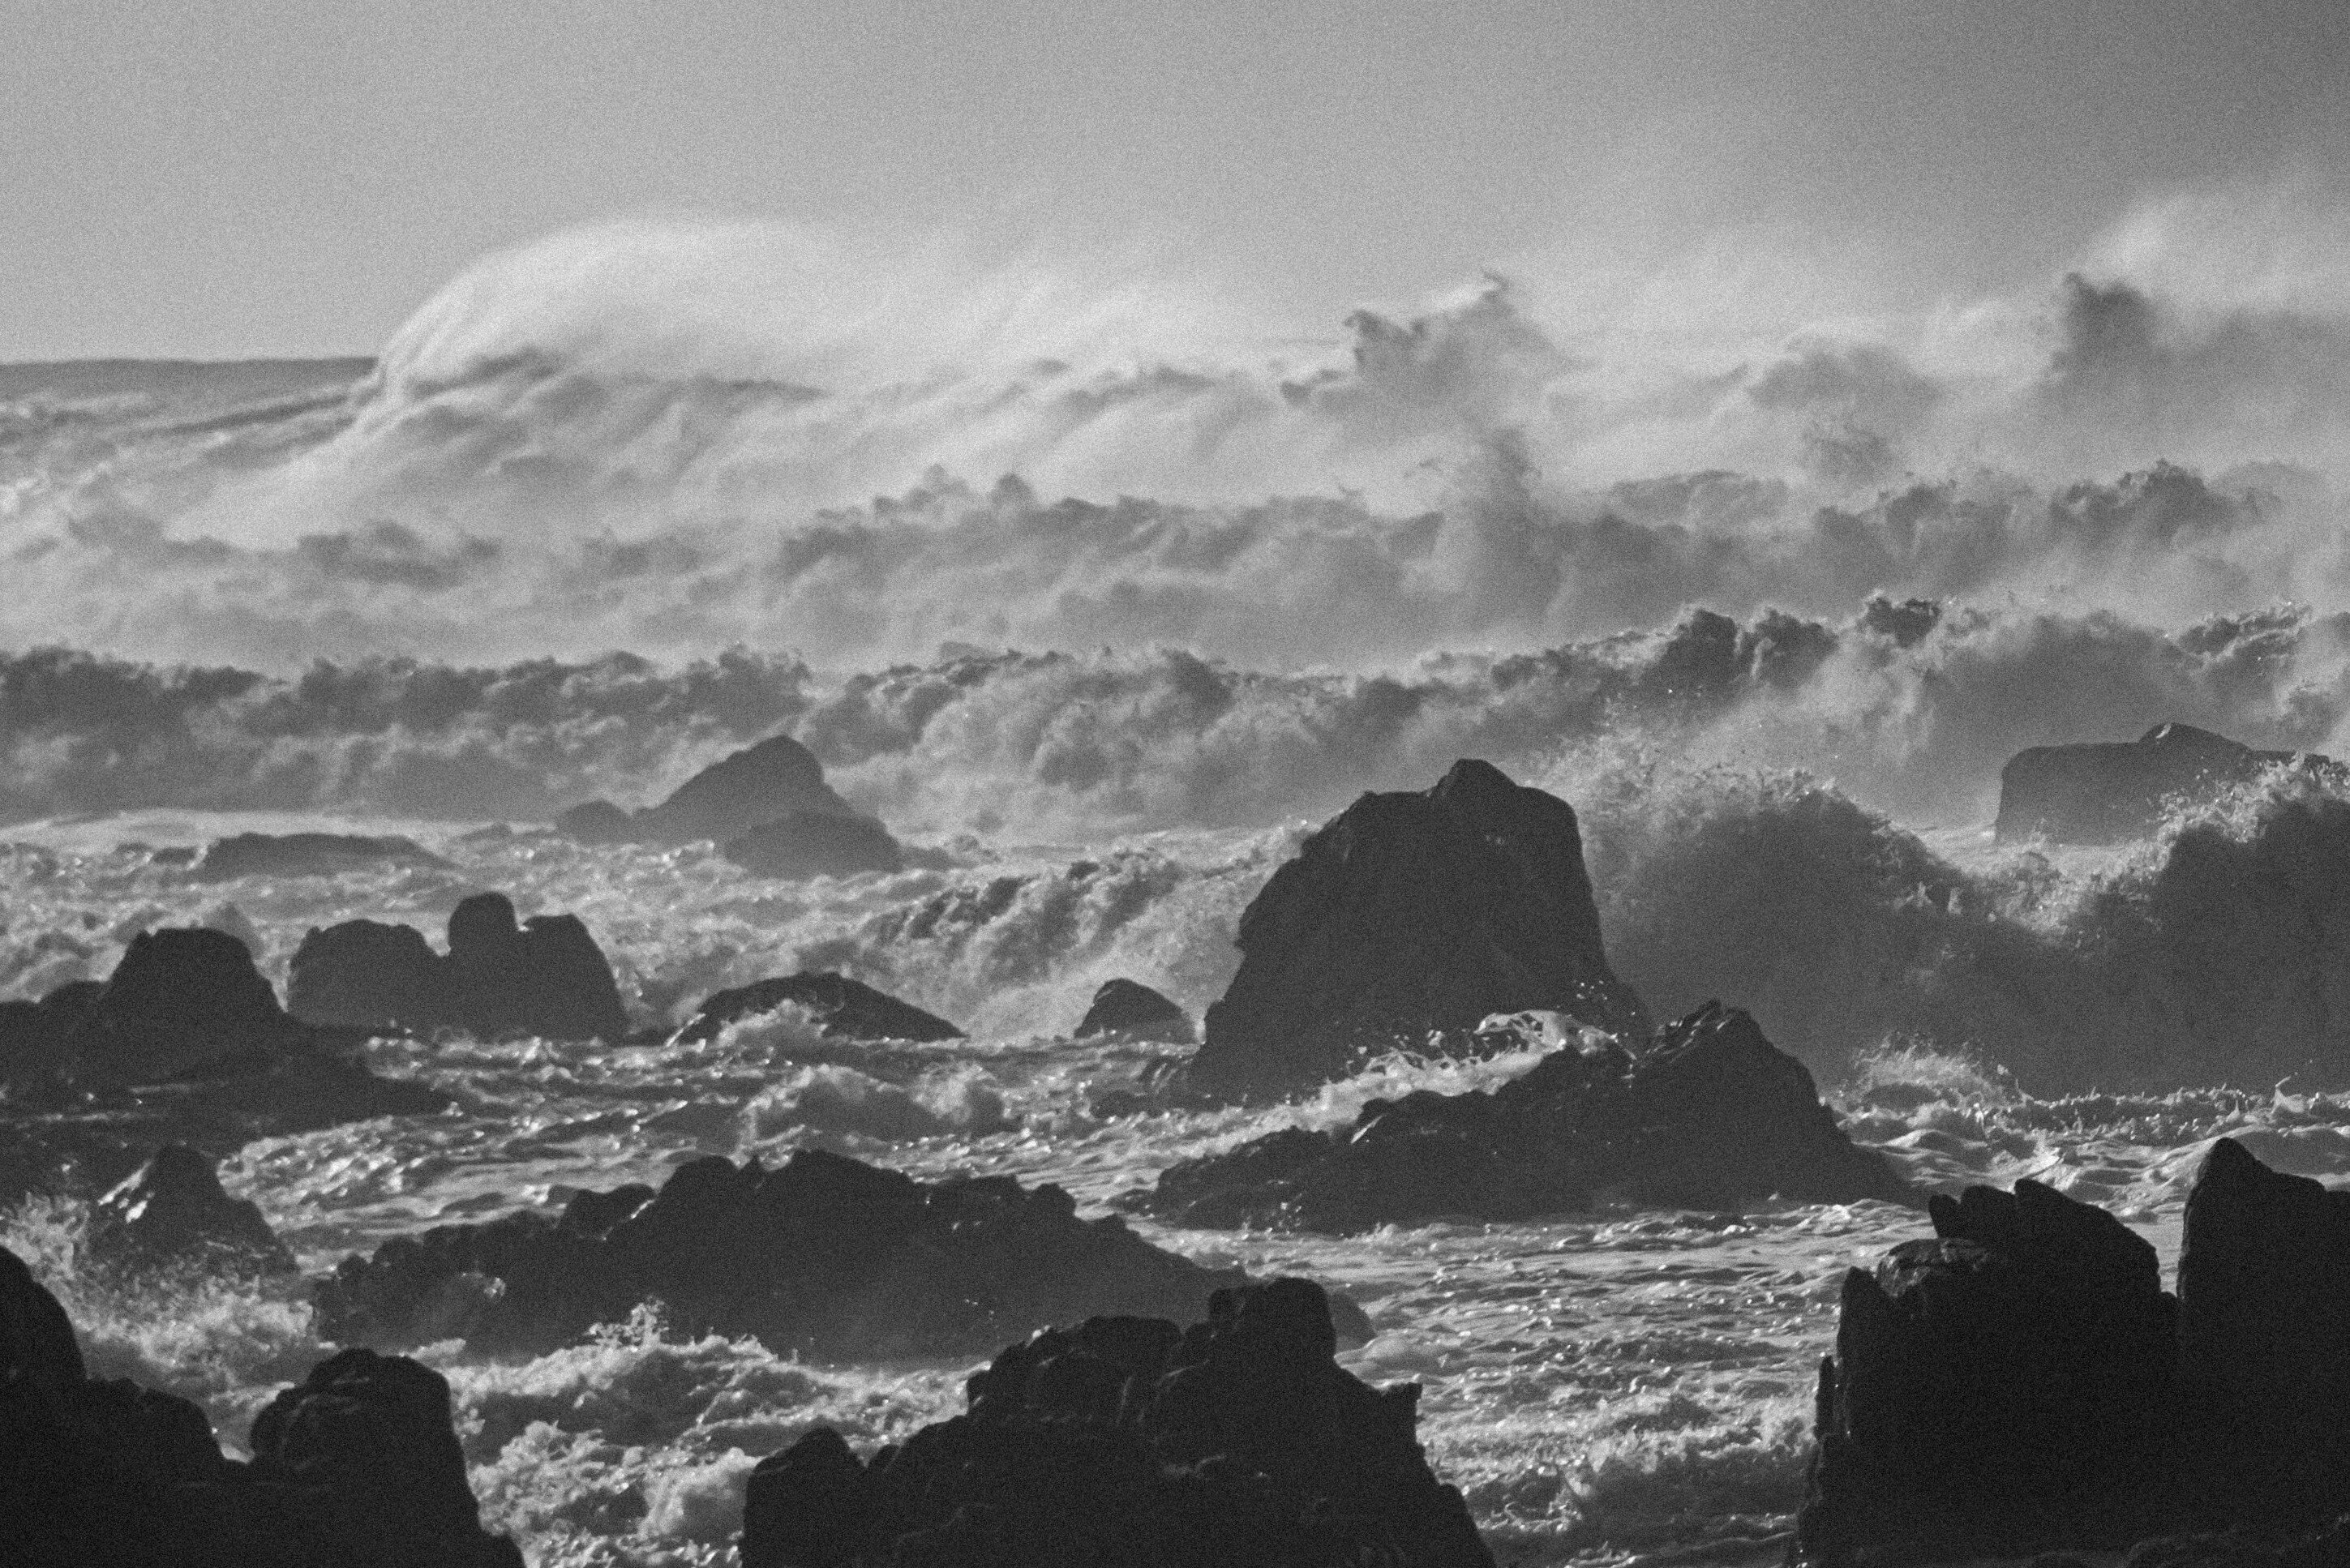
Briefly, that is if there can ever be a “brief” description from me… my wife and I had a scheduled vacation to the Monterey penninsula right at the time when the first monster storm was to hit the northern CA coast - the one that destroyed wharfs and such - and the first of several storms that battered our state for a couple weeks. We actually remained in the hotel room for a day and a half, losing power for some of it, while we waited out the storm. By noon or so the next day the storm cleared and we ventured out. We visited the same scenic loop in Pacific Grove that we have done so many times over the years - one of the most pictueresque coastlines anywhere… But not on this day. The storm had passed and the tide was now out, but the ocean was still angry. 30, 40 and even a 50ft waves just 12 hours earlier had now subsided and we were just seeing like 15-20ft swells. the road was closed to traffic from the storm damage, but the tide was out far enough that any danger had passed and it was ok for foot traffic. My wife and I venured out along the road to survail the damage - just like most folks due after a disaster… Anyway, I grabbed the camera, no tripod and we took a walk. I grabbed a whole bunch of handheld snapshots. This was one of them.

iso 400, 1/1000th @ f/9 to freeze the waves. The RAW file - well, you’ll see, just looks like a washed out round file image… and I almost deleted. But something made me open the RAW file in ACR. I applied my linear camera profile - and I couldn’t believe what was actually retained in the raw image. The rest is my attempt at rescuing this seemingly unrescuable file.

I’ll give just a little hint at what manipulation I did on this image. Once I applied the profile and opened in PS I noticed there were some whispy clouds up top that I liked. However, there was way too much blank sky - and cropping just left the top blank and empty. I forgot who revealed some of these techniques on NPN a couple years back, but I recalled some of them… I did a marque selection of the sky above the wave line and did a transform and literally “compressed” the sky to make it “shorter”, thus bringing the clouds closer to the horizon. I think 5 or more years ago I would have considered this cheating… and it’s more rare for me, but I think by doing this with this particular image, I was able to effectively translate my experience - even it it just meant retaining a a couple clouds…

the Rest is left to your imagination - but I can assure you no CA-cloning was used in processing this scene.

Very curious to learn how you might approach this RAW file. With the given theme and experience of an “angry ocean”.

thanks for playing! Oh, and I’ve converted to b&w as well, but should be pretty apparent what it might look like, so I’ll just post the color version.

Raw File

53D0205.NEF (43.8 MB)

You may only download this file to demonstrate how you would process the image. The file is Copyright of the photographer, and you must delete the raw file when you are done. Please post a jpg of what you created, along with an explanation of what you did and why you did it.

My Edit (click to see)

Wow, this is one tough challenge, Lon. I tried working with the color version, but the light was just too harsh, so switched to B&W. Here’s my take:

It’s still pretty harsh, but I think it brings out the angry sea. I also cropped quite a bit more than you did.

I processed this in Capture One:

  • Converted to B&W and adjusted the color sliders
  • Added a Top Gradient to work just the sky and water
  • Added a Bottom Gradient to work the rocks
  • Brushed the sky with a Deep Sky adjustment brush to bring down the highlights
  • Added a left upper corner gradient to even the sky out
  • Added a Heavy Contrast layer to add extra contrast…
  • Healed a couple of dust bunnies in the sky

It may not be to your liking, but it kinda works for me. A fun time and a serious challenge. Thanks, Lon.

Cheers,
David

Lon, I suspect mine is way over the top here, but it is a tough scene for me with the overall extreme dynamic range. Anyway, after 50+ layers of who knows what here are my results… :nerd_face:

My first time posting a challenge response. All edits in LR Classic.

I found the color version a bit difficult, so I converted to b/w and went from there. I decided to crop quite a bit and go grainy with it. Brushed in a little texture/clarity on the water and waves, added a slight vignette to the sky, adjusted sliders (mostly down) to exaggerate the old photo feel by making it slightly misty and faded (to go with rather than against the flatness in the middle). Healed a few sensor spots and bright spots on the rocks that stood out once it was cropped in so much. I’m not sure what I think of the result, but it was a great exercise! Thanks for the opportunity to give it a go.

2 Likes

That was a tough one Lon and those waves are incredible – I’ve never witnessed anything like this but I did have a lot of fun with this image. When I first opened up the RAW file in ACR I didn’t think I would be able to pull anything out the light areas but I was really surprised what the file could take.

My steps:

  1. I opened the image in ACR, straightened the horizon, darkened down the sky and adjusted the white balance and then opened it up in Photoshop.

  2. I duplicated the image as a new smart object and went back into ACR to adjust this new layer to bring up foreground. Then I blended the images together.

  3. I then used Nik’s Viveza plugin to add some “Structure” to the waves. While I was in Viveza, I also increased the contrast and added a little bit of warmth.

  4. Next, I used Nik’s ColorEfex Brilliance/Warmth to warm the image up even more. This was unusual for me because I hardly ever use ColorEfex anymore.

  5. Then, I applied some DARKS Triple Play and LIGHTS Triple Play from the TK8 panel to increase the contrast more.

  6. Next I applied a curves layer through a “lights” mask to make the waves pop a bit more.

  7. Then a 81 Warming Photo Filter to add yet more warmth – looking back at this now I see that I increased the warmth of the image 3 or 4 times.

  8. And finally a crop and some healing to remove some distractions and the dust spots in the sky.

I have to say that I’m really enjoying processing everyone else’s images! First, it’s interesting that by not having an emotional connection to the image (because I didn’t shoot it and I don’t have the benefit of the memory of what it felt like to be there) I feel freer in editing and make adjustments more easily and without second guessing myself as much. Second, by writing out the steps I did to make the edit has shown me how I approach editing and that I tend to edit by building on the previous steps. Like for example here where I added warmth to the image 4 times. I guess if I were to compare it to cooking it would be like cooking without a recipe and adjusting the seasoning of the dish as it developed rather than cooking with a recipe where all of the ingredients are pre-measured and are then just added at the appropriate time.

1 Like

Wow, thanks for taking on the challenge! Such diverse and terrific results. Certainly a big challenge given the nearly washed out exposure. But I think some of you found out like I did, and was amazed at was actually contained in the RAW image. Hard to believe what was able to be recovered. Yeah, maybe not worth recovering… but the data was still captured!

@David_Bostock , great job with the b&w. I think a good choice here. I also like your crop and how the primary “pyramid rock” is more cental. The surf looks great. And also the crop eliminated the one problem area of the water spray - that was pretty much a wash out and a trouble spot.

Question for you on your steps. When you mention using a gradient… I’m assuming a gradient filter, but what adjustment layer were you masking with the gradient? Have no clue about Capture One either.

@Paul_Breitkreuz thanks for taking on the challenge! 50 layers? yikes! I do like the details and contrast you were able to pull out of the upper waves. Yeah, the sky went a bit wonky, not sure what’s going on there.
What I’m really curious about is how you were able to process to bring out the glow and warm light in the rocks! You really made the light come alive in the lower section. Defnitely pulled the rabbit out of the hat there - never saw that or thought about that when processing.

@Beth_Buelow , and thank you for taking on the challenge too! I’d say kudos for taking this in yet quite a different direction. I think the crop for starters really boils the scene down to the core of the “angry surf”. The added grain most certainly does take this towards that “old photo” or nostalgic look. In fact, I might take that a step further by adding a sepia tone to it. I think you creativity came through here. Thanks for taking on the challenge

@Tom_Nevesely , wow, I really love your rendition. You mentioned several “warming” adjustments, yet this is still retaining a lot of cool tones. And a bit like Paul’s, I like how you brought out the light/glow in the rocks.

thanks for including the steps as well. Steps 1 & 2 are pretty much how I approach the early stages of processing. But then bummed because I lost my free Nik pluggin’s… but I do still have and use as needed TK’s Triple plays. Great job on the challenge! Thanks for playing.

Oh, and I agree with you and am enjoying this new feature of the challenge and processing other images. Maybe not so much for the emotional disconnect, but honestly, when others chime in on how they processed an image… there is always something to learn! And I’ve been learning and picking up tips just by reading thru all the challenges thus far.

Keep 'em coming folks!


It was really fun but also very hard doing this! I have used DxO Photolab 6 for most of the adjustments but also added a few final tweeks in Luminar Neo. There are to many steps to describe them all, but my overall thinking has been to achieve sharpness and contrast in the FG and then let it fade away as we move into the image. I also added a tint of blue to the ocean to get a some color contrast with the rocks. Finally, I cropped to more emphasize the triangular rock and reshaped the image to getr the clouds closer to the sea.

Hey Lon, well with the rain having pinned me down for a couple weeks it gave me something to work on. My brother & I go to J-tree once a week normally but had to skip for the last two outings with extreme winds, rain, and bad weather traffic too… :nerd_face:
The sky on mine needed follow up work. But, it was that or take a nap… :clown_face:

1 Like

Here’s my crack at it:

Tough Image:

ACR worked highlights and tones
Some Dehaze, but not much
In PS:
Selected Sky, transformed with Warp and Skew to bring clouds from top down lower in the scene
Applied a Blue/Transparent gradient in Overlay Blend mode and repositioned it to touch up sky
Applied warmth to foreground with color balance, and then curves
Applied subtle Orton Effect to entire image
Cropped and output

edit: I uploaded the version before working to level the horizon. Here’s the update.

Question for you on your steps. When you mention using a gradient… I’m assuming a gradient filter, but what adjustment layer were you masking with the gradient? Have no clue about Capture One either.

Lon, just about everything you can do in Capture One you can do on layers. It’s such a powerful, yet simple concept. Create a layer, mask some part that you want to adjust, and then use most all of the tools to do that adjustment.

For your image, I created a layer, then used a gradient mask to mask the foreground:
Image 2-25-23 at 10.37 AM
Then I used curves, contrast, and clarity to affect that area of the image.

You can create gradient masks, circular gradients, or you can brush in a mask manually. You can also use the magic brush to create a mask. I use that to select the sky all the time…

Anyway, hope that makes sense.

Thanks for the added details David. I use masking all the time - mostly freehand painting where I’ll create an adjustment layer, then add a blank mask and either paint in or paint out with some level of opacity the area I want changed. It’s rudimentary - like we don’t need to say, “white reveals, black conceals…” But I am missing the rudimentary step. “I created a Layer.” A layer of what? an empty layer, a copy of the bg layer, an adjustment layer like curves, levels, contrast, etc. And then you applied the mask to that layer? gradient, brushing or whatever.

Not clear how one would perform curves, contrast and clarity on a single layer. Only way I know would be in a Smart Object Layer in PS; or maybe “group” the adj layers.

I’m really liking this whole process where we all get to learn something - or teach something, beyond the visual critique. Good stuff.

Thanks for playing Keith! Yeah, it’s a tough image, but I am quickly learning that one shouldn’t give up on many images just cause they look like crap on the first pass… :slight_smile:

Wow, that is quite the transformation in the sky. The added “clouds” - actually more like clearing storm situation, or certainly clearing fog and/or blowing sea mist. I like the idea of the blue gradient as well.

I can see now what you and others did to bring out the “glow” in the rocks - simply by warming the bottom area. Excellent! Thank you!

This image will never see print and not meet my website criteria… lol - but this has been a great learning experience. Thanks again all!