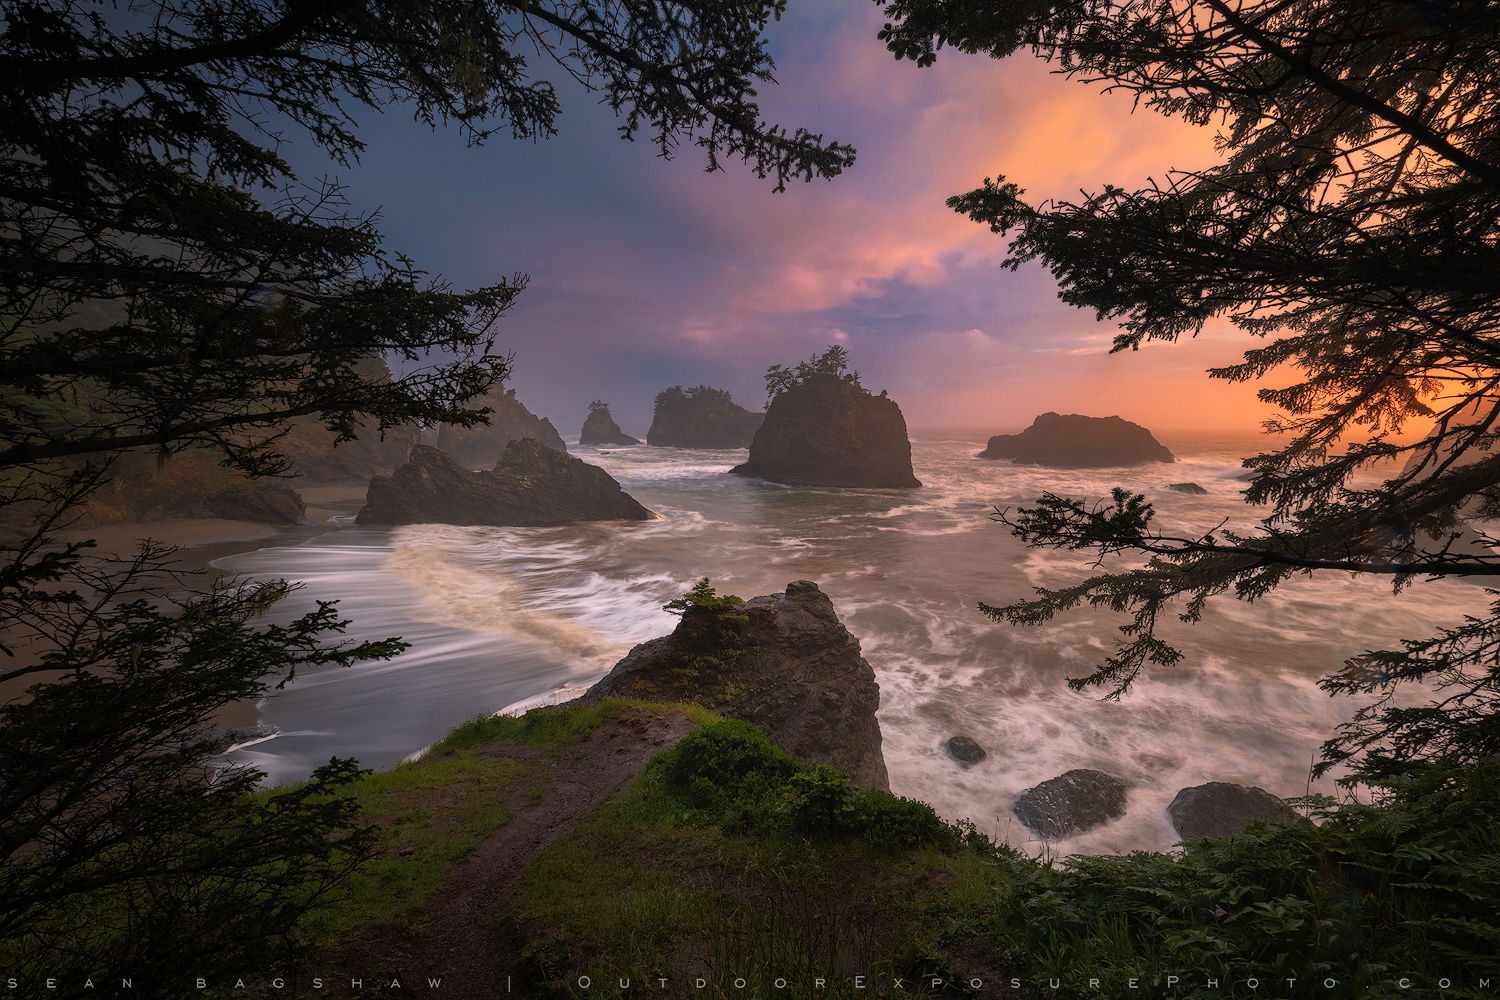
In my opinion, the best light on the west coast happens when a storm is breaking just at the moment of sunset. The timing of this can be very elusive. The evening I took this may be the best example I have had the fortune to photograph. In this case, even though the clouds were parting out on the horizon, it was still quite stormy on land. The rain kept spotting up my lens, so I ducked back under these trees to try to find some shelter.
Because the difference between the scene I witnessed and the way my camera recorded the raw file was significant I thought this might be a good before/after developing example. As you can see, the raw file is not well-balanced tonaly and the colors and light are muted. As camera dynamic range improves we can capture scenes like this in a single exposure more often. However, the resulting untouched raw files often have blocked up shadows and inaccurate highlight colors. Fortunately, all the information is there and can be brought out with careful developing.
In this case, I did a lot of the groundwork in Lightroom. Lightroom adjustments included the following:
Shifting the white balance from the camera’s auto white balance choice to be warmer and more magenta.
Individual color luminance adjustments in the HSL section.
Tone adjustments to recover shadows, blacks, highlights and whites.
Intensify colors using the Blue Saturation adjustment in the Calibration section.
Increasing Exposure and decreasing global Contrast.
Warm up highlights using the Split Toning section.
Enable the Lens Profile to remove lens distortion.
Adjust the Crop Angle to level the horizon.
Spot removal to remove as many water spots as possible.
Next, I opened the image in Photoshop to continue developing with many small incremental adjustment layers.
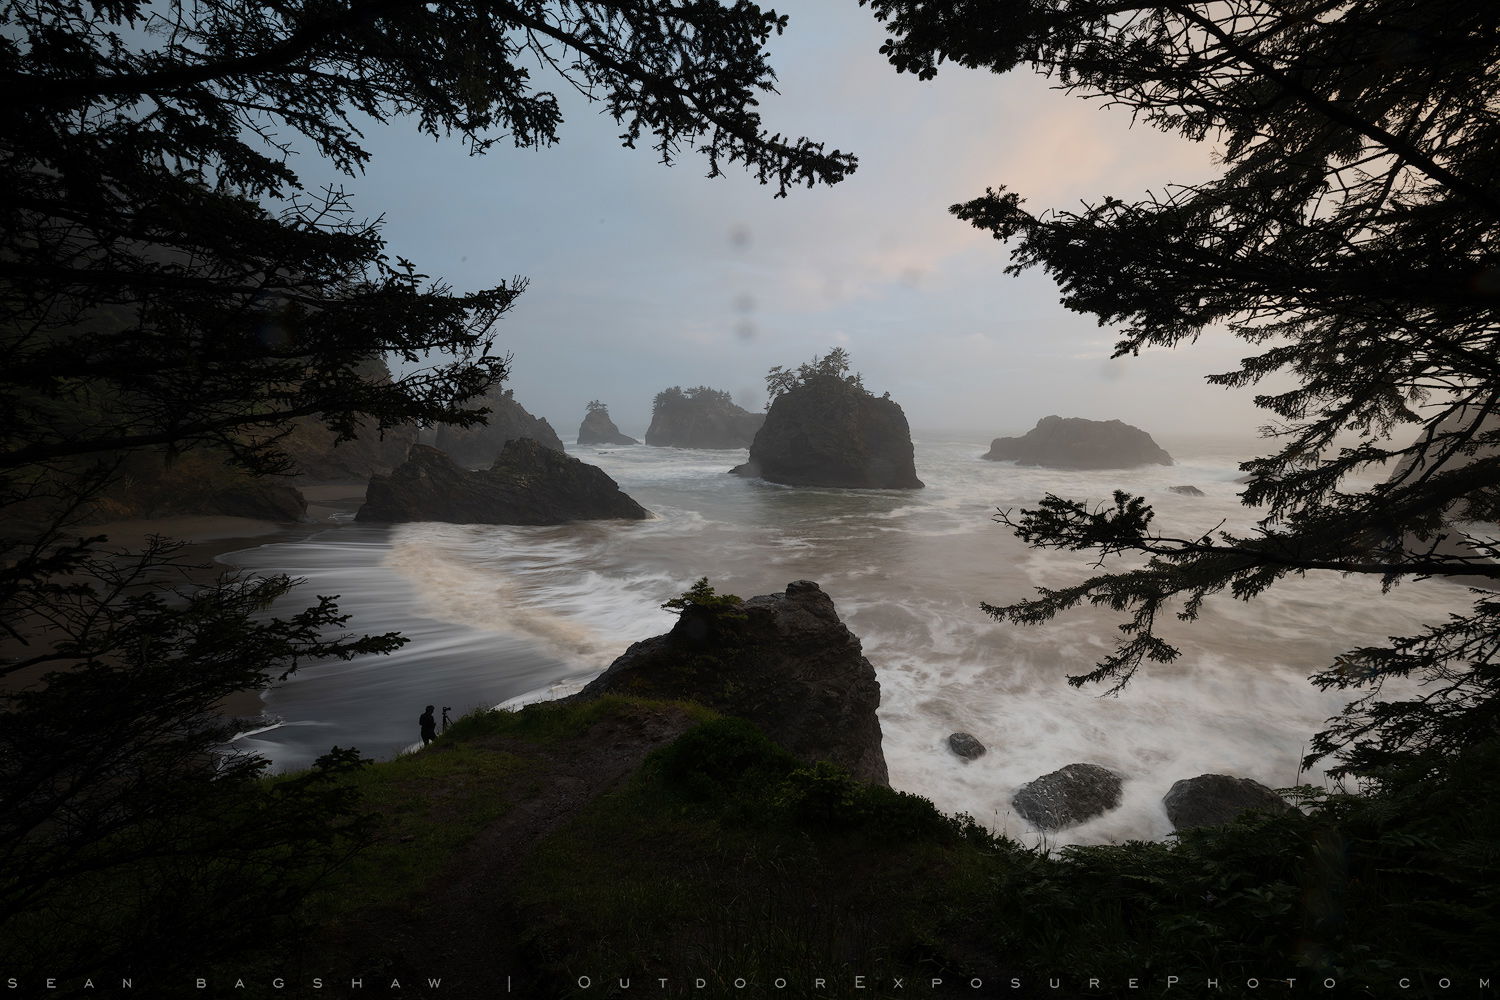
Removal of remaining water spots and photographer using the Spot Healing Brush and Clone Stamp Tool.
Slight vertical transformation to remove some distracting branches along the top of the frame and give the sea stacks a small boost in height to counteract diminishing by the wide angle lens.
Curves adjustment with a lights luminosity mask to darken the highlights and create better tonal balance.
TK7 Panel Dehaze action masked to the sea stacks and water to bring in some more detail.
TK7 Panel Smart Orton action with a hand-painted luminosity mask targeting the effect to the sky and water to enhance the light and color.
Dodge layer to selectively lighten parts of the foreground and central sea stacks.
Burn layer to darken the upper left corner and along the bottom edge of the frame.
TK7 Panel Add Color action to add some “light bleed” and enhance the sunset light on the horizon and in the clouds…Controlled with a hand-painted luminosity mask.
TK7 Panel Clarity action targeted to the darks with a darks luminosity mask and then Mask the Mask to add the clarity just to the sea stacks.
Selective Color layer to fine tune the color grading for individual colors.
Levels adjustment layer for brightness and contrast. Hand-painted mask to confine it to the sky and water.
Another Levels adjustment layer to increase contrast and brightness targetted to the lights with a lights luminosity mask.
I think many of us have experienced disappointment when looking at raw images after photographing an intense light event. I make a habit of trying to be very present and aware of what I am seeing in the moment to establish a vivid picture in my mind that I can work back to. It is also helpful to remember that, due to how dynamic range, color and contrast are recorded, the more intense the light the less an unadjusted raw file may represent the scene.
It is always interesting to see how a photographer gets from the starting file to the finished version. I appreciate this overview of your process, Sean!
would be lovely to do a time lapse from this viewpoint with some classical music overlay as well …
maybe around sunrise / sunset with lot of moving clouds and crashing waves to enhance the drama
Sean, thanks for the detailed look at your workflow on this wonderful scene. For me learning how the editing tools function is one thing, knowing how, when and where to apply them to your artistic vision is the real challenge. It is always helpful to see how others approach that process.
Thank you so much for this detailed explanation. It’s amazing how many steps you performed, and also amazing that the difference between the before and after is so great. This is the kind of explanation that can really help me learn.
Haha! It was a tough call…but in the end, I mostly like my landscapes sans people. Maybe if the person was standing on top of the center rock in a red jacket with an Instagram pose I would have left them in.
Sean, thank you so much for investing your time in this excellent post-processing tutorial. I love how you worked in both the “how” and the “why” of your processing approach. It’s things like this post that make NPN such a wonderful resource to have, made possible by helpful members such as yourself.
Sean, I’ll echo others to say thank you for the step by step details. This transformation is a wonderful example of the potential of raw files in Photoshop. I really need to hone my processing skills with the TK panels, and this really motivates me to do so.
@Bill_Leggett and @Ed_McGuirk - Most welcome. Glad to hear that what I could share about this image was helpful. Bill, if you come up on any questions with the panel feel free to contact me via email or my website.
Thanks for sharing this, Sean. I really enjoy seeing before/after images and explanations of steps. I rarely visit the “gallery” forums on the new site (because I like more engagement with the process), but posting more before/after (love adding a tag into the menu of tag options and to the post title) makes this a more interesting part of the NPN Community.
Great image, by the way, and I love the stormy PNW lighting here.
Yes, thank you @Sean_Bagshaw for sharing your process with us. And I’d like to thank you for making those great video tutorials for @Tony_Kuyper’s action panels. I’m working my way through the v7 videos, and I just learned about frequency separation using the panels. I’m stoked to learn how to get rid of footprints in the dunes! Thanks!
Thanks for the step by step, great results too. Amazing what can be pulled out of a RAW file. I’m still working my way through the TK7 videos. One of my many challenges is how much processing to do in Lr before moving into PS. Also, are you always bringing your files into PS as smart objects? Thanks Sean.
@david11 It is challenging to know how much to do in Lr. I tend to do things that I know Lr does well…which I think is more broad sweep foundation adjustments. I do stuff like general color balance and HSL work, set a starting point for exposure, contrast, highlights and shadows, basic leveling and perspective control, chromatic aberration removal and noise removal if needed. If I feel I can get exactly where I want to go with a Lr adjustment then I might push it all the way. But I’m mostly careful to not take the image all the way to the edge in areas where I think I will want to work more precisely in Ps. For example, if I push contrast, saturation or color balance really far in a particular direction in Lr then I have no where left to go in Ps without “over cooking”. I am opening as smart objects more and more as I find new and better uses for them. However, if I don’t think I will need come back to re-adjust the raw settings then I don’t open as a smart object because they have their own set of limitations. If I am opening as a smart object I’ll frequently do almost no adjustments in Lr. Instead I’ll wait until I’m in Ps and then begin opening up Camera Raw as many times as needed and making raw adjustments as I see how they are working together with my Ps adjustments.
Thank you so much @Sean_Bagshaw for such a detailed walkthrough of your process with this image.
I’m heading to the Oregon coast in a couple weeks. I have concerns about my ability to shoot a decent seascape. This post is extremely helpful. Very much appreciated!