After working with Canon for several years I’m disappointed with Nikon’s colors straight from the camera (raw). A lot of processing is required in PS just to get the colors that were provided by the Canon. Last night I came across this product which allows you to create camera color profiles. Has anyone used it? Would you recommend it? What are it’s drawbacks, if any. It’s gotten a lot of good reviews on B&H and the few bad ones deal with it not working with large files.
I have it and use it. I routinely go through all of the Calibration samples (Adobe Standard, etc) but rarely find that I prefer the profile made by Color Checker is the one I prefer.
I also have it but unlike Tony, I never use it. It’s not that it’s hard but it’s an extra step that I rarely want to do. I’m usually not after accurate colours anyway so I go by feel.
Tony,
Do the color profiles generated provide better colors than what you get with ACR or Lightroom?
I wasn’t clear enough in my earlier post. When you create a profile and put them into LR and Photoshop, the profiles appear along with the other profiles generated by Adobe. In LR, they are in the Develop Modeule at the top of the page on the right, right here:
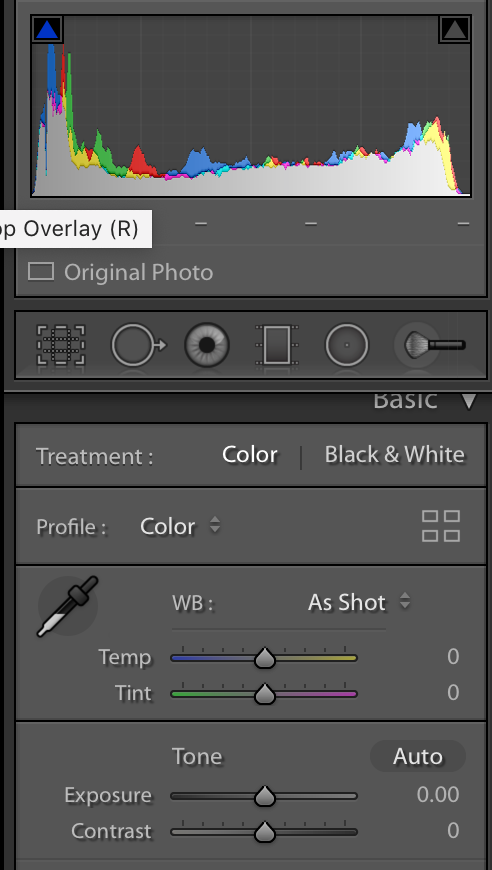
If you choose Profile: Color, then click on the icon with four rectangles, you get all the canned Adobe Profiles plus the ones you generated. In Photoshop ACR, they are likewise at the top on the right:

Same deal, click on the icon with four rectangles and you will get the Adobe canned profiles and your profile/s that you created. Again, I always check these profiles and my experience is rarely do I prefer the one/s created by ColorChecker. If it matters, I shoot with a Canon. Adobe creates the canned profiles based on what make your camera is. The canned profiles for other cameras may or may not be as good as the ones for Canon. Let’s hear from other camera users. For those who aren’t familiar with these profiles, her is a video by Michael Frye explaining them:
https://www.youtube.com/watch?v=-EcYAWJO9q0
It is designed to give you accurate color. In some instances that is what you want. Other times one wants a warmer or cooler rendition to match the feeling of when the image was taken. I don’t take a documentary approach to my images so I will click through the different calibrations to find one that I like. It is definately worth having as an additional tool.
Wondering…what do such products accomplish that your eye and hand on the many sliders can not? Is it primarily a time saver?
For me, the lens profiles are both a time saver and a “nudge” in a direction I might not have thought of. As I am in the habit of looking at all of the profiles as my first step in post editing, I find them very useful. They are a starting point for editing. As I mentioned in my above post, I rarely choose the ColorChecker choice, so I don’t find it very useful. IMO, the color lens profiles are similar to the very popular Nik Silver Efex Pro add on that people use for Black and White conversion. This app does nothing that you can’t do on your own in Photoshop, rather it gives a large selection of starting points, all slightly different. True, there is nothing in the color lens profiles that you can’t do on your own, but they offer you a different choice of where to begin. I’ll take all the help I can get!
That’s a good comparison.
Another thing to remember is that you are using these profiles whether you choose to or not. Adobe has a default profile that it assigns you (in both LR and PS), so unless you change it your photo is in that profile. I prefer to choose my own profile.
I’ve had one for several years. Sometimes the profiles I create with it are the only way to get the colors I desire. Primarily when the color of the sky is just “wrong” in landscape images. All cameras render cyan skies sometimes.
You only need to create profiles for the light you shoot in. I make them for sunrise, blue hour, golden hour, sunlight, shade, and cloudy. I use whatever I like best not necessarily the “correct” one.
You can make profiles for each lens in each light as well as with each filter you might use. You can take away the blue of a polarizer or a color cast from an ND filter. You can also make them at different ISO settings.
It’s also recommended to make profiles for artificial lighting and when there are strong color casts, like in Utah with all the red rocks.
I need to make some new profiles now that I switched from Canon to Sony.
I totally recommend it. It greatly simplifies and expedites correcting weird colors without leaving LR.
I have used the color checker with my D4s when shooting football games that start in daylight and proceed under artificial lights in the late afternoon and evening. I shoot the checker at the beginning, at halftime and at the end of the game and use the resultant profiles to correct images shot in the parts of the game which are lit by the appropriate light source. It works better than trying to correct for the light source manually with WB - that’s a two slider correction and the color checker has multiple color samples which are used to shape the profile for a given light source and lens/camera combo.