When shooting Wall Mural sized images using a telephoto lens that inherently has a very shoot DOF I am constantly challenged to widen the DOF in an image like this one. This is virtually a polar opposite of shooting with a wide angle lens with a fast f-stop to result in a nice bokeh. For wall mural photos one targets have everything in the photo absolutely tack sharp focus.
My goal in mind when shooting this was to create a wall mural photo of at least 1 gigapixels or greater. Focus bracketing/stacking is always required for a scene like this. Using 200mm at f/11 and the nearest objects being some 4-1/2 ft. away the DOF at that distance is only 1-1/16th inch. In order to assure everything in the image was in focus I had to shoot focus bracketed. For the nearest objects I had to shoot some 43 different focus bracketed images to assure that I had images focused from 4-1/2 ft. to the Hyper Focus Distance (HFD) which was 386 ft. from the camera. Virtually everything in the foreground was much closer than the HFD.
Feedback Requests
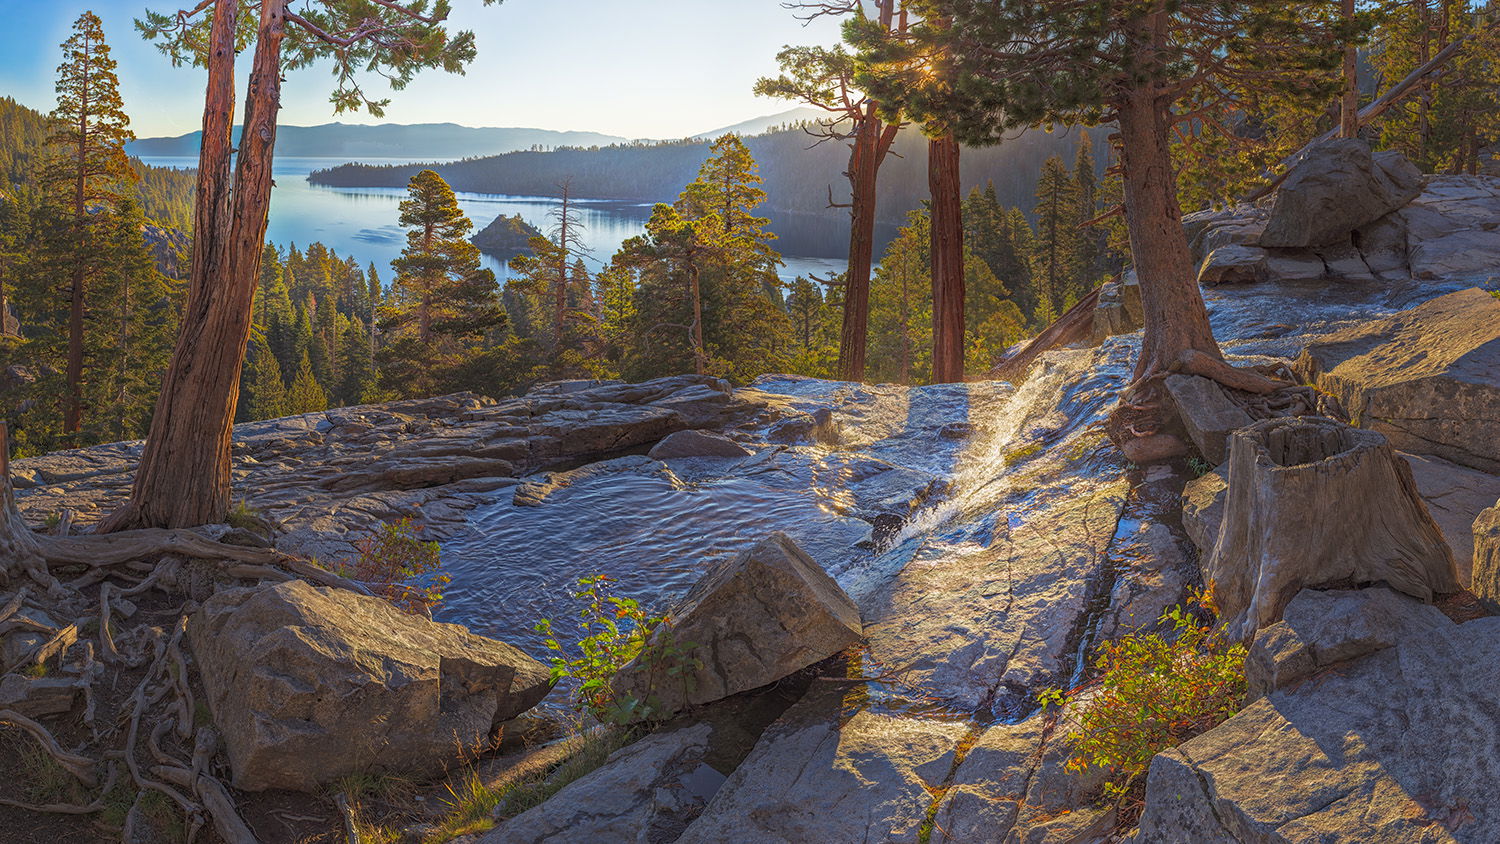
When tackling the technical aspects of shooting this type of image sometimes it is difficult to do a good job of capturing the aesthetic emotional feel of the moment. I wanted to capture the sunrise light beams playing on the little waterfall along with the early morning serenity of the location. Welcome comments on how I could have done better.
Also a technical critique.
Pertinent Technical Details
This panorama consists of 192 individual 45 mega-pixel focus stacked images derived from 3567 focus bracketed images. It was shot with Canon R5 at f/11, 1/250th second exposure time and ISO 400 using a 200mm focal length on Canon 100-400mm lens.
The image as shown is:
3.419 Gigapixels
43,857 x 77,968 pixels
146″ x 259″ (12 ft. 2 in. x 21 ft. 7 in.) 300 PPI original image size
I can’t even begin to imagine how such an undertaking to that large a photograph with that many frames must have been done. The sharpness is impressive front to back. Well done. I have stood where you made this photo and it is unfortunate that there was not more water to make the waterfall more prominent. Other than that, which is out of your control, I did notice a strange halo around the tree in the ULC that looks odd. Otherwise, congratulations on a stunning piece.
Beautiful place and a beautifully done piece of work, John. The light is gorgeous, and the details are excellent. I too see the halo @Youssef_Ismail mentioned. Other than that, this a keeper.
-P
That halo is an artifact of Adobe Camera RAW’s Dehaze filter. It shows up if one gets a little too aggressive with Dehaze. Other than not using Dehaze at all I have never been able to figure out how to prevent it.
Then maybe only photographers will notice it. It just seems sad that to go through with all the effort you put into obtaining such excruciating detail to then let it succumb to a Dehazing artifact. Surely there must be a way to mitigate that one artifact.
John, I agree that you’ve done a great job in catching the feel of sunrise in a lovely, peaceful scene. In this case, there’s a straightforward way to “fix” the halo in the sky around that tree on the left. Go to the Channels panel and command-click on the Blue channel and save that as a new mask. This will give you a mask of the blue channel. Burning-in through that mask will most strongly effect blue tones. For an even more targeted blue mask do a command-option-shift-click on the saved blue mask. Now burn in around that tree through this second level blue mask. I tried this in a quick test and it worked reasonably well…you should be able to do better. BTW, if you watch the histogram as you apply Dehaze, it looks like it’s effecting all colors about equally. That is most definitely not what the original Dehaze software (developed by DOD for satellite image processing) did. I’ve also gotten around Dehaze, by burning/dodging through luminosity masks. If you have questions, we should converse offline.
I have a couple of thoughts. As far as the halo around that tree, an easy way to get rid of that is to use the clone tool in PS, set to darken mode, about 25% for both opacity and flow. Click it on the blue that you want to match, then run it around the edges of the tree. I tried it and it worked fairly well (you would get better results with the large file, for sure).
My other thought is about the shadows in the foreground. Even though you have incredible DOF, the shadows feel flat. Did you raise the shadows? Perhaps a slight curve on just the shadow tones would give this a “deeper” feeling.
John: Really like the play of light and shadow and the sun just peeking through the trees. Lots of effort expended here but the results appear to be worth it. >=))>