Iceland Gull Fly Away

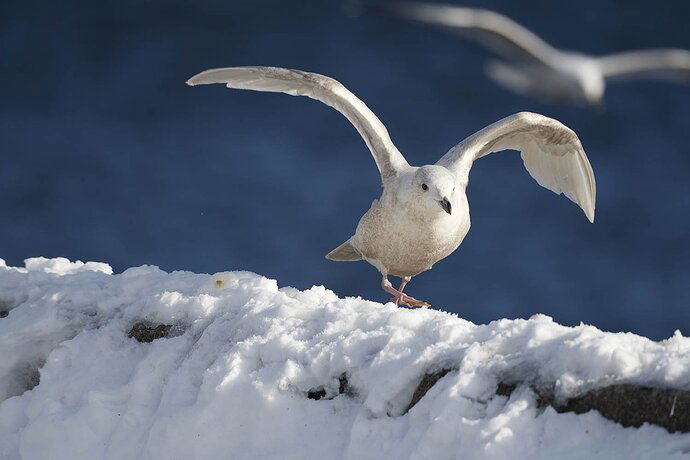
Iceland gull (Larus glaucoides) is a medium-sized gull that breeds in the Arctic regions of Canada and Greenland, but not in Iceland (as its name suggests), where it is only seen during winter. This visitor was spotted on the Merrimack River in Massachusetts this February 2022. The seagull in the upper right corner is not an Iceland gull, there was only one found amongst many other Ring-billed gulls.

Specific Feedback Requested

This is the second image I am posting of this gull in this group. I do have more pictures and here is one I like of him taking off from the snow covered rocks along the Merrimack River. I only brought my captured raw into Photoshop and resized it saving as jpeg with sRGB. I am getting so much great tecnical information from my posts on NPN which is why I joined. I do appreciate any and all input. Thank you!

Technical Details

Is this a composite: No
Nikon D500
Nikon F5/6 - 500mm
sec 1250
F5/6
ISO 140
manual

photoartistnorma
1 Like

Norma:

The technical aspects look very good. Nice sharpness and exposure on a scene that could be tough because of the large contrast between the whitest snow and the darkest parts of the background. That looks nice.

The composition feels off as the bird is moving to the right and has nowhere to go. Here’s a version with canvas added to the right side of the frame and some removed from the left to provide a more balanced feel for the movement in the image.

sRGB. You mentioned you saved it with sRGB. When I opened the image in PS, there was no color space embedded. That means you probably converted the colors to sRGB, but you did not embed the color space when saving. You need to do both.

Here’s the image with a different crop:

Thank you Keith, Yes! your added cavas works much better. I spent hours last night trying to figure out how I set the P3 and found it and deselected it. Please tell me how to embed the sRGB. I looked everywhere in Photoshop. I did stop myself from over processing it in Photoshop so I guess lesson learned by previouse critiques. I am so appreciative of all the help I am getting here. Great learning experiences are definetly helpful.

OK, this is progress! The image looks good technically, with good focus, sharpness and tonal detail.
I second the cropping/composition suggestions by @Keith_Bauer.

On to the processing: Before you get into PS, a raw file opens in Adobe Camera Raw (ACR) which is not PS but a “helper program” for it. Many people use Lightroom’s Develop module as that first step of raw processing, and others use Capture One or several other programs. ACR is the same engine as LR Develop with a slightly different interface but about 95% of the same sliders and controls.

Please – can you tell us what version of PS? What computer (Mac, PC or something like a tablet?) Recent or dated?

As Keith said, this image is OK without any work on the sliders, but most often you would take advantage of the tonal overhead in a raw file by adjusting the sliders in the raw converter for exposure, contrast, shadows, highlights, blacks and whites, and color temp and tone to give a good starting point.

Keep contrast on the low side, as you can increase it in PS but you can’t decrease it without subtle tonal damage.

In PS, use some of the good plug-ins for noise reduction, such as Topaz DeNoise. Save your money on sharpening plug-ins and spend it on good lenses. Real sharpening is a myth, and is done by creating halos on edges. The caveat is that they have to be too fine to be noticed, but if you subsequently resize an image, they will cause problems. There are techniques in PS that give an appearance of larger-scale sharpness such as the high-pass filter technique. The Clarity slider in ACR is similar but be careful of creating even small areas of blocked blacks or blown whites in the raw stage. Any areas like that are set on cement when you go to PS.

Exporting from PS may depend on your version – what is it?

An aside: I just dragged a handy iPhone picture from my desktop into PS to see how to export from it, as I always export from Lightroom. I was surprised to see it shows the color space as Display P3…

In the newer PS versions, to export a JPEG for web posting:
File > Export
Choose Save for web (legacy)
There are other export choices but they don’t give you enough control and some may not embed the profile. In that case you need to convert to sRGB in PS. In that case browsers will display the image colors properly.
Choose JPEG
Check Embed Color Profile
defaults for the other settings will be OK
Choose the size and Save

Now, here’s the other big issue with PS:
Go to Edit > Color Settings (for a Mac) – or for a PC I think it’s in a different menu??
Choose a working space – for a beginner at all this, sRGB is safe, Adobe RGB is OK, please avoid the wide gamut of ProPhoto until you know a lot more about color management. Any other spaces you see listed are to be ignored – they are for specialized legacy or prepress use.
Check the 3 boxes for warnings, so you will be warned when you open an image in PS (such as from a smartphone) that has a different color profile. You will want to convert it to your working space.
You only need to do this once but you will need to do it every time you upgrade PS.

NEVER “assign” a profile unless you know what you are doing – that is for advanced use, such as an image that has been scanned and has no embedded profile, and ONLY IF you know the profile of the scanner and have it available to assign.

Apologies if you know some of this, but a grasp of “the whole picture” is important. A lot to digest here! I’d suggest printing this for reference.
1 Like

I’m not sure I understand the language here that real sharpening is a myth. RAW images, by default receive sharpening whether you are using ACR, or LR Develop and I’d guess it is also true for programs like Capture One, etc. Yes, you can turn it off, but that is not a recommended processing step.

Sharpening creates increased contrast at edges and if pushed too far, creates halos. Proper sharpening does not create halos. Sharpening should be done in a non-destructive manner and should be the last step in processing, and should be done on an image at the size that the image is intended for. Doing sharpening for the sake of sharpening is a mistake. There is no universal right answer for how much sharpening should be applied to any image. Sharpening should never be done to resolve focus issues. It does not, and will not solve that problem.

Clarity is Mid-Tone Contrast so just like creating more contrast at edges as sharpening does, adding too much Clarity will create unwanted artifacts since it too is creating more contrast, but is trying to restrict itself to mid-tone values.

I have a document that I created a few years ago for NPN on how to save images for any web presentation. I will create a post in the Discussions section to share that document again. It discusses 4 different options using either Photoshop or LightRoom. I know there are many other options available with other software, I just don’t have access to them to create a detailed document.

1 Like

Thanks Keith, sorry this got so confusing. It was a Murphy Law moment that I just figured out. I had reset all my settings in PS and forgot to go back and make my choices. Anyway its all good because I would love to get that printout in the Discussions section for saving for any presentation.

@Keith_Bauer, I should have said the sort of significant large-scale sharpening that would correct for a noticeably out of focus image is largely a myth – or a sales hype. I think people often hope to be able to correct a soft image, but expectations (and hopes) can exceed the real possibilities. Some strides are being made in newer software, but it still needs realistic expectations.

Most raw converters have a default sharpening that is meant to correct for the slight softness in debayering the image, and should generally be used. That slider can be taken farther and can sometimes be helpful if used with caution, and on an image that is very sharp to begin with.

I am in complete agreement with your second and third paragraphs – a valuable addition to my comments and something I neglected to mention, as I was getting very wordy.

Your document on saving for the web would be well worth posting again.

Norma, many people here use DXO PR and swear by it. The first example I ever saw of it, outside of company advertising, was awful, and I tried a trial version and found the same thing, so I never looked at it again, but I understand it has been improved since.

The best algorithms for NR can vary significantly with different images – not only the amount of noise but detail. A careful inspection at 100% view is the only way to be sure you’re getting the best results.

I’ve never shot with Nikon and can’t answer the lens question but I’m sure others here can. You might start a discussion.

1 Like

Quite a discussion your photo has generated. I’ll just say I like the image with the snow and background and the take-off position. I like Keith’s idea of adding more room for the gull to fly into.

Keith has been great! I agree with the adding of the canvas etc…

A great pose and snowy background, Norma. You certainly got some good advice and discussion.

Thank you Dennis It certainly was fun photographing the Iceland gull.

This is a great, informative conversation! I am learning so much from the detailed commentary. Thank you!

1 Like