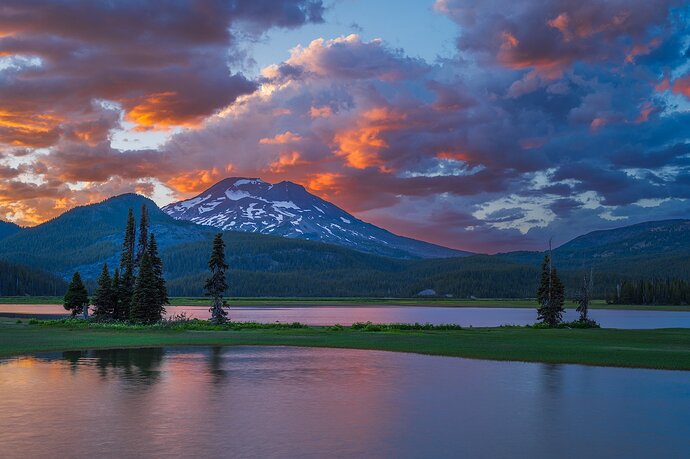
Sparks Lake Sunset


First post


Re-post

Critique Style Requested: Standard

The photographer is looking for generalized feedback about the aesthetic and technical qualities of their image.

Description

I had a booth last weekend at a summer art festival in Bend, OR. That didn’t leave a lot of time or energy for photography, but Sunday night, after I was packed up, I saw the clouds to the west and hightailed it for Sparks Lake. I made it there just as the sun was sinking below the mountain to the left of this frame. The mosquitoes were abundant and ravenous, and I was in shorts, but with the dramatic cloud action I just swatted as many as I could and kept shooting until the light was gone.

Specific Feedback

  1. I’m unsure about how much water to show in the foreground.

  2. I decreased the WB to 4500 to bring out the color, but did not increase the saturation. It’s very colorful, but is it too much?

  3. I’m finding that when I do a sky selection in PS, it’s not as clean as I would like. There are some edge artifacts that are hard to eliminate. At this resolution, it may not be visible, but there is a slight halo on the RH side of the mountain. Any suggestions out there?

Technical Details

Two frames, manually blended in PS. After adjusting each with curves layers, and flattening the image, I added a slight vignette using the camera raw filter.
Frame #1: 1.6 secs, f/16, ISO 31 (FG)
Frame #2: 0.4 secs, f/16, ISO 31 (sky)
Nikkor Z 24-120mm @39mm, Nikon Z7ii

Hi Patrick,
wow, that looks great. This is what we all wish for when we think of a sunset… the sky is burning, nice dramatic clouds… and most importantly, you managed to get a nice composition. The snow-covered mountain is beautifully framed by the coniferous trees. The picture makes you want to stand there and enjoy the sunset.
If I see unplanned such clouds at sunset, then I usually do not have the camera with me or am in the middle of the city. :rofl:

Great that you endured the mosquitoes. It was definitely worth it.

Was the dynamic range really too large for only one exposure to be sufficient?
The Sky selection in PS isn’t perfect. After creating the selection you could use the Select and Mask feature to further improve the selection. But sometimes it is not possible to avoid halos and you have to remove them afterwards. Here on NPN is a link to a YouTube Video that provides a simple workflow to get rid of halos.

I downloaded your image and played around with it. Here is my result:

  • I tried to fix the halos in the center of the image using the Clone Stamp tool.
  • I reduced the saturation in the cyans. Thus, the green tones under the trees on the left and the mountain in the background no longer attract so much attention.
  • I dodged and burned here and there to equalize the brightness of the mountains a bit

I quite like your crop. As an alternative, you could try something like 16:9:

BTW, I just did a quick research about the art festival. That looks like a lot of fun. Did you exhibit your images there?

This is really nice! I don’t have a lot to add from what the others have shared, but one thing I have found with hard edge masks (like a sky selection) sometimes it can be helpful to feather it in/out a bit at the transition zone with a low opacity soft brush working back and forth between white and black. It can help to eliminate the obvious transition which leads to the halo.

Here is an example:

I took your image, added a curves layer and pulled up from the middle a touch, then added the sky selection mask and feathered the transition zone between the sky and the land.

The mask ended up looking like this:

@Jens, @David_Wallace , thanks so much for your critiques!

Was the dynamic range really too large for only one exposure to be sufficient?

It wasn’t primarily for dynamic range, but because the longer exposure had smoother water, and the shorter exposure had a better sky (not overexposed).

I went back to the image and used the technique explained in the video by Steve Arnold along the edge. Interestingly, the original frames both had a lightened edge along the right flank of the mountain.

I reduced the cyans with a separate color saturation layer.

I left the mountains otherwise as-is because I wanted to emphasize the largest mountain, South Sister, just a little bit.

I quite like your crop. As an alternative, you could try something like 16:9:

I tried that too, but I think it makes the image look a little bottom heavy. Still undecided.

BTW, I just did a quick research about the art festival. That looks like a lot of fun. Did you exhibit your images there?

Yes, I had a booth there. Sales were good! Funny thing, getting ready for this, I was worried about not having any work from Central Oregon where Bend is located. I got really lucky with this shoot, and have a lot more images, including some panos, so I’m on my way to fix this!

Your rework looks good.

That sounds great. Do people tend to buy images that they have a personal connection to?
I never thought about that, but it makes sense.

Hi Patrick, what a great sunset you captured! I really like that you placed the trees below the mountains. There is one on the right that is not, but I guess it would be hard to get high enough to place it below the mountains.

One thing I will suggest is to think about how a scene like this is viewed with your eyes. Usually when you look upon a scene with multiple layers over a long distance, each layer decreases in contrast the further away it is. In your photo the contrast is the same across the whole photo, making it loose that sense of depth.

Just some nitpicking, is the right side a bit dark? I actually think the right side could be cropped out so that you are left with a 1:1 crop of the left side (where the interest is). But that is just my personal though.

Keep up the good work!
Julie

1 Like

@Julie_Gunstensen , thanks for your comments!

The only way to get higher up from the this spot would be to use a drone! :grinning:

One thing I will suggest is to think about how a scene like this is viewed with your eyes. Usually when you look upon a scene with multiple layers over a long distance, each layer decreases in contrast the further away it is. In your photo the contrast is the same across the whole photo, making it loose that sense of depth.

That’s an interesting take on this image. In general, I agree with you, but in this case, the magnificent light show in the background was very contrasty and bright. The foreground was not. With this image, the primary areas of interest are the sky and then the snow-covered mountain, and so I left them intentionally a little bit lighter than their surroundings. (The eye tends to go to the brighter parts of an image first.).

Just some nitpicking, is the right side a bit dark? I actually think the right side could be cropped out so that you are left with a 1:1 crop of the left side (where the interest is). But that is just my personal though.

Yes, it is brighter on the LH side, but that is from the directionality of the light. I might try adding a linear gradient to lessen it a bit. I might try a 1:1 crop, too, just for fun, but I do like the balance of the composition as-is.

Thus far, I have only done shows in Oregon, and most of my sales have been of images in Oregon. So yes, I think that is the case. OTOH, I haven’t featured images shot outside of the PNW.

1 Like

Hi Patrick

Great image! So many good things and corrections have already been said and done.

Just wanted to say: Looking at your picture, I was immediately thinking what Julie already said. There‘s something not right about the mountain further away being as sharp and contrasty as the one in front of it. From my POV it actually needs less contrast and maybe more haze to look somewhat more distant.

What I always do to get more depth: Dehaze slider on negative and paint some on the mountain further away. Maybe some Gaussian blur, too. Might seem counterproductive, but could make it even more atmospheric.

My two cents …Keep put the good work!

Markus